Hello fellow creators, today I’ll show you how to bring your own Grey Cartoon Characters to life. Icons like Bugs Bunny prove that grey is perfect for animation—it’s neutral and supports highlights and shadows.
With Adobe Character Animator’s 2026 update, animating these characters is easier than ever. Improved AI-driven motion tracking lets your puppet follow your body movements with almost zero lag. The Morphic Studio guide will help you, whether you’re a teacher or YouTuber, through the entire process.
Why Use Grey Cartoon Characters for Your Next Project?
Choosing a color palette is the first step in character design. Grey cartoon characters are incredibly versatile because grey is a “bridge” color. It doesn’t clash with bright backgrounds and it looks professional in educational settings. In the 2026 version of Character Animator, the software handles monochromatic gradients much better, preventing that weird “pixel buzzing” we used to see in older versions.
When you work with grey, you focus more on the silhouette and the “acting” of the puppet. Since you aren’t distracted by bright reds or yellows, the viewers pay more attention to the facial expressions and the story you are telling. It is a classic choice for a reason.
Preparing Your Artwork for Grey Cartoon Characters
Before you even open Character Animator, you need a drawing. You can use Adobe Photoshop or Illustrator to create your grey friend. The 2026 update has a better “Auto-Layer” feature, but you still need to follow a specific naming convention so the software knows which part is the arm and which is the eye.
Start with the Base: Create a group named “+CharacterName”.
The Head Group: Inside, create a folder called “Head”. This is where you put the eyes, nose, and mouth.
The Body Group: Create a folder called “Body” for the torso, arms, and legs.
Grey Tones: Use different shades of grey to separate limbs. For example, make the back arm a slightly darker grey than the front arm to create depth.
By using shades like charcoal, slate, and light silver, your grey cartoon characters will look 3D even though they are 2D drawings.
Setting Up Adobe Character Animator (2026 Update)
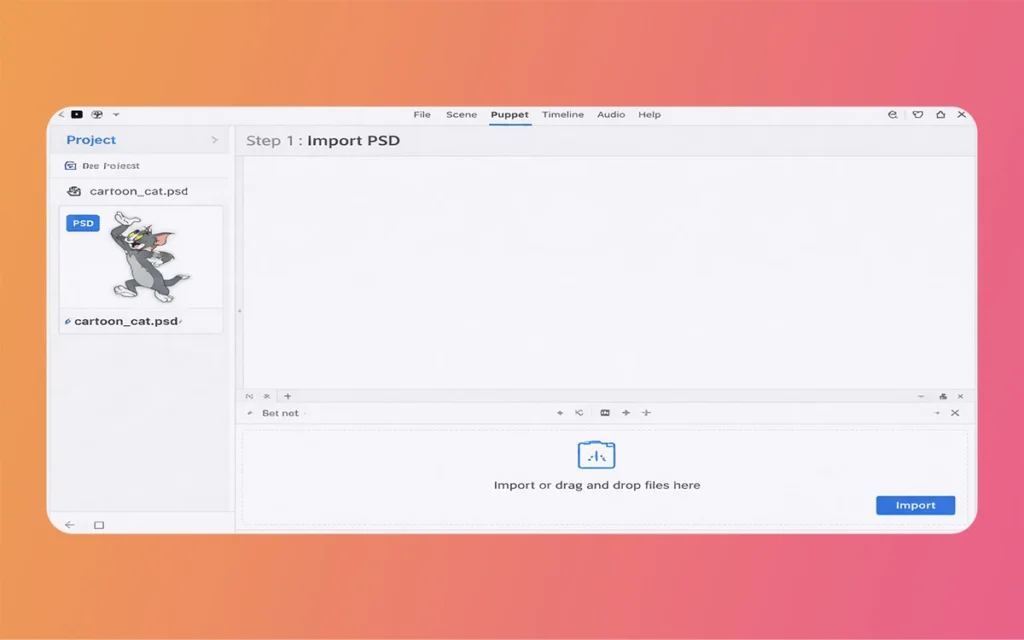
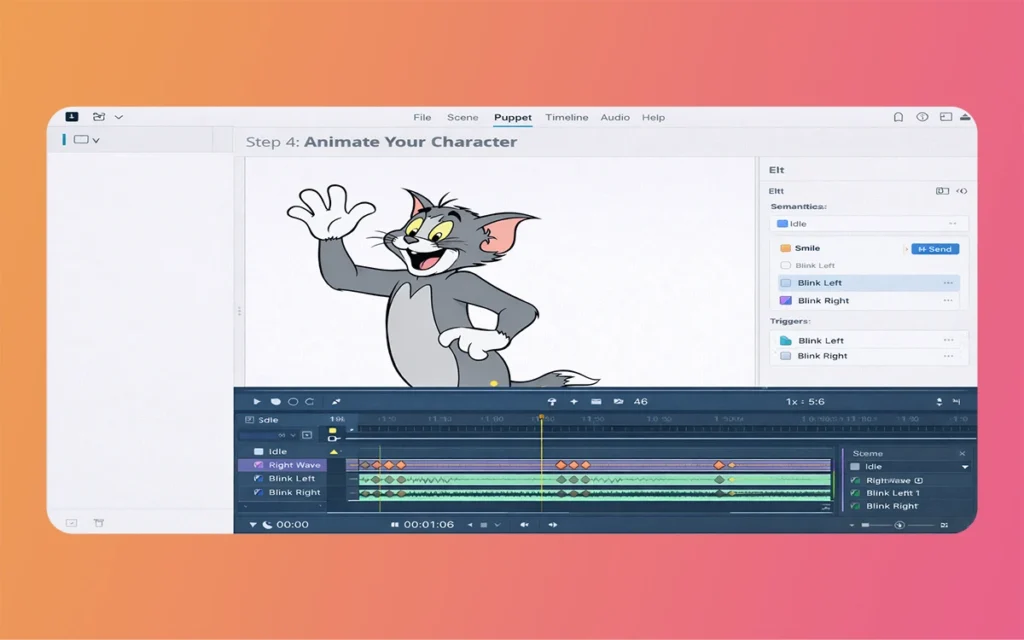
Once your art is ready, import it into Adobe Character Animator. The January 2026 release (Version 26.0) has introduced “Smart Rigging” which automatically detects your Photoshop layers and attaches “handles” to them. This saves you hours of manual clicking.
When you import your file, the software will show you a “Puppet” panel. Here, you can see all your grey layers. If you named them correctly with a “+” prefix, they will be “warped” independently, meaning when the character moves its arm, the body stays still. This is crucial for making your grey cartoon characters feel like they have bones and weight.
Grey Cartoon Characters
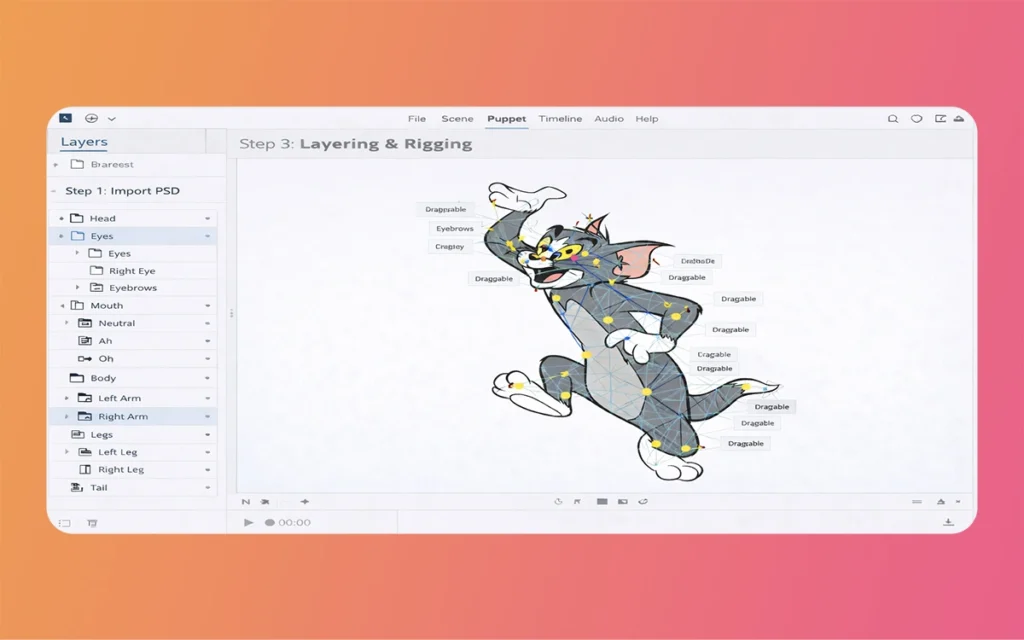
Rigging Your Grey Cartoon Characters for Movement
Rigging is just a fancy word for giving your character a skeleton. In the 2026 Pro mode, the “Body Tracker” has been significantly improved. It uses your computer’s webcam to track your shoulders, elbows, and wrists.
To rig your grey cartooncharacters, follow these simple steps:
Open the Rig workspace.
Check the “Tags” panel to ensure the eyes and mouth are correctly identified.
Add a “Walk Behavior” if you want your character to walk across the screen.
Use the “Dragger” tool so you can move the character’s hands with your mouse.
Because your character is grey, you might want to add some “Motion Lines”. This is a feature that adds small streaks of color (or white) when the character moves fast, giving it a high-energy “cartoon” feel.
Using the 2026 “Puppet Maker” for Fast Results
If you aren’t an artist, don’t worry. The 2026 version of Character Animator includes an updated “Puppet Maker”. This is a built-in tool where you can pick a style and customize it.
You can select a base model and then change the skin tone to various shades of grey. You can pick their clothes, hair, and accessories without drawing a single line. This is the fastest way to generate high-quality grey cartoon characters for quick social media posts or educational presentations.
Capturing Your Performance in Real-Time
This is the most fun part of the process. Character Animator is unique because it uses “Performance Capture”. You don’t have to move the character frame by frame like old-school animators. Instead, you just act!
Turn on your webcam and microphone. As you talk, your grey cartoon characters will talk. As you blink, they blink. The 2026 update has improved “Lip Sync” accuracy, so the mouth shapes (visemes) match your voice perfectly, even if you have a background noise.
Grey Cartoon Characters
Essential Elements for Character Creation
When building your puppet, you need to keep a few technical details in mind. Here is a failure of what you should include in your project:
Layer Organization: Always keep the “Head” and “Body” in separate master folders to avoid messy overlapping.
The “+” Prefix: Putting a plus sign before a layer name (like +Right Arm) tells the software this part should move freely without stretching the rest of the body.
Mouth Shapes: You need at least 14 different mouth shapes for perfect lip-syncing. These include shapes for sounds like “Oh,” “Ee,” and “L.”
Independence: Make sure the pupils of the eyes are independent so they can look around while the head stays still.
Shadows and Highlights: Since you are working with grey, use a “Multiply” layer for shadows and a “Screen” layer for highlights to make the character pop.
Troubleshooting Common Issues in 2026
Sometimes, things don’t go as planned. If your Grey Cartoon Characters look like they are melting, it usually means your “Mesh” is too tight. You can go into the Puppet panel and increase the “Expansion” of the mesh to smooth out the movements.
Another common issue is “Eye Float,” where the eyes move off the face. In the 2026 version, you can fix this by using the “Snap to Eye Socket” feature in the behaviors panel. This keeps the eyes locked onto the grey face no matter how fast you turn your head.
Grey Cartoon Characters
Exporting Your Masterpiece
Once you are happy with the performance, it is time to share it with the world. You can use the “Quick Export” feature located at the top right of the screen.
For Grey Cartoon Characters, I recommend exporting in 4K resolution. Since grey can sometimes look flat in low resolution, a high-quality export ensures that your subtle shading and textures remain crisp. You can also export with a “Transparent Background” (Alpha Channel) if you want to place your character into a different video later using Premiere Pro.
Grey Cartoon Characters
Start Creating Today!
Creating Grey Cartoon Characters in Adobe Character Animator is a rewarding experience. The 2026 updates have removed many of the technical hurdles that used to frustrate beginners. Now, you can focus on being creative and telling your story.
Think of the best characters aren’t always the most colorful ones, they are the ones with the most personality. So, grab your webcam, open up Adobe, and start bringing your grey friends to life. The world is waiting to see what you create!
Logo animation company: 10 Jaw-Dropping Styles to Skyrocket Engagement, The Morphic Studio
The statistical world is moving faster than ever before. In the year 2026, having a simple picture for your brand is just not enough to grab the attention of your audience. This is exactly where the magic of movement comes into play. This is why choosing the right creative partner is so incredibly important for […]
July 8, 2026
Advertising agency in Ahmedabad: 10 Brilliant Tactics to Massively Boost Sales, The Morphic Studio
This is exactly where a strong marketing partner comes in. Finding the right Advertising agency in Ahmedabad can totally change the game for your brand. At The Morphic Studio, we understand the local heartbeat o f the city. We know what works, what fails, and how to get your cash register ringing constantly. Let us […]
July 3, 2026
Motion Graphics Studio: 10 Jaw-Dropping Trends to Massively Boost Sales, The Morphic Studio
Hiring a professional team to handle your visual storytelling is no longer a luxury for big brands. It is a strict necessity for anyone who wants to survive networked. The right visuals can explain complex ideas in seconds, making your audience feel connected to your core message. Motion Graphics Studio at The Morphic Studio, we […]