Game development is always changing, and the difference between 2D and 3D workflows is becoming less clear. If you have experience with 3D tools like Blender, Maya, or 3ds Max, Unity’s Animating 2D Assets package can help you make the switch to 2D more easily. Rather than using frame-by-frame sprite swapping, many developers now use skeletal animation. This approach lets you create smooth movement, set up bone structures, and use features like Inverse Kinematics (IK) for more natural animation.
With Unity 6 and newer versions, these tools have become even easier to use. You can now move your work from Photoshop into Unity’s Game View with less hassle. In this handbook, you’ll find step-by-step guidance on rigging, preparing, and animating 2D assets so you can achieve professional results.
Animating 2D Assets
1. Preparing the Foundation: Prerequisites and Setup
Before a single bone is placed, the environment must be correctly configured. Professional 2D rigging relies on two primary pillars: the Animating 2D Assets package and the 2D PSD Importer.
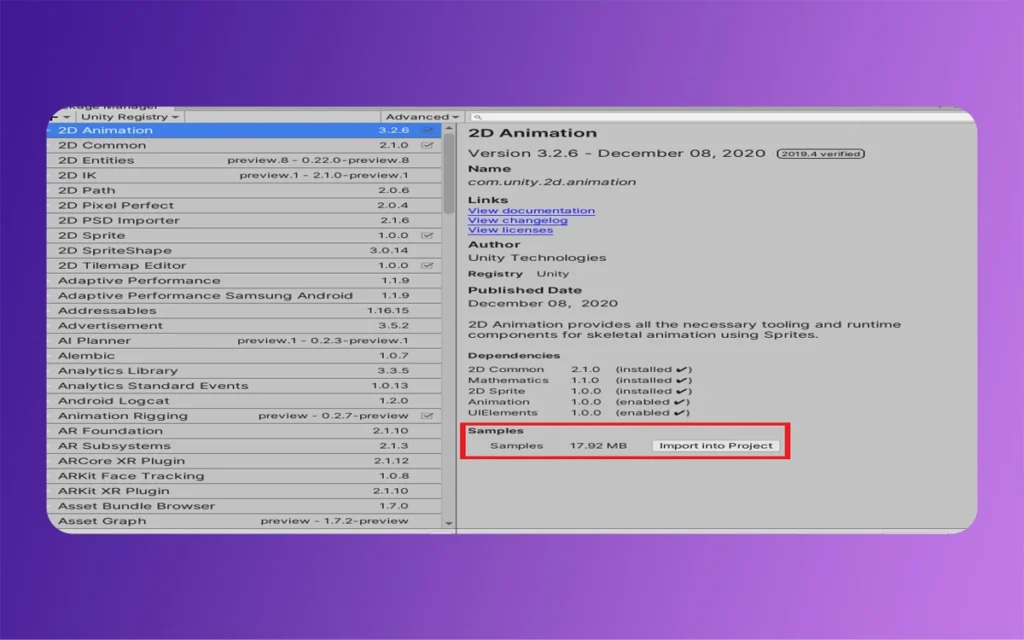
Essential Package Installation
Negotiate to Window > Package Manager. Ensure the registry is set to “Unity Registry” and install:
2D Animation (Version 10.x or later): The core engine for skeletal rigging and skinning.
2D PSD Importer: Essential for anyone using Adobe Photoshop or Affinity Designer. This allows Unity to read .psb files (large document format) and automatically convert layers into a rigged hierarchy.
Animating 2D Assets
Asset Preparation: The “Exploded” View
For a character to deform correctly, your source artwork must be “rig-ready.” Professionals typically use a layered approach.
Separation: Each movable part (upper arm, lower arm, hand, torso, etc.) should exist on its own layer.
Overlapping: Ensure joints have enough “padding” or overlap. When an elbow bends, you don’t want a gap to appear; rounded limb ends help maintain a perfect look during extreme rotations.
File Format: Save your work as a .psb file. Unlike standard PNGs, .psb files preserve layer naming and positions, which Unity uses to generate the initial GameObject hierarchy.
2. The Rigging Workflow: From Pixels to Skeleton
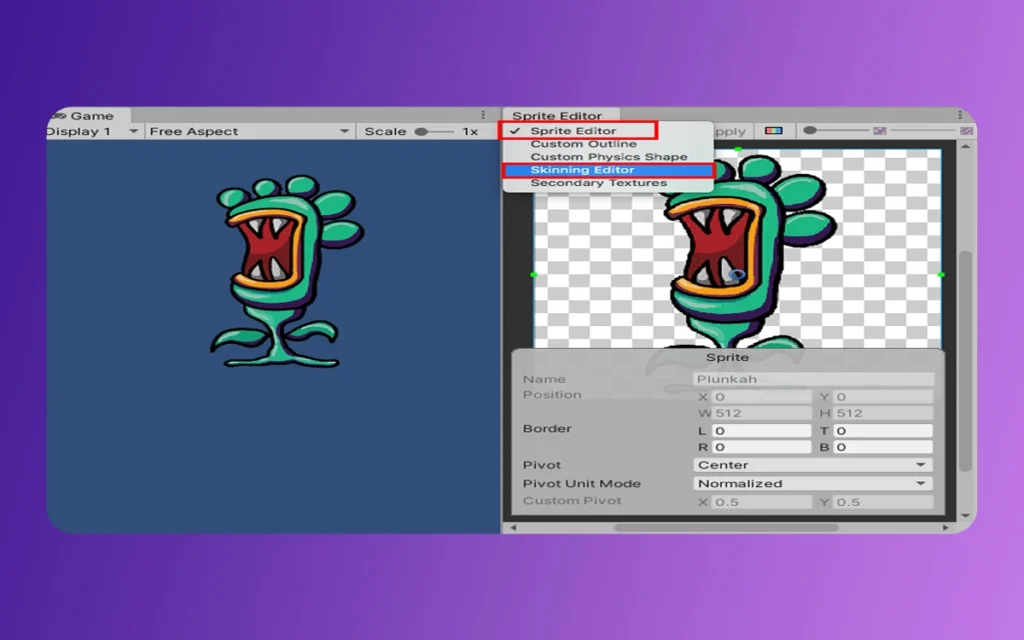
Rigging is the process of defining the “internal logic” of your character. In Unity, this happens primarily within the Skinning Editor.
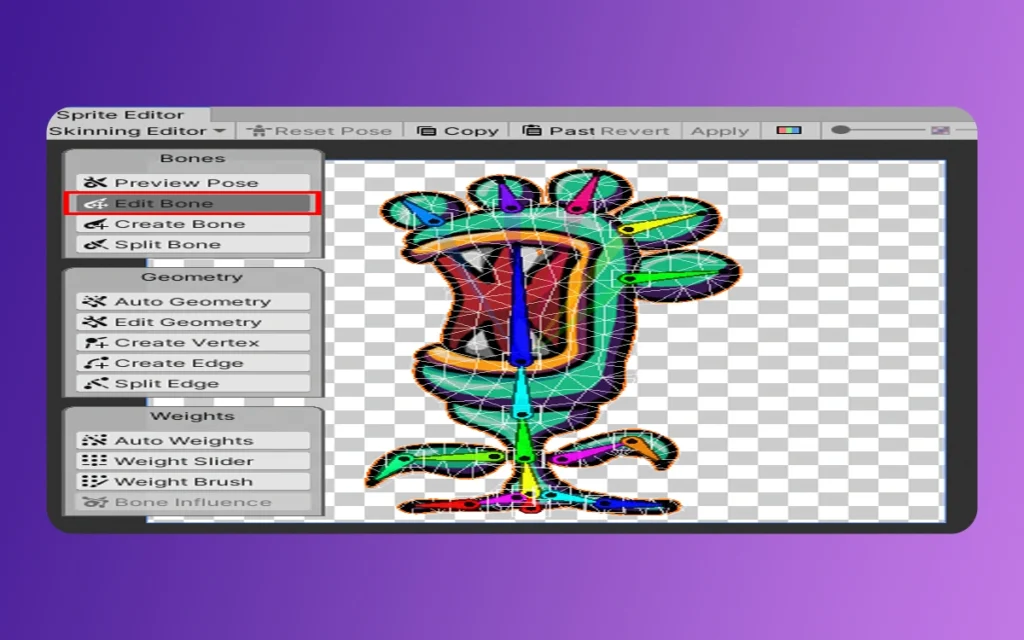
Step A: The Bone Hierarchy
Select your asset in the Project window and open the Sprite Editor, then switch the dropdown in the top left to Skinning Editor.
Using the Create Bone (Shift + E) tool, begin building your hierarchy. The golden rule of rigging is to start at the Root (usually the pelvis or hips).
The Spine: Chain bones upward toward the chest and head.
The Limbs: Branch out from the hips for legs and the shoulders for arms.
Bone Depth: In 2D, “Depth” replaces the Z-axis. Assign higher depth values to bones that should appear “in front” (e.g., the right arm moving across the torso).
Animating 2D Assets
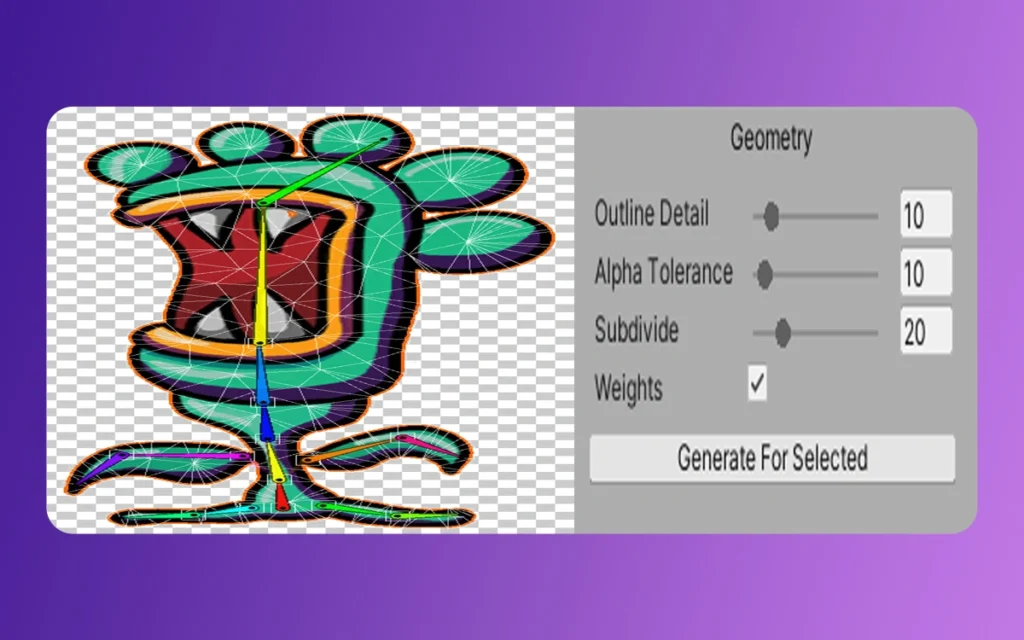
Step B: Geometry and Mesh Generation
A bone cannot move pixels directly; it moves a Mesh.
Select Auto Geometry.
Adjust the Outline Detail (how closely the mesh hugs the sprite) and Subdivision (how many internal triangles are created). Higher subdivision allows for smoother bends but carries a slight performance cost.
Click Generate for Selected. Unity will now wrap your sprites in a flexible wireframe.
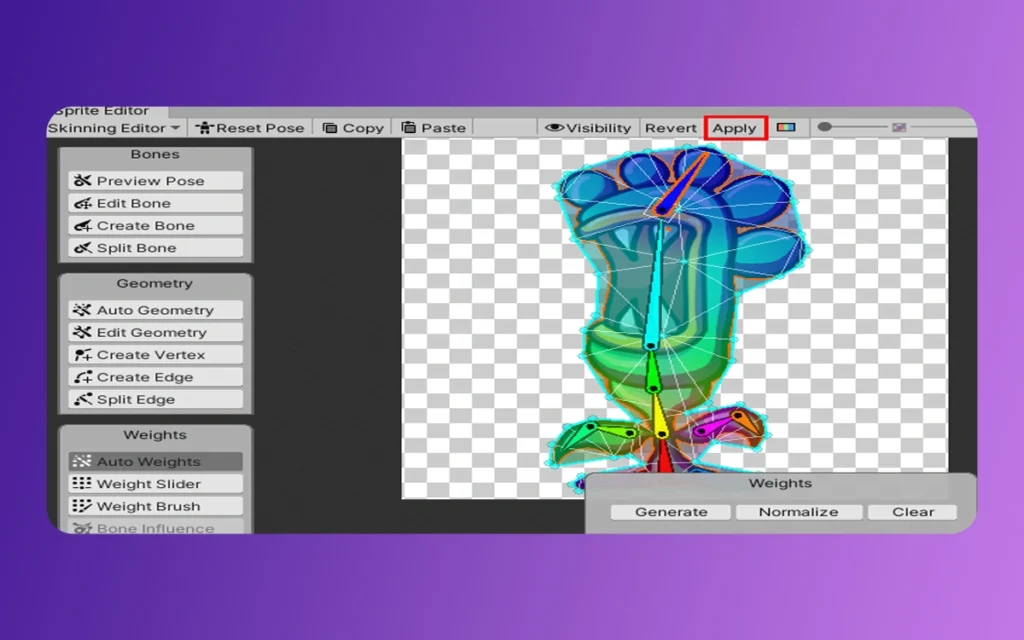
Step C: Mass Painting and Normalization
This is where the “skin” is attached to the “bones.” Each vertex in your mesh needs to know which bone it should follow.
The Mass Brush: Use this to manually paint influences. For example, the elbow area should be influenced by both the upper and lower arm bones to ensure a smooth curve.
Normalization: Professional rigs must have mass that sum to exactly 1.0. Unity’s Mass Slider tool helps you “Normalize” mass, preventing glitchy artifacts where a mesh stretches toward infinity because it isn’t properly anchored.
3. Bringing Assets to Life: The Animation Process
Once the rig is “Applied” in the Skinning Editor, drag your asset into the Scene. Add the Sprite Skin component to the parent object and click Create Bones. Your character is now ready for the Animation window.
Animating 2D Assets
Basicframing and the Animator Controller
Unity treats 2D bones exactly like 3D objects. By selecting a bone and pressing Record in the Animation window, you can set basicframes for Rotation and Position.
Linear vs. Tangent: For organic movement, ensure your basicframe tangents are set to “Clamped Auto” or “Free Smooth” to avoid mechanical, jerky motions.
Looping: For “Idle” and “Walk” cycles, ensure the first and last basicframes are identical to prevent a “hiccup” in the animation.
State Machines and Blend Trees
Professional character controllers don’t just “play” an animation; they transition between them.
The Animator Window: Create states (Idle, Run, Jump).
Parameters: Use a “Speed” float to control transitions.
Blend Trees: For locomotion, use a 1D Blend Tree. This allows the character to smoothly transition from a slow walk to a full sprint based on the player’s input, rather than snapping between two different clips.
Animating 2D Assets
4. Technical Comparison: 2D Animation Methods
To choose the right approach for your project, consult the table below:
Comparison of 2D Animation Techniques in Unity (2026)
Feature
Frame-by-Frame (Traditional)
Skeletal Animation (2D Animation Pkg)
Procedural (Animation Rigging)
Workflow
Hand-drawn individual sprites
Bone-based deformation
Script/Constraint-based
Performance
Memory-heavy (many textures)
CPU-heavy (mesh deformation)
Minimal overhead
Flexibility
Rigid; hard to change
High; easy to tweak poses
Energetic; reacts to environment
Visual Style
“Classic” Disney/Anime look
Fluid, “Puppet-like” movement
Realistic physics/interaction
Best For
FX, UI, simple 8-bit characters
Main Heroes, Bosses, complex NPCs
Foot planting, head aiming
5. Pro Tips for the Professional Technical Artist
1. Grip IK (Inverse Kinematics)
Don’t rotate every limb segment manually. Use the 2D IK Manager. By adding an IK Manager 2D to your character, you can create “Limb” or “Chain” solvers. This allows you to drag a hand or foot, and the rest of the arm/leg will follow automatically, essential for make certain feet stay planted on the ground.
Animating 2D Assets
2. The Power of the PSD Importer
If your character has 50 different expressions or outfits, don’t export 50 PNGs. The PSD Importer supports “Character Rigging” mode. You can swap out layers (like different hand shapes or eyes) within the same rig, allowing for “swappable” equipment or facial expressions without re-rigging.
3. Unity 6+ Auto-Rigging
In the latest versions of Unity, the Auto-Bone generation tool has become significantly smarter. It can now detect limb extremities and suggest a skeleton based on the sprite’s silhouette. Use this as a starting point, then refine the bone placement manually for the best results.
Animating 2D Assets
4. Integration with 3D Pipelines
Since Animating 2D Assets bones use standard Transform components, you can export these animations as standard clips. This makes it possible to use Blender to animate your 2D characters using 3D tools, then bring the .anim files back into Unity for a hybrid workflow.
Animating 2D Assets
Finally
Mastering Animating 2D Assets in Unity 2026 is about following the connection between Bones, Meshes, and Mass. By utilising the PSD Importer to maintain a direct pipeline from your design software and leveraging the 2D Animation package for skeletal deformation, you can create performance-efficient, visually stunning characters that rival 3D models in complexity.
The transition from 3D to 2D rigging is more than just a change in dimension; it’s an opportunity to apply professional rigging logic to a medium that is more popular than ever. Whether you are building a precision platformer or a narrative-heavy RPG, these tools provide the flexibility to iterate quickly and the power to deliver high-fidelity motion.
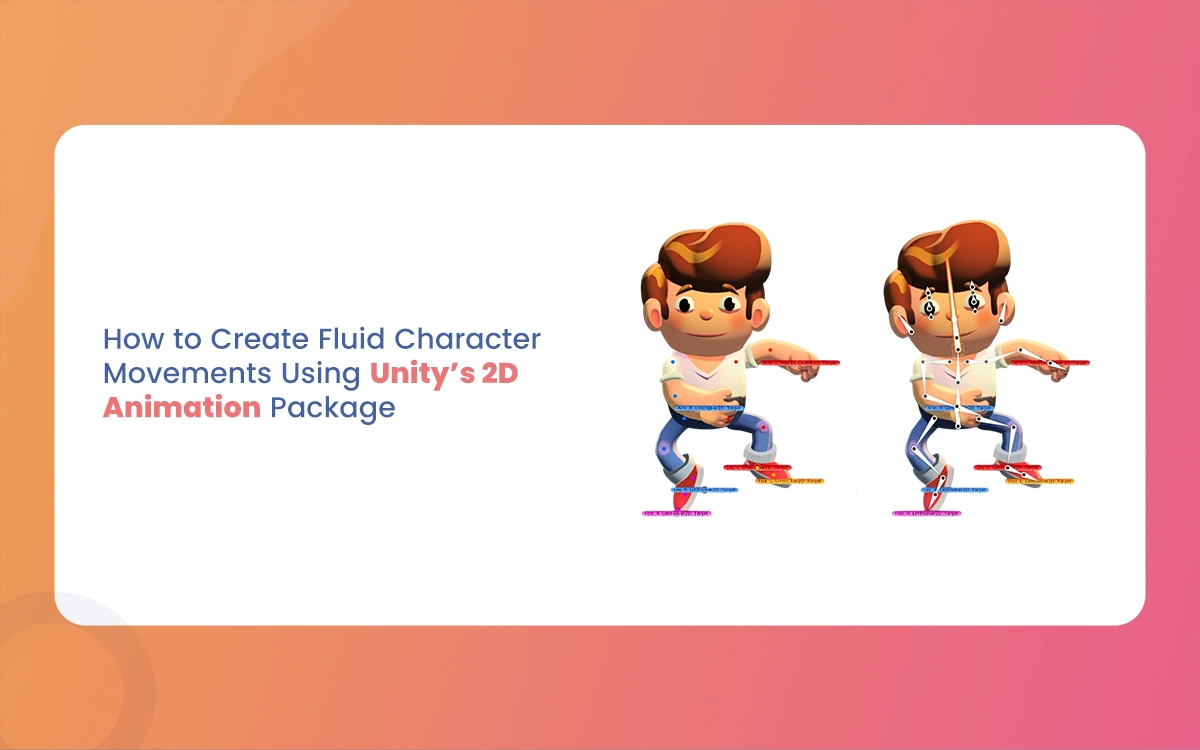
How to Create Fluid Character Movements Using Unity’s 2D Animation Package
Imagine breathing life into a pixel-perfect hero who dashes across neon-lit platforms, their cape fluttering with every leap, or a quirky sidekick whose bouncy idle loop hooks players instantly. That’s the magic of Fluid Character Unity’s 2D Animation Package, a powerhouse for crafting deformable,, a powerhouse for crafting deformable, responsive characters without the hassle of […]
March 2, 2026
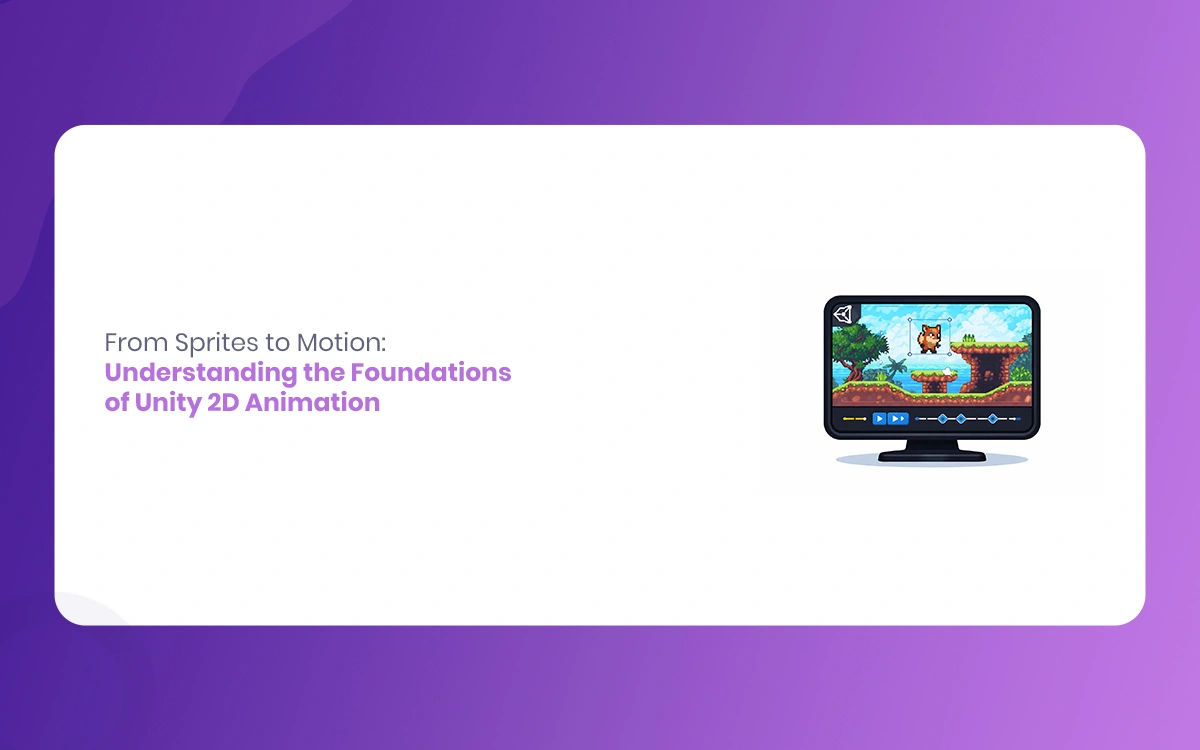
From Sprites to Motion: Understanding the Foundations of Unity 2D Animation
Unity has long been a playground for 3D artists, but its 2D animation tools pack a punch for game devs and animators who crave fluid character motion without ditching their rigging know-how. Imagine starting with a single, pixel-perfect sprite and growing it into a sprinting hero that blends seamlessly into your game’s world. The Morphic […]
February 27, 2026
The Ultimate Roadmap to 2D Animation Workflow within the Unity Engine
For years, Unity was primarily seen as a 3D powerhouse. Regardless of how, the evolution of its 2D toolset has transformed it into a premier destination for 2D content creators. At studios like The Morphic Studio, where 3D animation expertise meets high-end content creation, transitioning to a Unity-based 2D Animation Workflow pipeline offers a blend […]