The transformation of 2D photographs into life-like 3D face models has revolutionised digital content creation, from video game development to film production and virtual reality experiences. Whether you’re a 3D artist, animator, or hobbyist exploring the world of digital sculpting, Follow how to convert flat images into dimensional models opens up endless creative possibilities. The Morphic Studio shares multiple methods for creating a Photo or Image into a 3D Face, ranging from AI-powered instant generation to manual photogrammetry techniques.
Follow 3D Face Generation Technology
Before diving into specific methods, it’s essential to understand the underlying technology that makes photo-to-3D conversion possible. Modern 3D face generation relies on several approaches: artificial intelligence algorithms trained on thousands of facial scans, photogrammetry that reconstructs geometry from multiple angles, and specialized software that maps 2D features onto 3D meshes using sophisticated mathematical models.
The quality of your final 3D model depends heavily on your source material. High-resolution images with even lighting, clear facial features, and minimal shadows produce superior results. Front-facing portraits work best for single-image conversion, while photogrammetry techniques require multiple angles to capture depth and contours accurately.
Method 1: Reallusion Headshot Plugin in Character Creator
Reallusion’s Character Creator paired with the Headshot plugin represents one of the most powerful commercial solutions for transforming 2D images into production-ready 3D characters. This method excels in creating game-ready assets and animation characters with minimal manual intervention.
Photo or Image to 3D Face
Setting Up Auto Mode for Quick Generation
Auto mode provides the fastest path from photo to 3D face. Begin by launching Character Creator and installing the Headshot plugin through Reallusion’s content management system. Once installed, negotiate to the Headshot panel and select Auto mode for streamlined processing.
Load your front-facing photograph into the system. The image should feature even lighting across the face, with the subject looking directly at the camera. Avoid images with harsh shadows, extreme expressions, or tilted heads, as these can confuse the automatic detection algorithms.
Select appropriate body and skin type options from the dropdown menus. Character Creator offers various presets for different ethnicities, ages, and body builds. These selections help the software generate appropriate underlying geometry and texture maps that match your reference photo.
Click the generate button and wait for the system to process your image. The software automatically detects facial features, creates geometry, generates textures at 1024×1024 resolution, and even adds appropriate hairstyles based on the reference image. This entire process typically completes within two to three minutes, depending on your hardware specifications.
Unpicking Pro Mode Capabilities
Pro mode transforms Headshot from a convenient tool into a precision instrument for professional 3D artists. Access Pro mode through the same Headshot panel, and immediately you’ll notice expanded options for image matching and morphological adjustments.
The resolution boost to 4096×4096 textures provides significantly more detail, capturing skin pores, fine wrinkles, and subtle color variations that bring realism to your 3D face. This higher resolution proves essential for close-up renders and cinematic applications where viewers will scrutinize facial details.
Pro mode’s most powerful feature lies in its extensive morph slider library, offering over 1000 individual adjustments. These sliders control everything from general head shape to minute details like nostril flare, eyelid thickness, and lip curvature. Spend time experimenting with these controls to perfect the likeness between your 3D model and source photograph.
Point mapping functionality allows you to manually range specific facial landmarks. Click to place markers on the photograph at locations like eye corners, nose tip, mouth edges, and ear positions. The software then adjusts the underlying mesh to precisely match these reference points, dramatically improving accuracy compared to automatic detection alone.
Exporting for Multiple Platforms
Character Creator’s strength extends beyond generation to its complete export capabilities. The software supports direct integration with iClone for animation, Unreal Engine for game development, and standard FBX format for universal compatibility with applications like Blender, Maya, and 3ds Max.
When exporting for animation, enable the facial rig option to include blend shapes for expressions and lip-sync. For static renders or 3D printing, you can export simplified geometry without rigging to reduce file size.
Method 2: Blender FaceBuilder Add-on
Blender’s FaceBuilder add-on offers a completely free alternative for creating 3D faces from photographs. While requiring more manual intervention than commercial solutions, this method provides exceptional control and integrates perfectly into existing Blender workflows.
Installing and Initializing FaceBuilder
Download the FaceBuilder add-on from Blender Market or the developer’s official repository. Install it through Blender’s Preferences panel under Add-ons, then search for “FaceBuilder” and enable the checkbox.
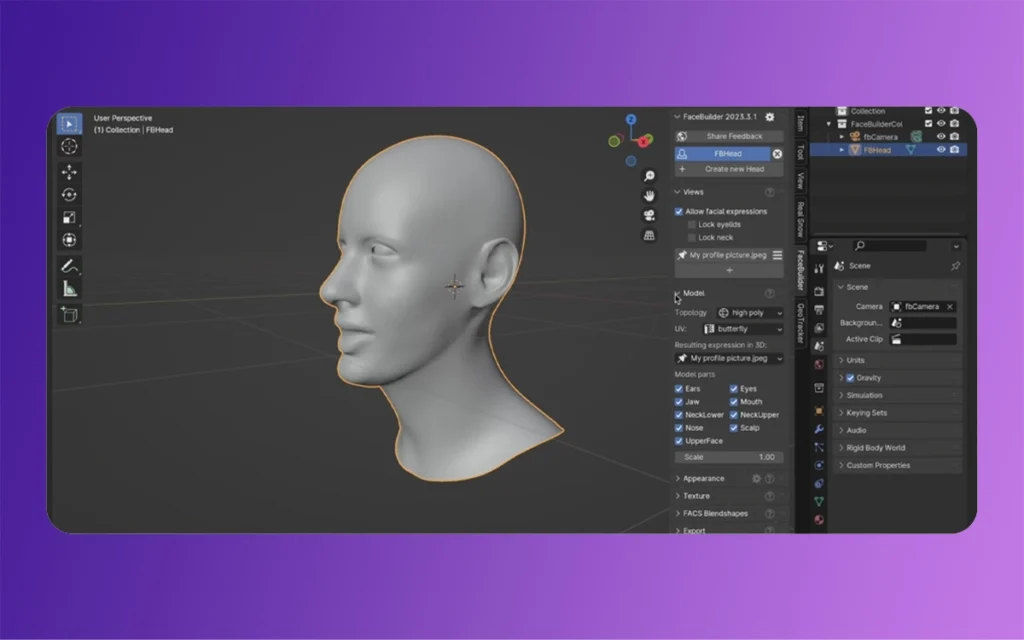
Access FaceBuilder from the 3D viewport sidebar, typically located on the right side of your workspace. Click the “Add Head” button to generate a default head mesh. This base geometry serves as your starting point, which you’ll deform to match your reference photograph.
Photo or Image to 3D Face
Single Image Rangement Technique
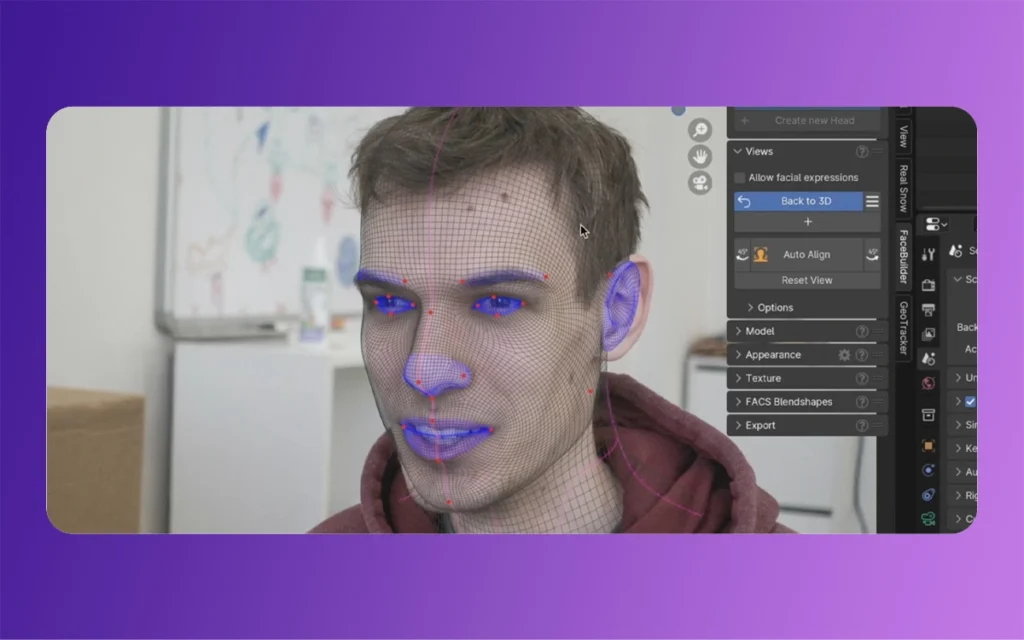
Import your reference photograph into Blender and position it as a background image. Enable FaceBuilder’s autoline detection feature, which automatically identifies facial contours and features. While helpful, this automated detection rarely achieves perfect accuracy without manual refinement.
Switch to pin placement mode and begin adding red adjustment pins to critical facial landmarks. Focus first on major features: place pins at the inner and outer corners of both eyes, the tip and base of the nose, the corners of the mouth, and the edges of the jawline.
The software responds to each pin placement by deforming the mesh to range with that specific point. Work systematically across the face, gradually refining the general shape. Don’t worry about achieving perfection immediately—FaceBuilder allows you to reposition pins as many times as needed.
After establishing basic rangement, apply facial expressions if your source image shows any. FaceBuilder includes expression presets for smiles, frowns, and neutral faces. Selecting the appropriate expression ensures your 3D model matches the emotional state captured in your photograph.
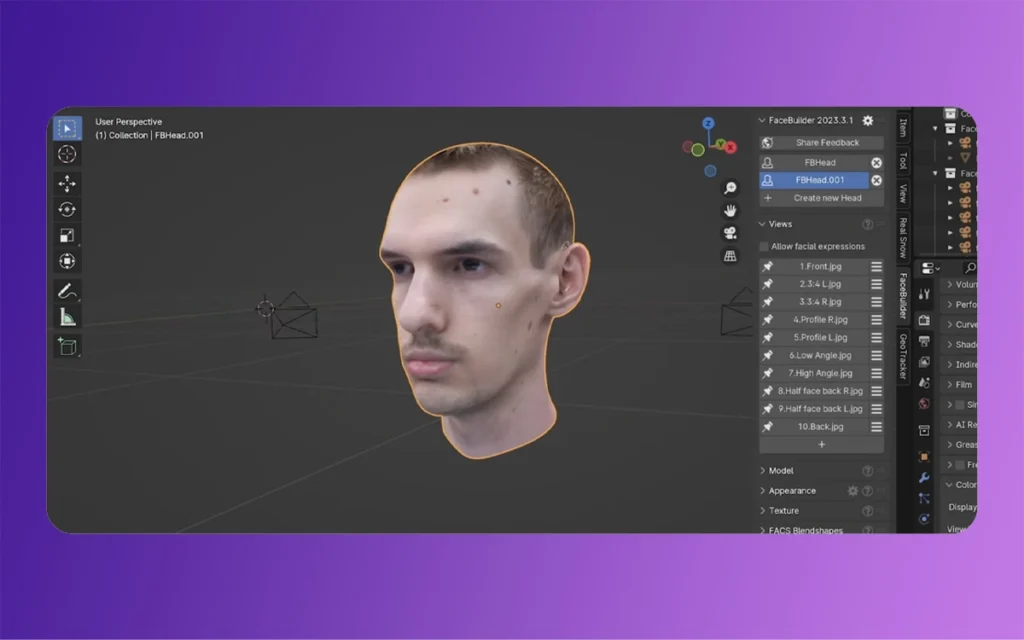
Utilize the one-click texturing feature to project your photograph onto the 3D mesh. FaceBuilder automatically unwraps the geometry and maps the image across the surface. Examine the results carefully, as you may need to manually adjust UV coordinates in areas where the projection creates distortion.
Multi-Image Photogrammetric Approach
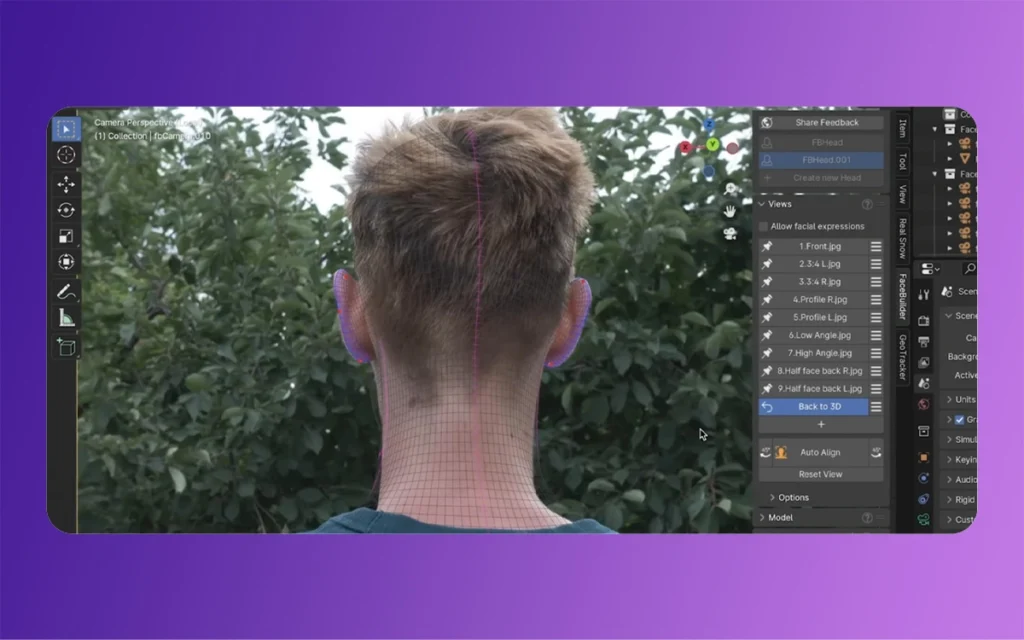
For significantly improved accuracy, capture or source multiple photographs of your subject from different angles. Ideally, include front, left profile, right profile, and three-quarter views. Consistency in lighting and facial expression across all images proves critical for successful rangement.
Load each photograph into FaceBuilder and cycle through them during the pin placement process. Position pins on corresponding landmarks across all images. The software triangulates these multiple viewpoints to construct a more accurate three-dimensional representation.
The multi-image approach captures features invisible from single angles: ear shape and position, the curvature of the skull from the side, and the true depth of the nose bridge all become measurable with multiple reference views.
Mesh Refinement and Optimization
Raw FaceBuilder output typically requires cleanup before use in production. Switch to Blender’s Sculpt mode and use the Smooth brush to eliminate any sharp transitions or geometric artifacts created during the generation process.
Apply the Remesh modifier to create clean, even topology. Subdivision-based remeshing works well for animation purposes, while voxel-based remeshing suits static renders or 3D printing applications. Adjust the octree depth or resolution settings to balance detail preservation against polygon count.
For animation workflows, retopologize the mesh to create an optimized edge loop structure around basic facial features. Proper topology ensures eyes, mouth, and brows deform naturally during animation without creating unnatural stretching or pinching.
Method 3: AI-Powered Instant Generation
Artificial intelligence has dramatically simplified 3D face creation through platforms like Meshy AI and 3D AI Studio. These cloud-based services grip machine learning models trained on extensive facial scan databases to generate 3D models from single photographs in seconds.
Using Meshy AI for Rapid Prototyping
Negotiate to Meshy AI’s web interface and create an account. The platform operates entirely through your web browser, eliminating software installation requirements. Upload your reference photograph through the designated portal.
Within the generation settings, specify your desired output characteristics: polygon count, texture resolution, and style preferences. Meshy AI can generate realistic human faces or stylized interpretations depending on your project needs.
Click generate and wait approximately fifteen to thirty seconds for processing. The AI analyzes facial features, predicts three-dimensional structure, and constructs geometry with applied textures. The speed of this process makes it ideal for rapid iteration and experimentation.
Generate multiple variants by adjusting the AI’s creativity parameter. Higher creativity values produce faces that deviate more from the source image, potentially adding artistic interpretation or filling in details the AI infers should exist based on its training data.
Post-Processing AI-Generated Models
AI-generated faces typically require refinement before professional use. Export your model from the web platform in OBJ or FBX format, then import it into Blender for cleanup and optimization.
Apply a Remesh modifier to standardize polygon distribution. AI generation sometimes creates irregular topology with varying polygon densities. Remeshing creates uniform geometry suitable for subdivision and sculpting.
Examine the UV mapping and texture quality. AI platforms sometimes generate textures with visible seams or resolution inconsistencies. Use Blender’s texture painting tools to manually correct these issues, or reproject your original photograph onto the cleaned mesh.
Add proper materials and shaders to transform the basic AI output into a render-ready asset. Subsurface scattering proves essential for realistic skin, while carefully configured specular maps capture the subtle sheen of facial features.
Photo or Image to 3D Face
Method 4: Traditional Photogrammetry Techniques
Photogrammetry represents the most accurate method for creating 3D faces from photographs, though it demands the most effort and source material. This technique works by analyzing overlapping photographs to reconstruct three-dimensional geometry through triangulation.
Capturing Source Material
Successful photogrammetry begins with proper photography. Capture at minimum fifty overlapping images of your subject from all angles. Each photograph should share approximately seventy percent of its view with adjacent images to provide sufficient overlap for the software to identify matching features.
Maintain consistent lighting throughout your photo session. Natural, diffused light works best, avoiding harsh shadows that can confuse photogrammetry algorithms. Overcast days provide ideal outdoor lighting conditions, while professional photography requires softboxes or diffusers for even indoor illumination.
Position your subject against a neutral, non-reflective background. Busy or patterned backgrounds create false geometry points that pollute your final mesh. Gray or blue backgrounds work particularly well, as they contrast clearly with skin tones.
Processing in Photogrammetry Software
Import your image collection into photogrammetry software such as Agisoft Metashape, RealityCapture, or the open-source option Meshroom. These applications analyze your photographs to identify common features and calculate camera positions for each shot.
The software processes through several stages: rangement, where it determines camera positions; dense cloud generation, where it calculates millions of three-dimensional points; mesh creation, where it connects points into continuous geometry; and texturing, where it projects original photographs onto the completed mesh.
Processing times vary dramatically based on image count, resolution, and hardware capabilities. Expect anywhere from thirty minutes to several hours for completion. Monitor progress through each stage and be prepared to adjust settings if initial results prove unsatisfactory.
Integration with ZBrush and Blender
Export your completed photogrammetry scan and import it into professional sculpting software. ZBrush excels at refining high-resolution scans, offering powerful tools for smoothing artifacts, filling holes, and enhancing details.
Use ZBrush’s DynaMesh or ZRemesher features to create clean topology from raw scan data. Photogrammetry output often contains millions of irregular polygons that prove unwieldy for animation or real-time applications. Retopology reduces polygon counts while preserving essential details.
Transfer your refined model to Blender for final material creation, rigging, and integration into your production pipeline. Blender’s complete toolset allows you to animate, render, or further modify your photogrammetry-derived Photo or Image to 3D Face.
Method 5: Hybrid Approaches with FaceGen and MakeHuman
For budget-conscious creators, combining free and low-cost tools creates professional results. FaceGenMaker generates faces from front and side photographs, while MakeHuman provides customizable body models.
Load matching front and profile photographs into FaceGenMaker, make certain accurate rangement between the two views. The software extracts facial features and constructs three-dimensional geometry by comparing the two perspectives. This dual-image approach provides significantly more accuracy than single-image methods while requiring less source material than full photogrammetry.
Export the completed face from FaceGenMaker, then import it into MakeHuman. MakeHuman allows you to attach the face to a fully articulated body model complete with rigging for animation. Adjust body parameters to match your subject’s build, creating a complete character from your original photographs.
Photo or Image to 3D Face
Comparison of Methods and Best Use Cases
Method
Cost
Speed
Accuracy
Best For
Skill Magnitude
Reallusion Headshot (Auto)
$$$
Very Fast (2-5 min)
Good
Game characters, quick prototypes
Beginner
Reallusion Headshot (Pro)
$$$
Fast (10-20 min)
Excellent
Professional production, precise likeness
Intermediate
Blender FaceBuilder (Single Image)
Free
Moderate (30-60 min)
Good
Budget projects, stylized characters
Intermediate
Blender FaceBuilder (Multi-Image)
Free
Slow (1-3 hours)
Very Good
Detailed modeling, custom characters
Advanced
AI Platforms (Meshy AI)
$
Very Fast (30 sec)
Moderate
Concept art, rapid iteration
Beginner
Photogrammetry
$-$$$
Very Slow (2-8 hours)
Excellent
Film production, digital doubles
Advanced
FaceGen + MakeHuman
$
Moderate (45 min)
Good
Full-body characters, animation
Intermediate
Technical Considerations and Quality Factors
Several factors dramatically impact the quality of your final 3D face model regardless of which method you choose. Source image resolution directly correlates with output detail—aim for minimum 2000×2000 pixel photographs when possible.
Lighting consistency prevents the appearance of baked-in shadows or highlights that look incorrect when your 3D model exists in different virtual lighting environments. Even, diffused lighting captured in your source material provides the most flexibility for later relighting in your 3D application.
Facial expression neutrality in source images typically produces the most versatile 3D models. Neutral expressions allow you to later add smiles, frowns, or other emotions through blend shapes or bone-based animation without fighting against expressions baked into the base geometry.
Polygon count management balances detail against performance. Real-time applications like video games require optimized meshes with 10,000 to 30,000 polygons, while offline renders or 3D printing can grip millions of polygons for maximum detail.
Finally
Transforming photographs into three-dimensional face models has evolved from a specialised technical challenge into an accessible process with options suitable for every skill level and budget. Whether you choose the polished automation of Reallusion’s commercial solution, the hands-on control of Blender’s free tools, the instant gratification of AI generation, or the unmatched accuracy of photogrammetry, each method offers distinct advantages for different project requirements.
Photo or Image to 3D Face
Success in Photo or Image to 3D Face creation in the end depends on following your specific needs. Game developers prioritising workflow efficiency gravitate toward Reallusion’s automated pipeline. Artists seeking creative control and willing to invest time prefer Blender’s manual approach. Those exploring concepts benefit from AI’s rapid iteration capabilities. Film productions demanding digital doubles rely on photogrammetry’s precision.
As you develop proficiency with these tools, consider experimenting with hybrid workflows that combine multiple methods. Generate initial models with AI for rapid prototyping, refine them manually in Blender, and enhance final details through photogrammetric texture projection. The flexibility of modern 3D software encourages creative problem-solving and personalised pipelines made or changed to your unique projects and preferences.
The future of Photo or Image to 3D Face conversion continues to advance rapidly. Machine learning algorithms grow increasingly sophisticated, requiring fewer input images while producing more accurate results. Real-time generation capabilities emerge, promising instant feedback during creative processes. As these technologies mature, the barrier between two-dimensional photography and three-dimensional digital content continues to dissolve, empowering creators to bring their visions to life with unprecedented ease and fidelity.
Related Article
June 16, 2026
Graphic Design Company: 5 Unstoppable & Brilliant Design Strategies by The Morphic Studio
Welcome to The Morphic Studio. Graphic Design Company We know that building a brand in today’s fast-paced statistical world can feel completely overwhelming. Attention spans are shrinking rapidly, and the competition is only getting louder every single day. This is exactly why simply having a nice logo is no longer enough to survive. You need […]
June 15, 2026
Graphic Design Company in Ahmedabad: 7 Unstoppable & Brilliant Design Strategies by The Morphic Studio
Welcome to the statistical era of 2026 The Morphic Studio. Everyone is fighting for attention, scrolling through feeds at lightning speed, and ignoring anything that looks average. This is exactly where a professional Graphic Design Company in Ahmedabad steps in to save the day. At The Morphic Studio, we do not just make things look […]
June 12, 2026
Animation Agency in Ahmedabad: 5 Breathtaking & Powerful Motion Strategies by The Morphic Studio
Why You Need a Top Animation Agency in Ahmedabad in 2026 Welcome to the future of statistical storytelling. The year 2026 has brought incredible advancements in how we consume media networked. Let us be completely honest, static images simply do not work the way they used to. People are scrolling faster than ever, and if […]