Creating a photorealistic Smeg refrigerator in Blender is an excellent project for intermediate 3D artists looking to master hard-surface modeling, PBR materials, and product visualization. The iconic retro design of Smeg Fridges—with their rounded corners, chrome accents, and energetic enamel finishes—makes them instantly recognizable and visually appealing for architectural visualizations, product renders, and game environments.
The Morphic Studio shares the complete workflow for modeling, texturing, and rendering a realistic Smeg fridge in Blender, from gathering reference materials to final render optimization. Whether you’re building assets for a kitchen scene, practicing product modeling, or creating props for a game engine, this tutorial provides professional techniques that ensure your final model meets industry standards.
Follow Smeg Fridge Design and Proportions
Before diving into Blender, Follow the distinctive characteristics of Smeg refrigerators is crucial for achieving authenticity. Smeg’s FAB series, particularly the FAB50, represents the quintessential retro attractive that made the brand famous. These appliances feature soft, rounded edges reminiscent of 1950s design, complemented by chrome details and the signature curved handle that spans the door’s height.
The typical dimensions for a full-size Smeg fridge approximate 75-76 inches (190-193 cm) in height, 31 inches (79 cm) in width, and 33 inches (84 cm) in depth. These proportions create the characteristic tall, slender profile that distinguishes Smeg from standard refrigerators. The door radius curves gently at all corners, usually with a bevel radius of approximately 2-3 inches, while the base features rounded feet that raise the appliance 2-3 inches off the ground.
Color options range from classic pastels—cream, mint green, baby blue, and pink—to bold reds and blacks, all finished in a glossy enamel coating that reflects light beautifully. The chrome handle typically measures 1-1.5 inches in diameter and extends nearly the full height of the door, positioned approximately 2 inches from the door’s edge.
Smeg Fridge
Gathering High-Quality Reference Materials
Professional 3D modeling begins with complete reference gathering. For a Smeg fridge, you’ll need multiple angles and detail shots to capture every hint of the design.
Start by collecting high-resolution images from official Smeg product pages, which provide clean, well-lit photographs from front, side, and three-quarter views. Supplement these with user-submitted photos from retail sites like Amazon or appliance stores, which often show the fridge in real-world lighting conditions and reveal how materials respond to different environments.
For technical accuracy, search for blueprint-style images or specification sheets that include exact measurements. Import these into Blender as background images by accessing the Viewport Properties panel, enabling Background Images, and loading your references. Range one image to the front view (Numpad 1), another to the side view (Numpad 3), and adjust opacity to 0.3-0.5 for easy tracing.
Additionally, download existing Smeg fridge models from BlenderKit, Sketchfab, or TurboSquid—not for direct use, but for studying topology approaches and material setups. Examining how experienced artists solved modeling challenges like the curved handle attachment or door seal geometry can save hours of troubleshooting.
Basic Modeling: Establishing the Foundation
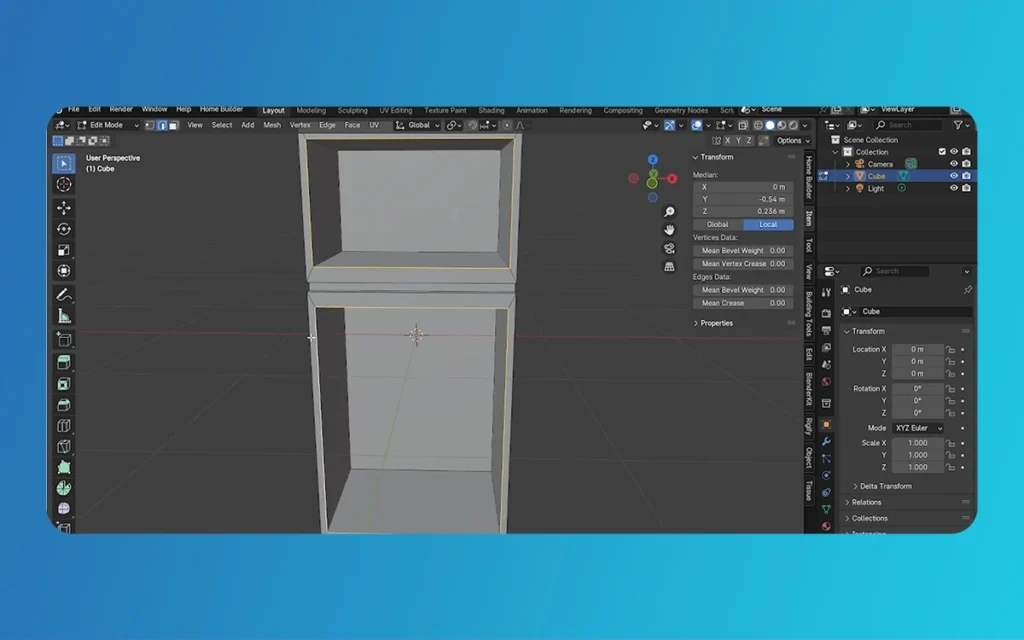
Begin your modeling process with a clean Blender scene. Delete the default cube, add a new cube (Shift+A > Mesh > Cube), and immediately apply all transforms (Ctrl+A > All Transforms) to ensure your scaling works properly throughout the project.
Scale this cube to match Smeg dimensions using the Transform Properties panel (press N to toggle). Set Dimensions to X: 0.8m, Y: 0.85m, Z: 1.92m to approximate the real-world size in Blender units. Working at real-world scale ensures proper interaction with lighting and camera settings later.
Enter Edit Mode (Tab) and add edge loops to define major sections. Press Ctrl+R and hover over vertical edges to add four horizontal loop cuts: one for the freezer-fridge division (approximately 30% from the top), one for each door’s bottom edge, and additional loops for panel details. These loops become the foundation for all subsequent modeling.
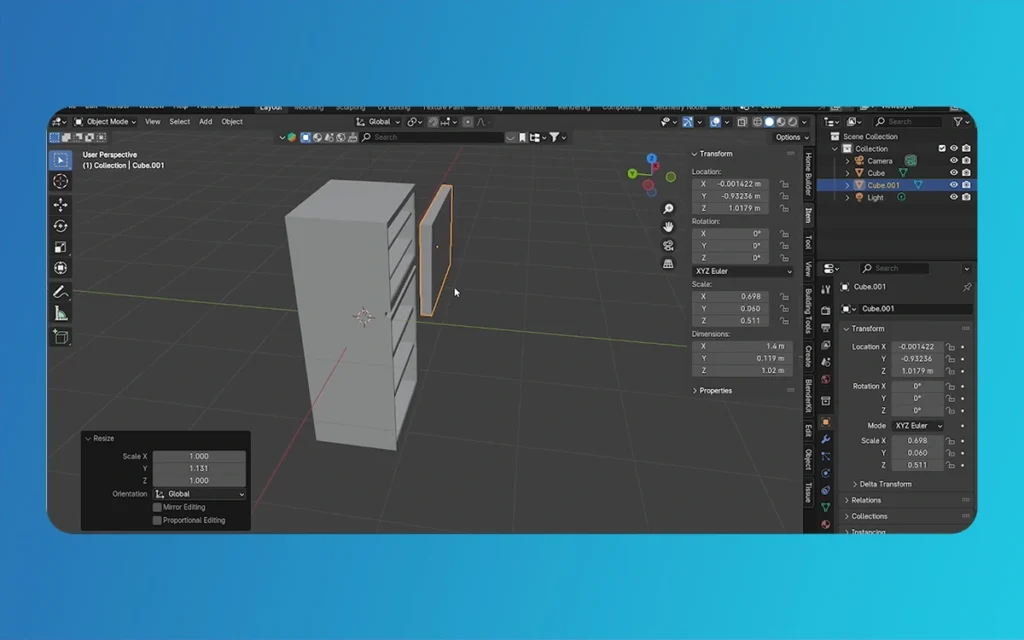
Select all edges (Alt+A in Edge Select Mode) and apply a bevel modifier (Ctrl+B) with two segments, setting the bevel amount to approximately 0.03m to create the characteristic rounded corners. Don’t apply the modifier yet—keeping it procedural allows for later adjustments.
For the door separation, select the horizontal loop cut at the freezer-fridge division, press V to rip vertices, then separate (P > Selection) into distinct objects. This creates two independent door objects that can be rigged later for animation.
Adding Signature Details and Features
The handle is arguably the most recognizable Smeg element. Create it by adding a Bezier curve (Shift+A > Curve > Bezier Curve), rotating it 90 degrees on the X-axis, and positioning it to run vertically along the door edge. In Edit Mode, adjust the curve control points to match the gentle arc seen in reference images.
Convert the curve to a mesh (Object Mode > Object > Convert > Mesh), then add a Skin Modifier to give it thickness. Adjust skin radii by selecting all vertices in Edit Mode, pressing Ctrl+A (for Skin Resize), and scaling to approximately 0.015m radius. Add a Subdivision Surface modifier afterward for smooth, rounded chrome tubing.
For the iconic Smeg logo, create it using text objects (Shift+A > Text) with a rounded sans-serif font like Futura or similar alternatives available in Blender. Extrude the text slightly (0.001m) for dimensionality, convert to mesh, and position it on the upper door panel using Inset Faces (I) to create a recessed area.
Model the door seal by selecting the edge loop around each door opening, duplicating (Shift+D) and scaling inward slightly (S, then 0.98), then adding a Solidify Modifier with thickness set to 0.01m and direction outward. Apply a dark rubber material to this geometry for contrast against the glossy body.
The ventilation grille typically appears at the bottom rear. Create this with an array of thin rectangular cutouts using the Array modifier combined with a Boolean modifier. Start with a small cube, array it along the X-axis with appropriate spacing, then subtract it from the main body using a Boolean (Difference) operation.
Feet are simple cylindrical shapes. Add a cylinder (Shift+A > Mesh > Cylinder), scale it down to approximately 0.04m diameter and 0.05m height, position one at each corner, and apply a Subdivision Surface modifier for smooth edges. These small details significantly enhance realism.
Smeg Fridge
Advanced Topology and Smooth Shading
Proper topology ensures your model deforms correctly, accepts subdivision smoothly, and renders without artifacts. After basic modeling, enter Edit Mode and examine your mesh flow. Edges should follow the natural contours of the design, creating “flow lines” around curved areas.
Select all faces (A) and recalculate normals (Shift+N) to ensure consistent face direction. This prevents rendering issues where some surfaces appear dark or inverted. Then apply Shade Smooth (right-click > Shade Smooth) to all objects.
Enable Auto Smooth in the Object Data Properties panel (the green triangle icon), setting the angle to 30-35 degrees. This automatically smooths faces while maintaining hard edges where angles exceed the threshold—perfect for appliances that combine smooth panels with crisp seams.
Add a Subdivision Surface modifier to the main body with magnitudes set to 2 for viewport and 3 for render. This increases polygon count intelligently, smoothing surfaces while maintaining edge definition where you’ve placed supporting edge loops. For optimal results, add edge loops (Ctrl+R) near hard edges you want to preserve—this technique, called “edge flow control,” prevents the subdivision from over-smoothing critical details.
Apply the modifier only when you’re completely satisfied with the base shape. Until then, keep it procedural for maximum flexibility.
Creating Photorealistic PBR Materials
Physically-Based Rendering (PBR) materials are essential for photorealism. Blender’s Principled BSDF shader contains all necessary parameters for accurate material representation.
Glossy Enamel Paint
For the main fridge body, create a new material and adjust the Principled BSDF as follows:
Base Color: Choose from Smeg’s palette (cream: #F4EDE3, mint: #B8D5C5, red: #D22630, or use a color picker from reference images)
Metallic: 0 (enamel is non-metallic)
Roughness: 0.05-0.1 (very glossy but not mirror-like)
Specular: 0.5 (standard for painted surfaces)
Clearcoat: 0.3 with Clearcoat Roughness at 0.1 (simulates the protective enamel layer)
This combination creates the signature glossy, slightly reflective finish that characterizes vintage appliances.
Chrome Handle and Accents
Create a separate material for metallic parts:
Base Color: Light gray (#E8E8E8)
Metallic: 1.0 (fully metallic)
Roughness: 0.03-0.05 (highly polished chrome)
Specular: 0.5
Chrome reflects its environment dramatically, so it will only look convincing with proper lighting setup (covered below).
Rubber Door Seals
For the black rubber seals:
Base Color: Dark gray/black (#1A1A1A)
Metallic: 0
Roughness: 0.7-0.8 (matte rubber texture)
Specular: 0.2 (slight sheen)
Smeg Fridge
Optional: Adding Texture Details
For even greater realism, add subtle imperfections using texture maps. Download PBR texture sets from Poliigon, Textures.com, or CC0Textures. Common useful textures include:
Fingerprint smudges: Connect a black-and-white image to a Bump node, then into the Normal input (very low strength: 0.05-0.1)
Slight scratches: Mix a scratch texture into the Roughness channel using a MixRGB node set to Overlay mode
Color variation: Add a noise texture with minimal color variation (0.02 factor) to Base Color for subtle paint inconsistencies
These micro-details make the difference between a CG look and convincing photorealism.
Professional Lighting and Rendering Setup
Materials only reveal their true quality under proper lighting. Switch to the Shading workspace and ensure you’re using the Cycles render engine (Render Properties > Render Engine > Cycles).
Environment Lighting
Add an HDRI environment map for realistic reflections and ambient lighting. Download free HDRIs from HDRI Haven (polyhaven.com) and select a kitchen or interior scene. In the Shading workspace, switch to World mode, add an Environment Texture node (Shift+A > Texture > Environment Texture), connect it to the Background shader, and load your HDRI file.
Adjust strength to 0.8-1.2 depending on desired brightness. Rotate the HDRI using a Mapping node (Shift+A > Vector > Mapping) connected between the Environment Texture and a Texture Coordinate node to control light direction.
Additional Light Sources
Supplement the HDRI with area lights for says:
Basic light: Large area light (3m x 3m) positioned above and to the side, strength 50-100W, simulating overhead kitchen lighting
Fill light: Softer area light opposite the basic, strength 20-30W, reducing harsh shadows
Rim light: Narrow area light behind the fridge, creating edge definition
Smeg Fridge
Render Settings Optimization
Negotiate to Render Properties and configure:
Samples: 512 minimum for final renders (256 for previews)
Denoise: Enable both viewport and render denoising using OptiX or OpenImageDenoise
Light Paths: Max Bounces at 8-12 (higher for glass/chrome but slower)
Film: Enable Transparent if compositing over other backgrounds
Enable Screen Space Reflections in the Render Properties for faster, approximate reflections during viewport navigation.
Rendering Tips for Professional Results
Position your camera (Numpad 0) at eye magnitude or slightly above, approximately 2-3 meters from the fridge, using a 50mm focal length for natural perspective. Add a subtle depth of field by enabling it in Camera Properties (Depth of Field > F-Stop: 5.6) and targeting focus on the door handle.
For product-style renders, create a simple studio setup: white cyclorama background (curved wall-to-floor transition) using a subdivided plane with smooth shading, positioned behind the fridge. Adjust your HDRI or add additional lights to eliminate dark shadows—product renders typically favor even, soft lighting.
Render at high resolution (1920×1080 minimum, 4K for professional work) with file format set to PNG for transparency or JPEG for smaller files. Enable 16-bit color depth in Output Properties for maximum quality.
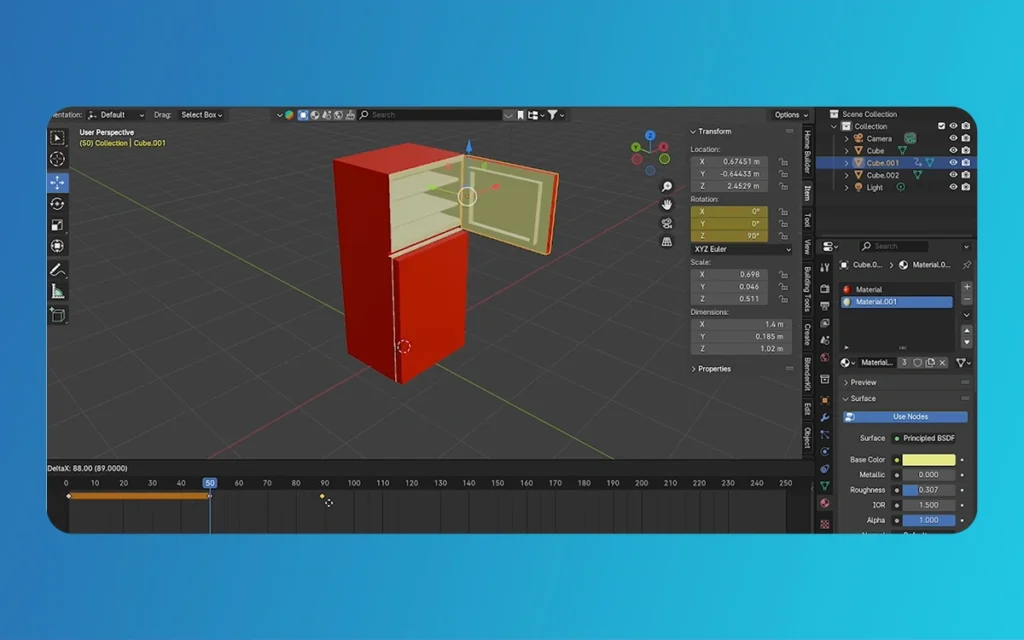
Animation and Rigging Basics
To animate door opening, add an Armature (Shift+A > Armature > Single Bone) and position the bone at the door hinge point. Parent the door object to the bone (select door, shift-select bone, Ctrl+P > Bone). Rotate the bone on the Y-axis to open the door smoothly.
Alternatively, use a Copy Rotation constraint on an empty object positioned at the hinge, allowing intuitive control by rotating the empty rather than switching to Pose Mode.
For more complex animations showing interior contents, model simplified shelves and food items inside, then animate the camera moving around the open fridge for a reveal shot.
Exporting for External Projects
If integrating your Smeg fridge into Unity, Unreal Engine, or other game engines, export as FBX format. Before exporting:
Apply all modifiers (except perhaps subdivision—many engines handle this internally)
Set object origin to geometry center (Object > Set Origin > Origin to Geometry)
Bake complex materials to texture maps if the target platform doesn’t support Blender’s node-based materials
Select all relevant objects, File > Export > FBX, and enable “Selected Objects,” “Apply Modifiers,” and set the scale to match your target engine’s requirements (Unity uses 1 unit = 1 meter by default).
Workflow Comparison Table
Workflow Stage
Beginner Approach
Professional Approach
Estimated Time
Reference Gathering
2-3 images from Google search
15+ images from multiple angles, blueprint dimensions, material studies
Beginner: 15 min / Pro: 1 hour
Base Modeling
Cube subdivision without measurements
Real-world scale with precise dimensions, transform applications
Beginner: 1 hour / Pro: 2 hours
Detail Modeling
Basic handle extrusion, no logo
Curve-based handle, embossed logo, seals, vents, accurate feet
PBR materials with clearcoat, chrome, separate seal materials
Beginner: 15 min / Pro: 1.5 hours
Texturing
Solid colors
PBR texture maps, fingerprints, scratches, normal maps
Beginner: Skip / Pro: 1 hour
Lighting
Default world lighting
HDRI + 3-point lighting setup, studio configuration
Beginner: 5 min / Pro: 45 min
Rendering
128 samples, no denoising
512+ samples, denoising, proper camera settings
Beginner: 5 min / Pro: 30 min
Total Project Time
~3 hours
~11 hours
—
Finally
Creating a realistic Smeg fridge in Blender requires attention to authentic proportions, Careful detail modeling, and sophisticated PBR material setup. By following this complete workflow—from gathering proper reference materials and establishing accurate base geometry to implementing professional lighting and rendering techniques—you can produce a photorealistic appliance model suitable for architectural visualization, product renders, or game assets.
The key to success lies in working methodically through each stage rather than rushing to the final render. Invest time in proper topology from the start, as clean mesh flow enables smooth subdivision and prevents costly revisions later. Grip Blender’s non-destructive modifier stack to maintain flexibility throughout the modeling process, and study how real-world materials interact with light before attempting to replicate them statistically.
Smeg Fridge
Whether you’re creating a standalone product render or populating a complete kitchen scene, the techniques outlined in this guide—precise scaling, curve-based detail modeling, layered PBR materials, and HDRI-based lighting—apply universally to hard-surface modeling projects. The iconic Smeg is attractive, with its perfect balance of vintage charm and a modern finish, making it an excellent subject for practicing these professional 3D modeling skills.
As you complete your Smeg fridge model, think about how photorealism emerges from accumulated details: the subtle fingerprint smudges on the glossy enamel, the precise chrome reflections on the handle, the soft shadows cast by rounded edges. Each element contributes to the viewer’s subconscious acceptance of the object as real, transforming statistical geometry into a convincing virtual appliance that rivals product photography in quality and appeal.
How To Create White Cartoon Characters Using Adobe Character Animator? (Education Guide)
If you have ever wanted to bring your drawings to life, you are in the right place. Animation used to be a very slow process where you had to draw every single frame by hand. However, things have changed. With the 2026 update of Adobe Character Animator, creating White Cartoon Characters is now faster and […]
March 31, 2026
How To Create Animal Cartoon Characters Using Adobe Character Animator? (Education Guide)
Welcome to The Morphic Studio, your favorite corner of the internet for all things design and animation. If you have ever wanted to make a lion talk or a little rabbit dance, you are in the right place. Creating Animal Cartoon Characters used to take months of frame-by-frame work, but thanks to modern tech, it […]
March 30, 2026
How To Create Grey Cartoon Characters Using Adobe Character Animator? (Education Guide)
Hello fellow creators, today I’ll show you how to bring your own Grey Cartoon Characters to life. Icons like Bugs Bunny prove that grey is perfect for animation—it’s neutral and supports highlights and shadows. With Adobe Character Animator’s 2026 update, animating these characters is easier than ever. Improved AI-driven motion tracking lets your puppet follow […]