The Animals 3D Printer attached is the best tool to make your fantasies come true. Designing a 3D printable character involves complexities like meshing, hinges, and assemblies. Because it is to be used as a toy, your art will need to be at a high level. You will also need to consider the printer’s limitations while also working with smart 3D modeling and animation software. Your creation will be a 3D character that is a whimsical animal or a true representation of a wild animal. You will also need to plan the character so that it is stitched down the middle and easily removed once printed. So that it does not affect the color of the finished piece.
The Morphic Studio shares the information about finishing designing a 3D printable character and everything that entails, to capture your vision and satisfy all requirements of a finished character with animal traits. You’ll master the 3D modeling software of your choice. You will become well-versed enough that you will captivate others to also devote their time and resources to crafting complex, whimsical, and art.
What You Should Know About Designing Animals For 3D Printing
Having a firm grasp on what design for 3D printing entails is basic before hopping into the software and learning principles and techniques. If you were to statistically design a model for a video game or animation, you would not need to worry about its physical, 3D presence. However, for 3D printing, the design must be a physical object and must obey certain physical principles like gravity and level overhangs. Furthermore, the design must be surface-appropriate and the material used to print must be elligible to survive the printing process.
The geometry challenges around an animal are a bit more in-depth than other designs because animals more than anything else on the planet are likely to contain a number of the following design features: complex and organic curves, a delicate detailing like fingers, a specifications expressive face and must contain surface detailing like layered fur, scales, or feathers. Aesthetic beauty and complexity must be planned to be structurally integral and to occomodate the requirements for 3D printing.
Animals 3D Printer
Develop a Vision for the Character and Construct a Narrative for the design
No great Animals 3D Printer character ever came to life without a well developed concept. An initial step for achieving a concept to a character is multiple angle sketches. A big focus should be placed on getting the character design and proportions correct in the side and front views, an orthographic projection.
During the design stage, it is essential to determine the character’s purpose. Whether it will be a static display, an articulated, moving toy, or a functioning object like a planter or a pencil holder. This will affect the pose to use and the structure’s requirements, among other things.
During the concept stage, simplification is the target. While the design may have delicate, intricate details like whiskers, fur patterns, or antennae, the reality is that each of them will add volume, and a 3D printer is only able to represent so much. Features that are less than 1-2 mm will likely break either when being printed or during a post-printing clean-up. So it would be better to use stylized patterns to represent fur or other details rather than attempt to model an entire structure of complex and fragile elements.
Your design should be an adaptation of an existing character or design, as simplification is the name of the game. Also, it’s best to take a look at real-world animals. Notable toy design projects will show the best ways to take organic materials and design them into something that looks complex while being simplistically manufactured.
Step 2: Choose the Right Software for Your Workflow
Selecting the right software will affect the amount of time needed for the character to be completed, the quality, and the overall design. There are many character design software programs that specialize in different aspects of the design character. Because of this, design professionals will often use a secondary or tertiary program in combination with an initial design software in order to get a character to its completed state.
For Artistic Detail and Organic Sculpting
For forming organic animal characters, Blender is an excellent and free choice. Its features to sculpt work like statistical clay, which is great for designing characters with flowing forms, muscular structures, or defined stylized proportions. The software features spezialized modifiers for for symmetry, smoothing, and subdivision to make modeling faster and more efficient. Blender also has an addon called 3D Print Toolbox which allows users to analyze and correct a variety of common printability problems .
For high-detail statistical sculpting, Zbrush is a market leader. Zbrush has feature called DynaMesh and ZRemesh which allow to concentrate more on the artistic part of the sculpting and allow the software to handle the underlying mesh and re topology in an automated fashion. Zbrush is great for adding details like reptile scales, fur patterns, or highly structured feathers.
For More Calculation and Mechanical Design
For designing characters Fusion 360 is the best option. If the character requires movements or has a lot of moving parts, Fusion 360 allows customizations at a parametric level to allow for precise movements. The software comes with a testing feature for movements to visualize articulation on design before printing. It has a timeline feature which helps for revision and changing parts of the design which were made earlier in the timeline.
Tinkercad is an excellent choice for newcomers or those creating simple geometric animal characters. Its block construction technique is beneficial for constructing low-poly stylized creatures or for use in educational animal models. While not as complete as professional solutions, Tinkercad is ideal for quickly creating preliminary models and testing ideas.
To Prepare and Optimize Your Model for Printing
Meshmixer is a 3D printing preparation specialist. It hollow models, adds drainage holes, creates smart supports, repairs mesh errors. Helps you analyze your mesh for structural weaknesses you may not want to print.
Creality Cloud and PrusaSlicer convert your 3D model into instructions for your 3D printer. They let you see your model’s construction in layers, change printing parameters, calculate material usage and print time, and check for model errors. Also, print in support-generating algorithms.
In Step 3, You Create your Model’s Shape Using Basic Forms
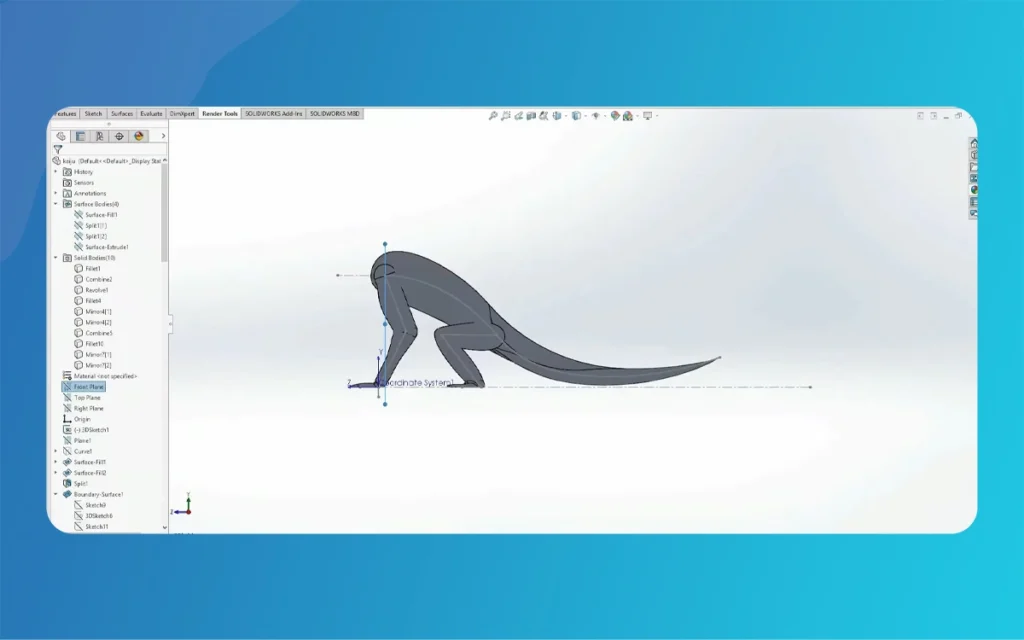
Professional 3D modelers rarely work with a blank canvas. They build the primary shape of the characters with simple geometric blocks, such as spheres, cylinders, cubes, and cones. This technique is referred to as “blocking out,” and it is a method of maintaining the correct proportions of the model as the time is saved in detailing out the model.
Start with placing ellipsoids or spheres to create the basic shapes for the head, torso, and pelvic centers of mass. Then individually scale these shapes to conform to your reference. If the animal is a quadruped, such as a cat or dog, position the shapes in a manner that will capture the silhouette with the typical curves of a spine and the angles of the legs. If the animal is a bird, position the shapes to capture a large volume for the breast and to allow for a tapered shape for the tail.
For the limbs, use elongated cylinders and taper these at the shoulders, elbows, wrists, thighs, knees, and ankles. Fingers, individual toes, and claws at this point should not be a concern. The silhouette and gesture should be the main focus.
To achieve bilaterally symmetrical designs, use a mirror symmetry modifier. This not only maintains symmetry, but it also halves the amount of work done for symmetrical designs. Breaking symmetry can also be done freely at a later stage for individual features or when achieving a particular pose.
If attaching shapes, use smooth boolean operations or edge manipulation to achieve clean connections with little to no visible joint. Control the sharpness of the topology when placing joints, mouths, and eyes.
Step 4: Add the character details and movement functionality.
You may now finish the character details to give the character personality. Ensure there is a balance between artistic expression and the ability to print the character seamlessly.
Facial Features and Expression
Invest time refining characters’ face features, as the eyes, nose, mouth, and ears carry the most personality. Incorporate edge loops and subdivision surface modeling for smooth, curved forms. For the eyes, you can decide whether to model them as part of the main mesh or make them as smaller. Separate objects to be printed in different colors and materials.
Be careful not to model overly thin eyelids and nostrils that might cause printing issues. Rather, model these features structurally thick, but use surface modeling and edge definition to depict these features in a less pronounced way. For the most part, expression can be conveyed through eye shape, brow, and mouth symmetry, and slight adjustments, as overly complex geometries do not need to be introduced.
Surface Texture and Detail
Use texture-based modeling approaches that suit the scale of the 3D printed object instead of modeling individual strands of fur or scales. In Blender, use sculpt brushes to sculpt surface patterns that will be subtle but flow as fur. In ZBrush, efficiently use alpha brushes that will stamp scale or feather patterns to the surface.
If the character will be painted, keep in mind that you can use painted details to add definition to the model that would otherwise be too complex or impractical to do. Suggest the underlying pattern with a simple textured surface that will also have a good surface to aid in paint adhesion.
Articulation for Movable Characters
To create movable, articulated designs including animals, dragons, snakes, and octopuses, you’ll want to incorporate a multi-joint system while modeling instead of adding them later on.
For instance, hips and shoulders should have ball and socket joints to allow for the widest range of movement in all directions. Hinge joints work best for elbows, knees, and fingers. Make sure to design your joints with the appropriate tolerance for clearances, typically between 0.3 and 0.5 mm, depending on how accurate your printer is.
Leave space between the joint surfaces so that they don’t fuse together, and plan carefully how the joints are oriented to the printing layers, as this will determine whether or not they’ll move. It is a good idea to use support material and/or gap distances when doing this.
Animals 3D Printer
Step 5: Optimize your Model for Successful Printing
Your character design can be perfect, but that doesn’t matter if the model doesn’t fulfill the requirements of printing. This area for optimization is where hobby practices become professional.
Ensure Mesh Integrity
Your model should be semi-manifold; there shouldn’t be any holes or gaps, and any edges that are connected must not be sharing space.μών
Utilization of Blender’s 3D Print Toolbox is recommended as it can facilitate the verification and automatic correction of common problems encountered in 3D printing such as isolated and duplicated vertices, non-manifold edges, and bad normals. In Meshmixer, the Inspector tool may be used to recongnize and address issues in the mesh while providing easy-to-understand visual feedback.
Preserve the Minimum Wall Thickness
Your model’s surfaces are required to have sufficient thickness to withstand the 3D printing process and the subsequent handling of the model. Generally, keep a minimum wall thickness of 1.2mm to 2.0mm, based on the material and scale of the model.
Ears, tails, and antennae are examples of components that can be especially dificult to print if they are thin. Designers should avoid making such features meet minimum recommended dimensions. Instead, it is preferable to modify the design to include thicker components, internal supports, or using flexible materials such as TPU, as they can print areas with thin cross-sections more easily.
Consider Please Overhangs and Support Issues
3D printing machines are not able to print in mid-air. Therefore, any surface that has an angle of more than 45 degrees from the vertical position will be printing in mid-air, which will lead to the need of a support structure to be made in order to prevent sagging of the surface. If done correctly, modern slicers will add supports automatically. In order to lessen the need for additional supports, a 3D model should be designed to have an appropriate orientation and a printout that includes self-supporting structures.
Position your model within the slicer in such a way to reduce overhangs. Quadrupedal animals may print at an angle better than an upright position. For large models, it may be beneficial to split the models into multiple parts that can print in the desired orientation. The parts can then be assembled after printing using glue or mechanical fasteners.
For organic characters, a built-in support, which is an extension of the base that connects to overhanging parts, can be designed within the model and removed after printing to achieve a cleaner look than other stiffer support structures generated by a slicer.
Optimize Topology and Polygon Count
Sculpting programs such as ZBrush may generate models with over a million polygons to achieve an organic and smooth model. While in reality, an organic model only needs enough geometry to smooth out the curves at the desired print scale. Too many polygons in a model means an unnecessarily large file that takes longer to process.
Using tools such as ZBrushs ZRemesher and Blender’s Quad Remesh is an excellent way to achieve smooth surface detail while reducing poly count. Success in this aspect can be attributed to flowing topology, particularly in locations of the model that contain curved or highly detailed sections.
Step 6: Export and Slice Your Model for Printing
Exporting is the final step in 3D modeling and links the modeling software to the printing software. Is a step that must be completed with attention to detail as there are specific format and scale requirements.
Choosing the Proper File Format
Please export your projects as either an STL or an OBJ file. All slicing software accept STL files, and it is the industry standard file type for 3D printing. OBJ files contain color information and the ability to have multiple objects. Which is beneficial if you plan to print using different colors or materials.
When exporting STL files, make sure to set the right tessellation resolution. If the resolution is too low, the curves will appear faceted. If the resolution is too high, it will result in unnecessarily large file sizes, and it will not improve print quality. Most exports are best to use angle-based tessellation with an angle control set to 10 to 20 degrees.
Scaling and Orientation
Import your model into your slicing software (e.g., Cura, PrusaSlicer, Creality Cloud). Make sure the scale is correct, as different software programs sometimes interpret units in different ways. Therefore, import models at incorrect sizes.
Find the best print orientation, and rotate your model accordingly. The first layer of the print should have maximum surface area contact with the build plate, and overhangs should be facing up whenever possible. Make sure that the gaps around the joints are range properly with the layer’s fusion orientation to avoid fusing.
Configure Print Settings
Decide on a suitable infill density according to the specific needs of the model. For display pieces, 15-20% infill is generally adequate as it is strong enough and saves on material and print time. For functional toys or pieces that are frequently handled, a higher infill density of 30-50% is advisable to increase durability.
The layer height should be chosen according to the level of detail needed and the amount of time available to print. For most character prints, 0.2 mm is a good standard layer height to use. For smaller models that have fine surface details, it is worth reducing the layer height to 0.12 mm or 0.08 mm to improve surface quality. During the printing of larger models, the use of a 0.28 mm layer height will result in a faster print without a noticeable loss in quality.
Support Configuration
Wherever possible, avoid enabling supports, as they will need to be removed afterward and leave unsightly marks. The density of the supports and the number of contact points should be adjusted to find a balance that best facilitates easy removal post-print. For organic characters, tree supports work better than standard linear supports.
Once the model has been sliced, preview it layer by layer to identify any potential printing issues that might cause a big waste in time and materials. There are correct joint gaps, and that there aren’t any unexpected discrepancies in the sliced model.
Step 7: Post-Processing for Professional Results
Once printing is done and the model removed from your printer, it is important to think of that it is still a work in progress. For a more finished, polished look of a character model that is display or play worthy, a post-processing step has to be implemented.
Support Removal and Surface Cleaning
Use flush cutters, hobby knives, or needle files to carefully detach support structures. To avoid damaging the surface of the underlying model, take your time. If your printer supports dual extrusion, consider using water-soluble support material for support material located in tricky places like mouths or underarms.
Inspect the model for stringing and carefully remove any thin plastic threads using a heat gun or lighter. With a sharp flat blade, carefully scrape at any elephant’s foot expansion on the first layer of the print.
Animals 3D Printer
Sanding and Smoothing
Select your starting grade based on the roughness of the area being sanded, starting around 120-grit for rougher regions, and finishing with 400-grit or higher for a smoother finish. For PLA, to achieve a glass-like smoothness that is ideal for painting, wet sanding and finishing with higher than 600-grit is recommended.
Without works on PLA or PETG, vapor smoothing of ABS prints by melting surface layer lines for a glossy finish. For any materials other than ABS, apply a filler primer, and repeat the sanding and smoothing process until the desired surface quality is achieved.
Gap Filling and Assembly
With multi-part prints, you should test-fit pieces prior to gluing them. If rangement is not proper, joint surfaces may need sanding. For strong, permanent bonds, use cyanoacrylate (super glue) or epoxy when gap-filling is needed for applications in which parts do not perfectly mate.
To fill visible seams and layer lines, use two-part epoxy putty or automotive spot putty. Apply the putty to the surfaces, allow it to cure, and then sand it smooth with the surrounding surfaces. For models that will be painted, this technique improves the appearance dramatically.
Painting and Finishing
Use a spray primer that is specifically for plastics to prime your model. When doing final surface sanding before the color is applied, gray or white primer surface color is preferable, since it will more easily show surface imperfections. Avoid obscuring fine details on the model by applying multiple thin coats instead of one heavy coat.
You should use acrylics to paint the model, applying color in a layered approach. Start with base colors, and then add shading and says to improve sculpted details. Techniques such as dry brushing should be used to add texture on things like fur, scales, or feathers. To improve the appearance of paint jobs, seal the model with a varnish that is either matte, satin, or gloss, depending on the character’s material properties.
Multi-Material Finishing
If you want to attain different outcomes, you can attempt printing a variety of different body parts in different materials. For example, a print of body structures in a rigid material like PLA or PETG, then flexible TPU can be used to print the joints or other elements in order to allow for durability and articulation. This method helps in bringing together the surface finish of the hard plastics together with the working advantages of flexible materials.
Adding non printed materials can be beneficial to the appearance and structure of the piece. Wire armatures can be used for reinforcement, glass or acrylic can be used for eyes to enhance realism, and fabric can be used for any clothing or accessories that may be impractical to print.
Common Challenges and Solutions
Designing animal characters for 3D printing can be very difficult, and even the technical experts may face problems. Regarding the issues and possible solutions to minimize the waste of time and material, the following can be noted:
Challenge: Thin Features Breaking During or After Printing
Things like delicate balloon like ‘ears’, tails, whiskers, or antennae are quite likely to break.
Solution: In order to minimize the thickness to at least 1.5mm, Features should be redesigned with reinforcement in the form of ridges or connecting elements/
Animals 3D Printer
Challenge: Poor Surface Quality and Visible Layer Lines
The curve of an object loses its organic and natural feel when there are many layers especially in a character piece.
Solution: Some of the solutions that can be used include to reduce the layer height, print at a different orientation to reduce visibility of layer lines, apply a filler primer over the surface to mask the lines, and sand the surface. Using resin printing may also be an option to obtain a better surface finish since it has higher surface quality.
Challenge: Articulated Joints Fusing or Having Excessive Play
If multiple articulated pieces are no longer moving, that means the rotation tolerances are too tight; if they are moving too freely, that means that the rotation tolerances are too loose. One solution is to test print a simple joint sample first, with different clearance gaps. Increasing or decreasing them by 0.1 mm until finding the right selling for your Animals 3D Printer. Optimal clearance is also impacted by the different materials and different environmental conditions that are present, so keep that in mind.
Challenge: Models Taking Excessive Time to Print
For larger or more complex characters, the printing time may take anywhere from 12-24 or more hours. Some solutions are: Hollowing large models with adequate wall thickness and adding drainage holes. Lowering the infill percentage for models that are non-structural, increasing the layer height where detail is not needed, or splitting the models into smaller pieces so that multiple printers can print at the same time.
Advanced supports, paint-on supports, organic supports, profiles for many printers
Creality Cloud
Slicing/Cloud
Creality printers, cloud slicing, model library
Low
Free
Cloud-based slicing, model sharing, remote monitoring, beginner-friendly
Finally
Designing animal characters for Animals 3D Printer represents a rewarding intersection of artistic creativity and technical engineering. Success requires following not only how to sculpt appealing character forms but also how to adapt those designs to the physical constraints of additive manufacturing. By following the systematic workflow outlined in this guide—from concept development through software selection, modeling, optimization, slicing, and post-processing. You can transform your animal character visions into tangible objects that capture personality and charm while maintaining structural integrity.
Think of that mastery as developing through practice and iteration. Your first prints will likely reveal areas for improvement in modeling technique or print settings. View these experiences as valuable learning opportunities rather than failures. The 3D printing community actively shares knowledge through forums, social media groups. Video tutorials that provide endless inspiration and problem-solving assistance.
As you gain experience, you’ll develop intuition for what designs will print successfully and which require modification. You’ll learn your printer’s capabilities and limitations, enabling increasingly ambitious projects. Whether creating collectible figures, educational models, articulated toys, or purely artistic expressions. The skills you develop in 3D printable animal character design open creative possibilities limited only by imagination.
The future of Animals 3D Printer character design continues evolving with advances in printer technology. Multi-color printing, advanced flexible filaments, and AI-assisted design tools promise to expand creative possibilities even further. By establishing strong fundamentals now, you position yourself to leverage these innovations as they come out. Continuously pushing the boundaries of what’s possible in bringing imaginary animal characters into physical reality.
Related Article
March 31, 2026
How To Create White Cartoon Characters Using Adobe Character Animator? (Education Guide)
If you have ever wanted to bring your drawings to life, you are in the right place. Animation used to be a very slow process where you had to draw every single frame by hand. However, things have changed. With the 2026 update of Adobe Character Animator, creating White Cartoon Characters is now faster and […]
March 31, 2026
How To Create Animal Cartoon Characters Using Adobe Character Animator? (Education Guide)
Welcome to The Morphic Studio, your favorite corner of the internet for all things design and animation. If you have ever wanted to make a lion talk or a little rabbit dance, you are in the right place. Creating Animal Cartoon Characters used to take months of frame-by-frame work, but thanks to modern tech, it […]
March 30, 2026
How To Create Grey Cartoon Characters Using Adobe Character Animator? (Education Guide)
Hello fellow creators, today I’ll show you how to bring your own Grey Cartoon Characters to life. Icons like Bugs Bunny prove that grey is perfect for animation—it’s neutral and supports highlights and shadows. With Adobe Character Animator’s 2026 update, animating these characters is easier than ever. Improved AI-driven motion tracking lets your puppet follow […]