Welcome to another tutorial from The Morphic Studio. Lighting A Character in Unreal 5 If you have been working on 3D games or animations, you know that creating a beautiful 3D character takes a lot of time. You sculpt the face, you bake the textures, and you spend hours making sure the clothing looks perfect. Regardless of how, all that hard work can disappear if you do not light your character correctly. Lighting is the magical element that brings a 3D model to life. In this guide, we are going to walk you through some of the best tips for making your characters look amazing.
We will talk about basic setups, advanced tricks, and even the latest updates from the 2026 Unreal Engine 5.8 release. Whether you are a beginner or a seasoned artist, there is always something new to learn about light.
Lighting A Character in Unreal 5
Why Lighting A Character in Unreal 5 is Important
Have you ever looked at a movie scene and felt a sudden wave of emotion? Most of the time, that feeling comes directly from the lighting. When we talk about Lighting A Character in Unreal 5, we are not just talking about making the character visible on the screen. We are talking about storytelling. The way light hits the face of your character tells the player a story before a single word is spoken.
If you use soft, warm lights, your character will look friendly and safe. If you use harsh, cold lights from below, your character might look mysterious or secretive. Without good lighting, your highly detailed 3D model will just look like a flat piece of plastic. By learning how to place your lights properly, you bring out the depth, the personality, and the artistic vision behind your project.
Setting the Mood and Tone with Lighting A Character in Unreal 5
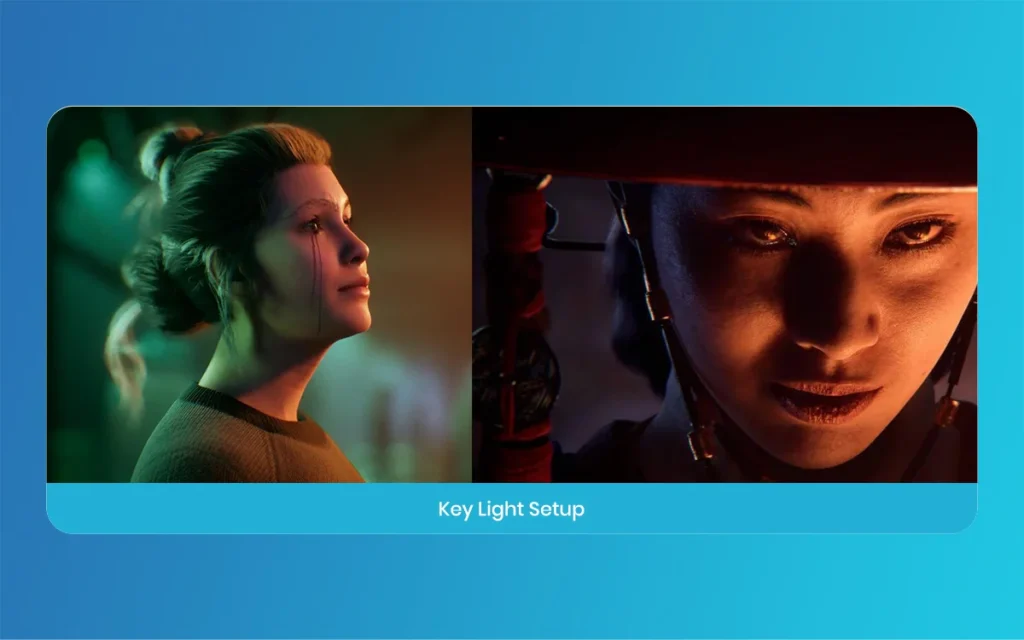
Mood is everything in game design. When you are Lighting A Character in Unreal 5, you have full control over the emotional impact of the scene. Imagine you have a detective character standing in a rainy alley. If you blast them with a bright, sunny light, the scene will look very strange and confusing. Instead, you want to use cool blue lights to match the rainy night, maybe mixed with a warm orange glow from a nearby street lamp. This contrast of warm and cool colors creates a moody atmosphere. It is important to think like a movie director.
Always ask yourself what the character is feeling in this exact moment. Are they happy, scared, or victorious? Once you know the emotion, you can choose the colors and the intensity of your lights to match that specific tone perfectly.
Lighting A Character in Unreal 5
Saysing Details When Lighting A Character in Unreal 5
All those hours you spent sculpting pores, wrinkles, and armor scratches deserve to be seen. Proper Lighting A Character in Unreal 5 is the best way to show off your texture work. If your lighting is too flat, it washes out the normal maps and makes everything look smooth and fake.
To fix this, you need to use directional lights that create shadows inside the small details of your model. When light grazes the side of a leather jacket, it sayss the bumps and imperfections in the material. This makes the clothing look real and tangible.
We at Morphic Studio always recommend experimenting with the angle of your lights. Do not just place a light directly in front of your character. Move it to the side, or slightly above, to let the shadows naturally fill in the crevices and says the beautiful textures you created.
Basic Setup for Lighting A Character in Unreal 5
Starting with a blank canvas can feel very overwhelming. Where do you even place the first light? The good news is that Lighting A Character in Unreal 5 does not have to be a guessing game. There is a classic method that photographers and filmmakers have used for decades, and it works perfectly in Unreal Engine. Before you start adding crazy colors or special effects, you need to build a solid foundation.
You want to make sure your character is readable against the background. To do this, we rely on a standard setup that guarantees good results every single time. This method involves three specific lights, each with its own very important job. Once you master this basic setup, you can break the rules and get as creative as you want.
Lighting A Character in Unreal 5
Using the Three Point Light System for Lighting A Character in Unreal 5
The most reliable technique for Lighting A Character in Unreal 5 is the Three Point Light system. This setup uses, you guessed it, three main light sources. It is simple, effective, and gives your character a beautiful sense of depth. You start by placing a Basic Light, which is your main source of brightness. Next, you add a Fill Light to soften the dark areas.
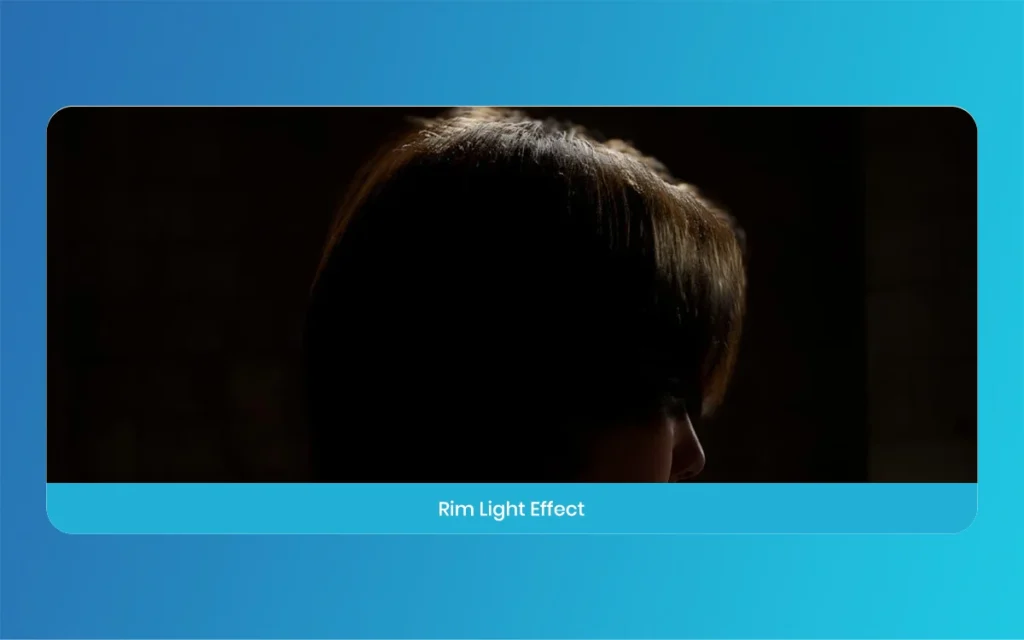
Finally, you place a Rim Light behind the character to separate them from the background. This setup is the bread and butter of 3D rendering. Whenever an artist at Morphic Studio is testing a new character model, they always start with a basic three point lighting rig. It allows you to see the silhouette clearly and make sure all the proportions look correct before putting the character into a complex game environment.
Basic Light, Fill Light, and Rim Light Energetics in Lighting A Character in Unreal 5
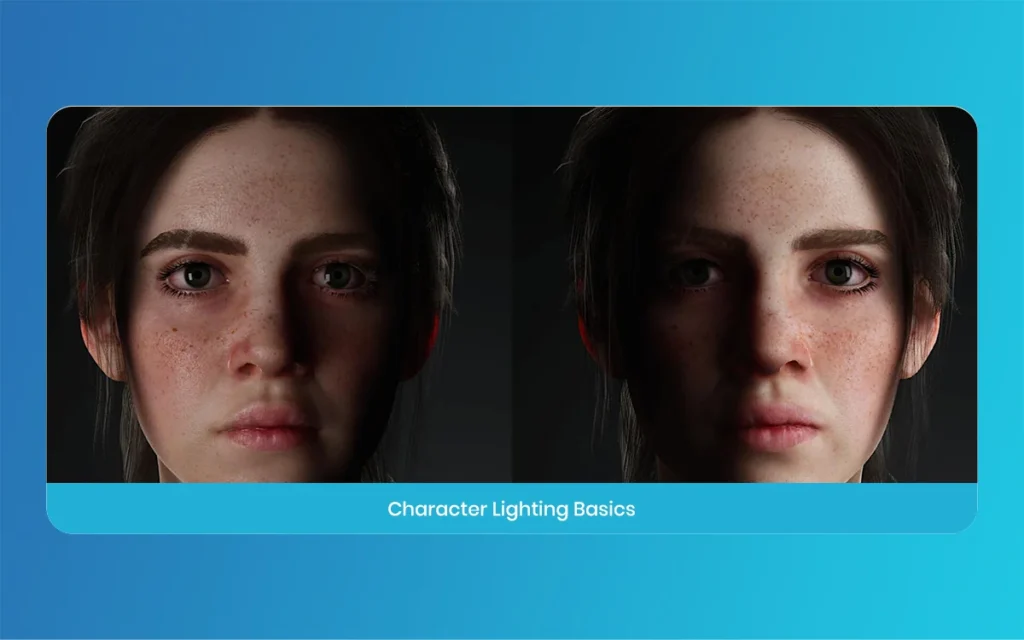
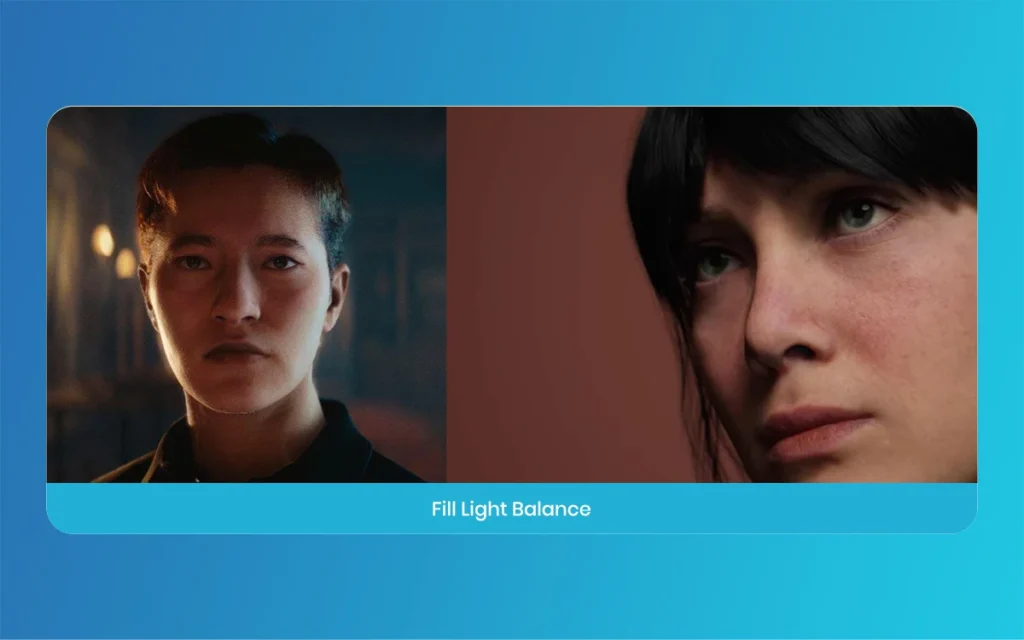
Let us break down these three lights a bit more for your Lighting A Character in Unreal 5 workflow. Your Basic Light is the star of the show. It should be the brightest light, usually placed at a 45 degree angle in front of your character. It creates the main shadows on the face. Regardless of how, those shadows can sometimes be too dark. That is where the Fill Light comes in. The Fill Light is placed on the opposite side of the Basic Light.
It has a much lower intensity, and its only job is to gently brighten the harsh shadows so we can still see the details on the dark side of the face. Lastly, the Rim Light, also known as a backlight, goes behind the character. It creates a bright outline around the hair and shoulders, making the character pop out from the background.
Lighting A Character in Unreal 5
New 2026 Features for Lighting A Character in Unreal 5
Unreal Engine is always increasing, and the year 2026 has brought some massive upgrades. If you are focused on Lighting A Character in Unreal 5, you will be thrilled with the new tools available in the Unreal Engine 5.8 update. Epic Games has really focused on giving artists more control, better performance, and higher quality visuals.
In the past, adding too many energetic lights to a scene would slow down your computer and ruin your game performance. But things have changed. The new rendering technologies allow us to be much more generous with our light placement.
We can now achieve cinematic quality right inside the editor, in real time. Let us look at two of the most exciting features that you can use right now to make your characters look breathtaking.
Lighting A Character in Unreal 5
Unreal Engine 5.8 MegaLights and Lumen Lite for Lighting A Character in Unreal 5
One of the biggest game changers for Lighting A Character in Unreal 5 is the new Production Ready MegaLights feature in UE 5.8. MegaLights allows you to place a huge number of energetic, shadowed area lights into your scenes without destroying your frame rate. It also drastically reduces noise, giving your characters a clean, realistic look.
This means you can add tiny rim lights, eye lights, and environmental bounce lights exactly where you need them. Alongside MegaLights, we now have Lumen Lite mode. Lumen is the global illumination system that makes light bounce naturally around the room. Lumen Lite provides beautiful, bounced light onto your character at a much lower GPU cost.
This is amazing because it means your characters will look perfectly integrated into their environments, catching realistic color reflections from the floor and walls.
Lighting A Character in Unreal 5
Utilizing the Toon Shader for Lighting A Character in Unreal 5
Not every game needs to look like a photorealistic movie. Sometimes, you want to create a stylized, anime, or hand drawn look. In the past, creating this style required a lot of custom programming. But now, Lighting A Character in Unreal 5 for stylized games is easier than ever. Unreal Engine 5.8 introduces an experimental new Toon Shader built directly on the Substrate framework.
This shader allows you to create sharp, cel shaded shadows on your character, mimicking classic 2D animation. When using the Toon Shader, your lighting approach changes slightly. You rely less on soft gradients and more on strong, directional light blocks. It is incredibly fun to play with. By adjusting the light angles, you can dictate exactly where the hard shadow lines fall on the face, giving your character that perfect comic book appearance with just a few clicks.
Advanced Techniques for Lighting A Character in Unreal 5
Once you have mastered the basics and explored the new tools, it is time to push your skills further. Advanced Lighting A Character in Unreal 5 is all about the tiny details that trick the human eye into believing the statistical model is a real, living person.
It is not just about placing lamps in a room anymore. It is about understanding how light travels through materials, how camera lenses interpret colors, and how to guide the player’s focus.
The artists at Morphic Studio spend a lot of time tweaking these final, subtle settings. A good lighting setup can look great, but applying these advanced post processing and material techniques is what takes your work from looking like a student project to a professional game studio masterpiece.
Post Process Volumes and Color Grading in Lighting A Character in Unreal 5
Think of the Post Process Volume as a pair of sunglasses for your game camera. When you are finalizing your Lighting A Character in Unreal 5, the Post Process Volume allows you to adjust the entire mood of the scene at once. You can change the exposure, add a slight bloom effect so the bright lights glow softly, and adjust the color grading. Color grading is just like applying a photo filter.
You can tint the shadows blue and push the sayss toward yellow to create a cinematic blockbuster look. If your character lighting feels a bit disconnected from the background, a good color grading pass will tie everything together beautifully. You can also use the Post Process Volume to add a vignette, which darkens the edges of the screen, subtly forcing the viewer to look directly at your brightly lit character in the center.
Lighting A Character in Unreal 5
Working with Subsurface Scattering in Lighting A Character in Unreal 5
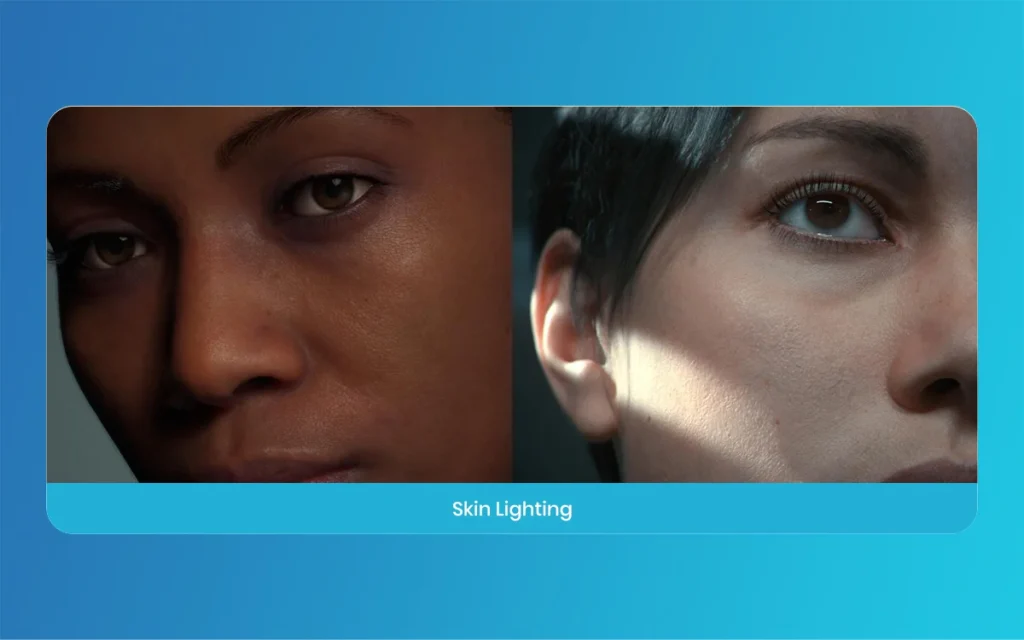
If you are lighting a human, or any creature with flesh, you must use Subsurface Scattering. This is a crucial secret for Lighting A Character in Unreal 5. In real life, human skin is not perfectly solid. When light hits your ear or your hand, a little bit of that light travels through the skin, glowing a soft pink or red color from the blood underneath. Subsurface Scattering simulates this exact effect in Unreal Engine.
When you set up your skin material correctly, your strong Basic Lights and Rim Lights will softly bleed into the skin, removing the harsh, plastic look. The edges of the shadows on the face will become slightly red and soft, making the character look warm and alive. Without this feature, your characters will always look like they are made of clay or hard stone, no matter how good your lights are.
Common Mistakes in Lighting A Character in Unreal 5
Instead of showing a standard table, we want to break down common lighting mistakes and their solutions into simple, easy to read points. When learning Lighting A Character in Unreal 5, it is very easy to fall into a few common traps.
By knowing what to avoid, you can save yourself hours of frustration. Here are the top mistakes we see beginners make, along with the quick solutions to fix them.
Flat Lighting: This happens when you only use one bright light pointing directly at the front of the character. It removes all shadows and makes the character look two dimensional. The solution is simple. Turn down the front light, introduce a rim light from behind, and place a soft fill light from the side to bring back the volume.
Overexposure: Sometimes artists want their character to be very visible, so they crank the light intensity way too high. This burns out the colors and hides the beautiful textures. The solution is to lower the light intensity and rely on contrast. Make the background darker so the character stands out, instead of just making the character blindingly bright.
Ignoring the Environment: A character lit with studio lights standing in a dark forest looks pasted in and fake. The solution is to use ambient sky lights and the new Lumen Lite system to ensure the environment colors bounce onto the character naturally.
Creepy Facial Shadows: If you place your main light pointing straight up from the floor, it creates unnatural shadows on the face, making the character look like they are telling a scary campfire story. The solution is to keep your main lights positioned slightly above the character, angling down, which matches how we see sunlight or ceiling lights in the real world.
Final
Lighting is truly an art form of its own. Mastering Lighting A Character in Unreal 5 takes practice, patience, and a lot of trial and error. But once you understand the basic three point setup, how to says textures, and how to use the incredible new 2026 features like MegaLights, your work will improve dramatically.
We hope these tips from our Morphic Studio artists help you on your creative ride. Do not be afraid to break the rules once you learn them. Experiment with colors, play with shadow angles, and always think of to use light to tell a compelling story. Keep practicing, and soon your 3D characters will look as though they can step right out of the screen and into the real world. Happy lighting, and keep creating amazing things in Unreal Engine!
Augmented Reality News: 7 Exclusive Breakthroughs for an Incredible Year | The Morphic Studio
Navigating the Latest Augmented Reality News Environment Welcome to another exciting deep dive into the statistical universe brought to you by The Morphic Studio. If you have been keeping up with tech headlines lately, you already know that statistical overlays and spatial computing are changing how we interact with our physical surroundings. The year 2026 […]
September 1, 2026
VR Horror Games: 13 Incredible Titles for a Brutal Scare – The Morphic Studio
Welcome to the ultimate guide for anyone looking to test their nerves inside a headset. When you strap a display to your face, flat screen rules no longer apply. VR Horror Games You are no longer watching a character run from danger on a distant monitor, because you are right there in the middle of […]
August 31, 2026
Meta Quest 4 Release Date: The Master Guide to 2026’s Most Incredible VR | The Morphic Studio
Virtual reality has traveled a long road over the last few years. We have moved from bulky, tethered headsets that needed expensive gaming computers to sleek, standalone machines that fit right inside a small travel backpack. If you follow immersive technology here at The Morphic Studio, you already know that Meta has been leading the […]