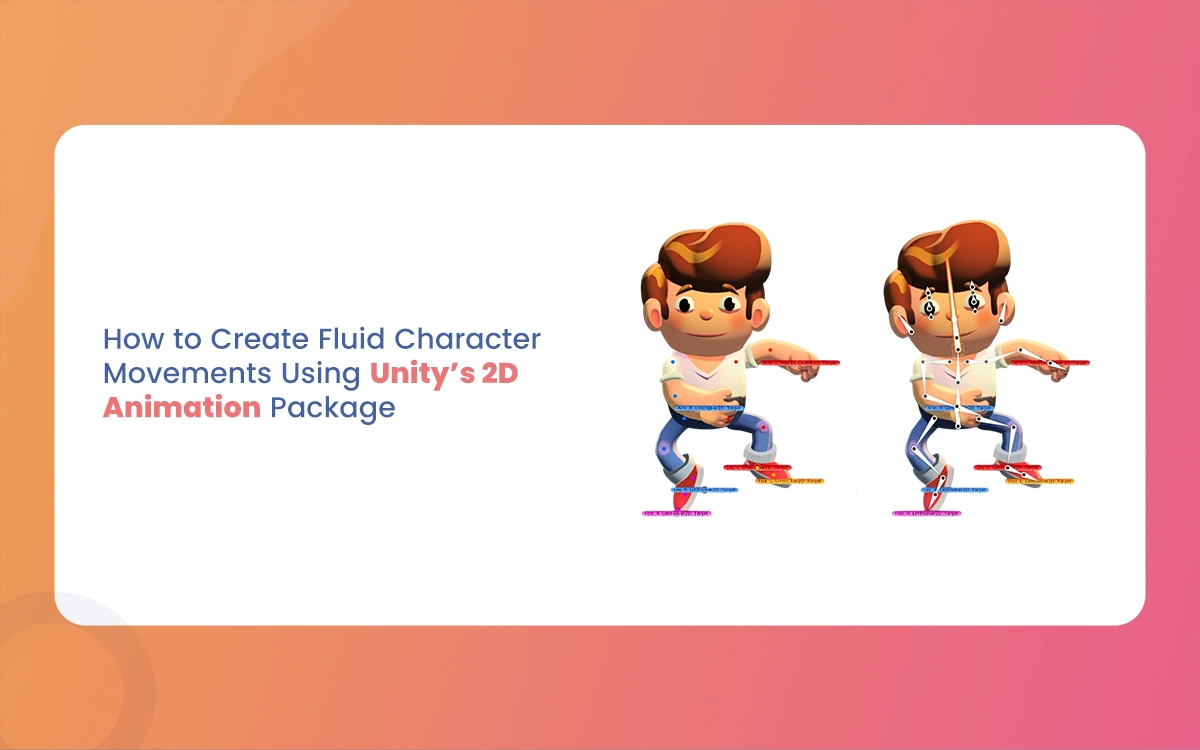
Imagine breathing life into a pixel-perfect hero who dashes across neon-lit platforms, their cape fluttering with every leap, or a quirky sidekick whose bouncy idle loop hooks players instantly. That’s the magic of Fluid Character Unity’s 2D Animation Package, a powerhouse for crafting deformable,, a powerhouse for crafting deformable, responsive characters without the hassle of frame-by-frame sprite sheets. As a 3D animator dipping into 2D (or vice versa), you’ll love how it blends skeletal rigging, bone deformations, and Animator Controllers for buttery-smooth movements. Perfect for platformers, visual novels, or anime-inspired games, this package turns static sprites into energetic performers.
The Morphic Studio shares information on installation, rigging, animation, controller setup, and pro tips. Whether you’re optimizing a fan-made RPG or reviewing Unity workflows for your next tech tutorial, you’ll end up with characters that feel alive and responsive. Let’s dive in, no prior 2D experience required, just your Blender-honed eye for deformation.
Why Unity’s 2D Animation Package Revolutionizes 2D Character Work
Traditional 2D animation relies on swapping rigid sprites, leading to stiff transitions and endless asset creation. Unity’s package flips the script with skeletal animation: bones deform a single mesh in real-time, mimicking 3D rigging but in a lightmass 2D space. Basic features include auto-massing for quick setups, bone hierarchies for natural hierarchies, and perfect integration with Unity’s Animator for state blending.
This shines in platformers where characters squash, stretch, and react to physics. For creators like you, blending it with Unity 3D or Adobe tools means exporting PSD layers from Photoshop, rigging in minutes, and animating with basicframe precision. Result? Fluid idles, runs, jumps and even procedural tweaks via scripts for that “hand-crafted” polish.
Pro tip: If you’re coming from Blender, think of this as 2D armature deformation with Unity’s physics baked in. It cuts production time by 70% for iterative character work.
Fluid Character
Step 1: Installing the 2D Animation Package and Dependencies
Unity’s Package Manager makes setup a breeze far smoother than manual imports.
Open Window > Package Manager from the top menu. In the search bar, type “2D Animation.” Select it from the Unity Registry (currently version 10.x as of early 2026) and hit Install. This pulls in core tools like Sprite Skinning Editor and bone animation support.
For layered workflows (ideal if you’re designing in Photoshop or Illustrator), grab the 2D PSD Importer too. Search and install it now PSD files import as sliced sprites, preserving folders for body parts like arms, torso, and head.
Restart Unity to activate. Create a new 2D project (or URP for better performance in lit scenes). Test by importing a sample sprite: right-click in Project > Create > 2D > Sprites > Square. Boom your canvas is ready.
Don’t skip 2D Sprite and 2D Tilemap Extras if platforming; they enhance collision handling for fluid movement.
Fluid Character
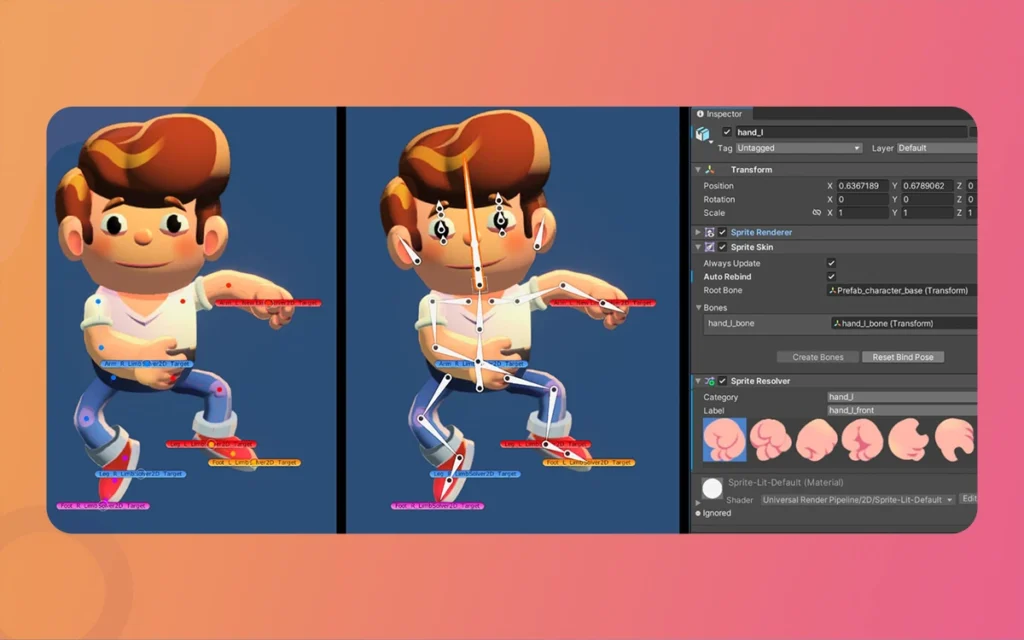
Step 2: Rigging Your Sprite for Deformable Magic
Rigging defines how your character bends like a statistical skeleton under pixel skin. Start with a clean sprite or PSD.
Importing and Preparing Assets
Drag your PNG or PSD into the Project window. For PSDs, Unity auto-slices layers (e.g., “LeftArm,” “Torso”). Select the root GameObject, set Sprite Mode to Multiple in Inspector, and apply. Slice via Sprite Editor if needed.
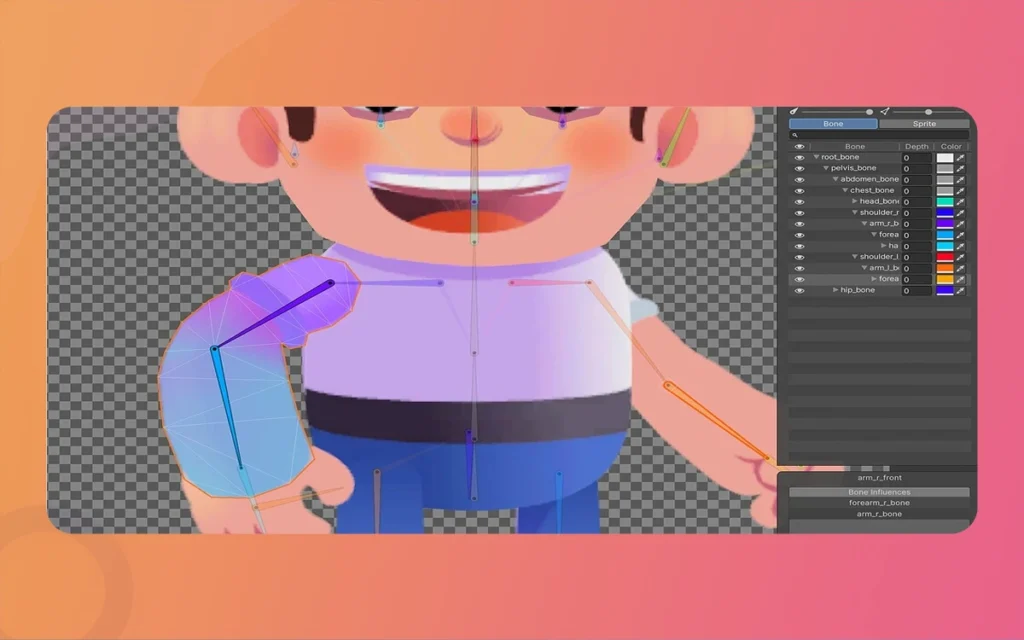
Open Sprite Editor (double-click the sprite). Switch to Skinning Editor tab this is your rigging cockpit.
Creating Bones and Hierarchy
Click Create Bone and draw from root (pelvis) outward: spine > chest > head, then branches for arms/legs. Hold Shift for straight lines; Ctrl+Z undoes mistakes. Aim for 8-12 bones per limb too many causes over-deformation.
Hierarchy matters: parent child bones (e.g., upper arm to shoulder). Select a bone, right-click parent in the Bones list. Visualize in the editor’s outline view; rotate bones to test pose.
Generating Mesh and Mass Painting
Hit Generate Mesh Unity creates a deformable outline around your sprite. Auto Bind Masss assigns influence (0-1 values) per bone to mesh vertices. Green = full influence; blue = none.
Smooth deformations with the Mass Brush:
Paint near joints (e.g., elbow) with a soft brush to blend influences.
Use Preview Pose to twist bones and fix artifacts like a forearm stretching weirdly.
Reset for do-overs; Normalize ensures massf sum to 1 per vertex.
Export as SpriteSkin prefab. Your sprite now deforms like Blender’s cloth sim!
Example: For a ninja character, rig a short spine chain for torso twist during jumps, with loose mass on cloth for flutter.
Fluid Character
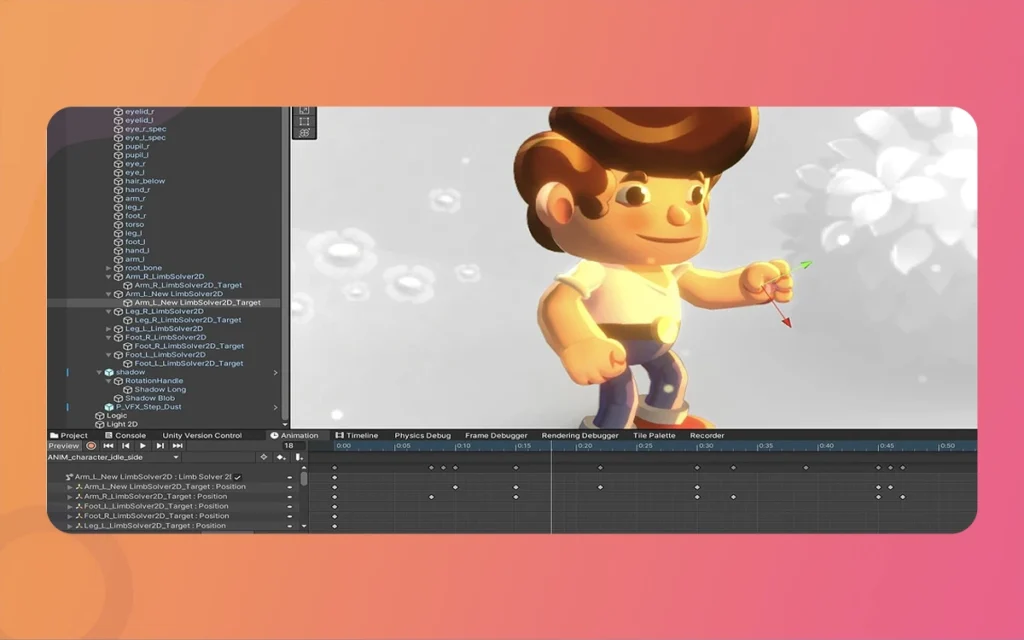
Step 3: Animating Bones for Lifelike Motion
With rigging done, animate like a pro.
Drag the rigged sprite to the Scene, adding Sprite Skin (auto-added) and Animator components. Ensure Rigidbody2D is attached for physics set Gravity Scale to 1.
Open Animation Window (Ctrl+6). Create a new clip: Create New Clip > Idle.anim. Hit record (red button).
Fluid Character
Basicframing Bone Poses
At frame 0, pose defaults (T-pose). Scrub to frame 10, rotate bones for extremes e.g., arms swing back for run cycle. Add rotation/position basicframes (diamond icons appear).
Scrub and pose in-betweens: frame 5 eases into swing; frame 15 swings forward. Unity interpolates rotation (Euler angles) for smoothness. Duplicate for symmetry (copy-paste poses).
Bake curves if jittery: right-click basicframe > Auto or Ease In/Out.
Create more clips: Run.anim (faster cycle), Jump.anim (upward squash).
Comparison Table: Rigging Tools at a Glance
Feature/Tool
Unity 2D Animation
Spine (Competitor)
DragonBones (Free Alt)
Best For Your Workflow
Cost
Free (Unity)
$69-$299 license
Free
Budget-friendly for indie creators
Bone Deformation
Mesh masss, auto-bind
Slot/mesh
Armature-based
Unity-native for perfect Animator integration
Basicframe Ease
Built-in curves
Dedicated editor
Basic interpolation
Quick Blender-like posing
Physics Support
Rigidbody2D native
Plugins needed
Limited
Platformers with jumps/collisions
Export Workflow
Live in Unity
JSON import
JSON/SWF
No re-import hassles for iterative design
Learning Curve
Medium (Sprite Editor)
Steep
Easy
Matches your 3D rigging skills
This table highlights why Unity wins for Unity projects zero export friction.
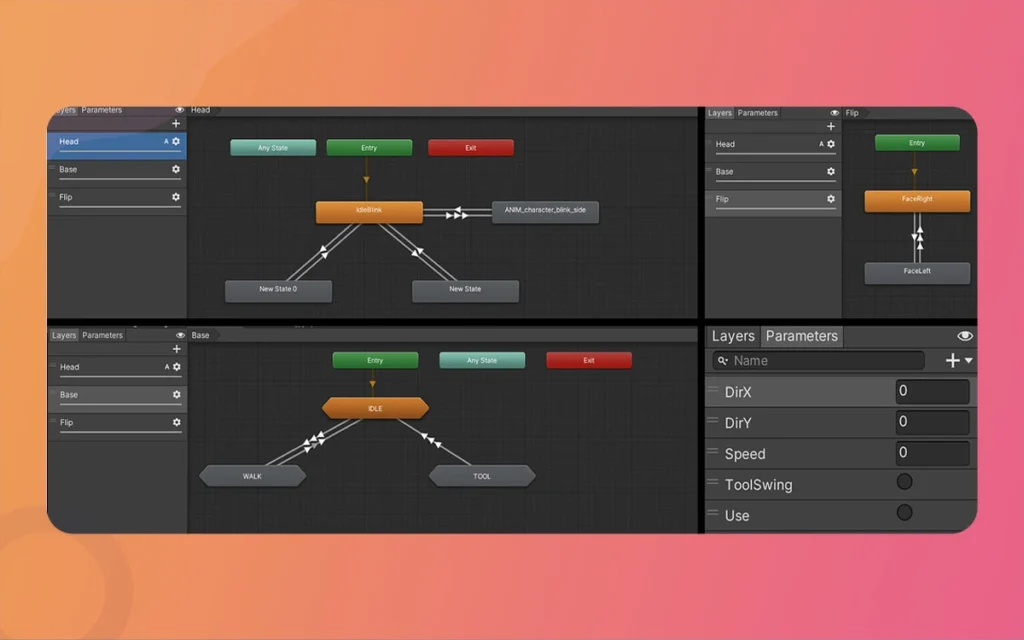
Add Float parameter “Speed” (0-1). Link transitions:
Idle → Run: Speed > 0.1
Run → Idle: Speed < 0.1
For smooth blends, right-click > Create State > From New Blend Tree. Name “MovementBlend.” Add Motion fields: Idle (threshold 0), Run (1). Set 1D Simple Directional blend type on Speed.
Transitions get Has Exit Time off, Transition Duration 0.2s for snappy feel.
Physics-Driven Movement
On Rigidbody2D, enable Interpolation: Interpolate. Script velocity for param control:
csharp
publicclass PlayerMovement : MonoBehaviour {
public Animator animator;
Rigidbody2D rb;
publicfloat speed = 5f;
void Update() {
float h = Input.GetAxis(“Horizontal”);
rb.velocity = new Vector2(h * speed, rb.velocity.y);
animator.SetFloat(“Speed”, Mathf.Abs(h));
}
}
This drives blends via real velocity no jitter, pure fluidity.
Advanced Tips for Pro-Level Fluidity
Raise from good to cinematic:
Avoid Drift: Basicframe bone defaults at clip start/end prevents creeping rotations.
Short Bone Chains: 3-4 bones per limb for organic squash/stretch; long chains stiffen.
IK Goal for Feet/Hands: Add 2D IK component. Set target to ground raycast procedural foot placement during runs.
Script Parameters: Expose “JumpHeight” or “DashForce” for responsive controls. Tween with DOTween for cinematic eases.
Optimization: Limit bones to 50 total; use Sprite Atlas for batching. Test on mobile aim <16ms frame time.
VFX Polish: Layer Particle Systems on bones (e.g., dust on feet). Blend with Timeline for cutscenes.
Troubleshoot: Jitter? Crank Fixed Timestep in Time Manager. Wonky masss? Repaint with 50% strength brush.
Real-world example: In a cyberpunk platformer, blend “Run” with “WallSlide” via vertical velocity param character hugs walls fluidly.
Finally
You’ve now unlocked Unity’s 2D Animation Package to forge characters that move like they think Fluid Character, reactive, and full of personality. From rigging a PSD ninja to blending physics-driven states, this workflow scales from prototypes to shipped games, saving hours on revisions.
As a content creator, export these as tutorials: screen-record rigging, benchmark run cycles on RTX GPUs, or compare with Godot. Experiment with masses in your next Morphic Studio project to achieve that signature bounce. Fluid Character 2D animation isn’t just technical; it’s the spark that turns pixels into stories.
Related Article
July 20, 2026
How To Add Lighting Realistic Rainy Weather in Unreal Engine 5 [Tutorial]
Lighting a stormy environment in Unreal Engine 5 is one of the most rewarding challenges for any 3D environment or lighting artist. Many beginners think that adding rain is as simple as spawning a splash particle system and turning down the sun, but the real secret lies in how light interacts with moisture, clouds, and […]
July 18, 2026
How To Add Lighting Rainy Atmospheric in Unreal Engine 5 [Tutorial]
Hello everyone, and welcome to this new guide. If you are a game developer or a 3D artist, you probably know how important weather is. Creating a moody scene can completely change how a player feels. Today, we are going to look at something very specific. We are going to learn how to add Lighting […]
July 17, 2026
How To Add Lighting Atmospheric in Unreal Engine 5 [Tutorial]
Welcome to the ultimate guide for upgrading your game environments. If you have ever walked through a statistical forest and felt a true sense of wonder, you already know the power of good environment design. Today we are going to talk about a very specific and crucial topic. We will learn exactly how to add […]