Animation has become an increasingly popular medium for storytelling, marketing, and creative expression. Whether you’re aspiring to create your animated short films, enhance presentations, or take a look at a new creative hobby, learning to Animate Props is an excellent starting point. Props form the foundation of many animated scenes, from simple bouncing balls to complex mechanical objects that bring stories to life.
Creating Animating Props might seem daunting at first, but with the right approach and tools, even complete beginners can master this skill. The Morphic Studio shares the information about starting Animating Props, from choosing your animation style to exporting your final creation.
Follow Animation Fundamentals
Before diving into the technical aspects, it’s crucial to understand what makes animation work. Animation is the illusion of movement created by displaying a series of static images in rapid succession. When these images show slight changes in position, scale, or other properties, our brains perceive continuous motion.
Props in animation serve various purposes: they can be the main focus of your scene, support characters in their actions, or add atmosphere to your environment. The basic of successful prop animation lies in Follow timing, spacing, and the basic principles of movement that make objects appear natural and believable on screen.
Choosing Your Animation Style
The first and most important decision you’ll make is selecting your animation style. Each approach has its advantages, learning curve, and creative possibilities.
2D Animation: The Classic Approach
2D animation involves creating movement in a flat, two-dimensional space. This traditional method offers excellent creative control and is often more forgiving for beginners. Popular software options include Adobe Animate, Krita (free), OpenToonz (free), and Synfig Studio (free).
In 2D animation, you’ll work with layers, creating each frame of your prop’s movement manually or using interpolation between basic frames. This style is perfect for cartoon-like effects, simple object animations, and stylized presentations. The learning curve is moderate, and you can achieve professional-looking results with practice.
3D Animation: Modern Versatility
3D animation allows you to create props with depth, realistic lighting, and complex movements. Blender stands out as the most popular free option, offering professional-grade features without cost. Other options include Cinema 4D, Maya, and beginner-friendly tools like iClone.
The advantage of 3D animation lies in its realism and the ability to view your props from any angle. Once you model a prop, you can animate it with sophisticated physics simulations, realistic lighting effects, and complex transformations. Regardless of how, 3D animation typically requires more technical knowledge and computer processing power.
Stop Motion: Physical Creativity
Stop motion involves photographing physical objects frame by frame, moving them slightly between each shot. This technique creates a unique, tactile quality that’s impossible to achieve with statistical methods. You can use everyday objects, clay figures, paper cutouts, or specially crafted props.
While stop motion requires patience and careful planning, it’s often the most accessible option for complete beginners since it requires minimal software knowledge. A smartphone camera and free stop motion apps are sufficient to get started.
Preparing Your Props
The preparation phase is crucial for successful animation, regardless of your chosen style. Proper planning and setup will save you countless hours of frustration later in the process.
Statistical Prop Creation
For statistical animation, start with simple geometric shapes before attempting complex designs. Draw your props with clean, distinct edges and consider how they’ll move throughout your animation. If you’re not confident in your drawing skills, don’t worry – simple shapes can be just as effective as detailed artwork.
When creating statistical props, think about their pivot points (the center of rotation), their size relative to other scene elements, and any special properties they might need. For example, if your prop needs to bend or deform, you’ll need to plan for that flexibility in your design.
Physical Props for Stop Motion
Physical prop creation opens up endless creative possibilities. Paper cutouts work well for flat, cartoon-style animations, while clay or plasticine allows for organic shapes and easy modifications between frames. LEGO bricks and other construction toys provide excellent structural stability for mechanical-looking props.
Consider the durability of your materials – you’ll be handling your props repeatedly throughout the animation process. Also, think about how visible your manipulation will be in the final animation. Sometimes, adding small handles or grip points that can be edited out later will make your animation process much smoother.
Animating Props By The Morphic Studio
Setting Up Your Animation Environment
Your workspace setup significantly impacts your animation quality and efficiency. For statistical animation, ensure you have adequate screen space to work with timelines, tool panels, and your main animation view simultaneously. Good lighting in your workspace reduces eye strain during long animation sessions.
For stop motion, consistency is basic. Set up your camera on a stable tripod, ensure consistent lighting (avoid windows where natural light changes), and mark your workspace boundaries. Many animators create small marks or grids to help maintain consistency between shots.
Mastering Basic framing Techniques
Basic framing forms the backbone of most animation techniques. A basic frame marks a specific point in time where you define your prop’s position, rotation, scale, or other properties. The animation software then interpolates (creates intermediate frames) between these basic frames to create smooth motion.
Basic framing Workflow
Start by placing your prop at its initial position and setting your first basic frame. Move forward in your timeline to where you want the next significant change to occur, adjust your prop’s properties, and set another basic frame. Continue this process throughout your animation.
The timing between basic frames dramatically affects the feel of your animation. Closely spaced basic frames create slow, detailed movement, while widely spaced basic frames produce quick, energetic motion. Experiment with different timing to achieve the desired effect.
Advanced Basic framing Concepts
As you become more comfortable with basic framing, take a look at concepts like ease-in and ease-out. These techniques make movements appear more natural by gradually accelerating from rest and decelerating to a stop, mimicking actual physics.
Many software packages offer graph editors that display your animation curves visually. These tools allow precise control over acceleration and deceleration, creating more sophisticated and realistic movements.
Animating Props By The Morphic Studio
Essential Animation Techniques
Looping Animations
Creating perfect loops is a valuable skill that makes your props appear to move continuously. The basic is make certain that your final frame closely matches your starting frame in position, rotation, and other properties. Many software packages offer specific tools to help create perfect loops.
Path Animation
Instead of manually setting basic frames for complex movements, path animation lets you draw the route your prop should follow. This technique is excellent for objects that need to follow curved or intricate paths, such as a paper airplane swooping through the air or a ball bouncing down stairs.
Transformation Effects
Further on than basic movement, animating scale, rotation, and opacity creates more energetic and engaging props. A spinning coin, a growing plant, or a fading ghost all use these transformation techniques to create compelling visual effects.
Physics-Based Animation
Many modern animation programs include physics simulation tools that can automatically animate props based on actual physics. Gravity, collision detection, and momentum can all be simulated, creating realistic interactions between props and their environment.
Software Suggest and Comparison
Software
Type
Cost
Best For
Learning Curve
Blender
3D
Free
Complete 3D animation suite
Steep
Krita
2D
Free
Hand-drawn animation
Moderate
Adobe Animate
2D
Subscription
Professional 2D animation
Moderate
OpenToonz
2D
Free
Traditional animation
Steep
iClone
3D
Paid
Beginner-friendly 3D
Easy
Stop Motion Studio
Stop Motion
Free/Paid
Mobile stop motion
Easy
Synfig Studio
2D
Free
Vector-based animation
Moderate
DaVinci Resolve
Post-production
Free
Video editing with animation
Moderate
Practical Example: Animating a Bouncing Ball
Let’s walk through creating a classic bouncing ball animation, which teaches fundamental animation principles while remaining simple enough for beginners.
Step-by-Step Process
Begin by creating a simple circle shape in your chosen software. Position it at the top left of your screen and set your first basic frame. The ball should be slightly stretched vertically to show anticipation before the fall.
Move forward in your timeline and position the ball at the bottom of its arc. Here, stretch the ball horizontally and compress it vertically to show the impact and deformation. This squash-and-stretch principle is fundamental to convincing animation.
Continue the sequence by positioning the ball at various points along its bouncing path, each time adjusting its shape to reflect the physics of impact and recovery. As the ball loses energy with each bounce, make subsequent bounces lower and closer together.
Adding Realism
To make your bouncing ball more convincing, consider factors like air resistance, surface friction, and gravitational acceleration. Real balls don’t bounce at perfectly consistent intervals – they slow down over time and eventually come to rest.
Animating Props By The Morphic Studio
Troubleshooting Common Issues
New animators often encounter specific challenges that can be frustrating but are easily overcome with the right knowledge.
Timing Problems
If your animation feels too fast or too slow, adjust the spacing between your basic frames rather than adding more frames. Sometimes, fewer, well-placed basic frames create better results than many closely spaced ones.
Jerky Movement
Abrupt, unnatural movement usually results from inconsistent spacing between basic frames or improper easing curves. Review your basic frame placement and consider adding intermediate basic frames to smooth out problematic sections.
Technical Difficulties
Software crashes, missing files, and corrupted projects are unfortunately common in animation work. Save your work frequently, maintain backup copies, and learn your software’s recovery features before you need them.
Workflow Optimization Tips
Planning and Storyboarding
Before starting any animation, sketch out your ideas on paper or create simple storyboards. This planning phase helps you visualize the entire sequence and identify potential problems before investing time in detailed animation work.
Reference and Inspiration
Study actual movements and existing animations to understand how objects naturally move. Video reference, slow-motion footage, and physics demonstrations can all provide valuable awareness for your animations.
Organization and File Management
Maintain organized project files with clear naming conventions. As your projects become more complex, good organization becomes essential for efficiency and sanity.
Animating Props By The Morphic Studio
Building Your Skills Progressively
Start Simple, Build Complexity
Begin with basic shapes and simple movements before attempting complex props or intricate animations. Master the fundamentals thoroughly before moving on to advanced techniques.
Practice Regularly
Animation skills develop through consistent practice. Set aside regular time for animation work, even if it’s just 15-30 minutes per day. Short, frequent sessions often produce better learning results than occasional long sessions.
Learn from Others
Join networked animation communities, watch tutorials, and study the work of professional animators. The animation community is generally supportive and willing to share knowledge with newcomers.
Future Development Paths
As your skills improve, consider specializing in specific areas that interest you most. Character animation, effects animation, and technical animation all offer different challenges and course opportunities.
Advanced topics to take a look at include rigging (creating control systems for complex objects), scripting and automation, advanced physics simulation, and integration with other software tools for complete production pipelines.
Animating Props By The Morphic Studio
Finally
Creating Animating Props as a beginner is an exciting ride that combines technical skills with creative expression. While the learning curve can seem steep initially, the fundamental concepts are accessible to anyone willing to practice and experiment.
Think of that every professional animator started as a beginner, making mistakes and learning through experimentation. Don’t be discouraged by initial difficulties – they’re a normal part of the learning process. Focus on mastering basic techniques before moving on to more complex projects.
The basis of success lies in consistent practice, patience with yourself, and willingness to learn from both successes and failures. Start with simple projects, use the suggested tools and techniques defined in this guide, and gradually build your skills over time.
Whether you choose 2D statistical animation, 3D modelling and animation, or hands-on stop motion, the principles and techniques covered in this guide will serve as a solid foundation for your animation ride. The most important step is to begin – pick up your tools, create your first simple prop, and start animating. Your future self will thank you for taking that first step into the wonderful world of animation.
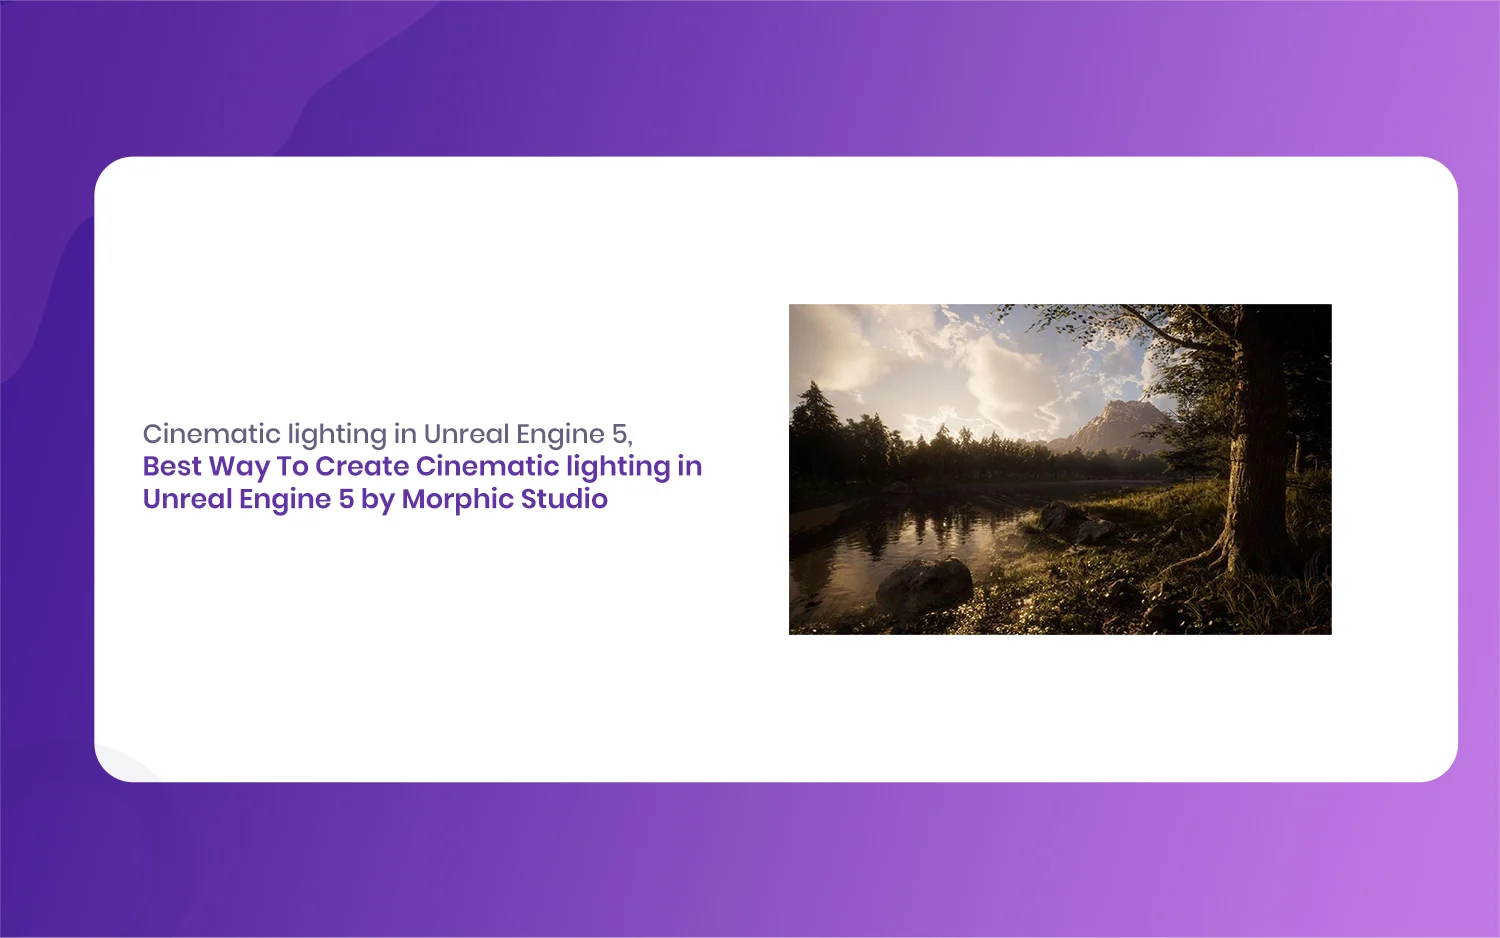
Best Way To Create Cinematic lighting in Unreal Engine 5 by Morphic Studio [Tutorial]
The Magic of Cinematic lighting in Unreal Engine 5 Have you ever looked at a beautifully rendered game or a virtual film set and wondered how they make it look so incredibly real? Well, the answer almost always comes down to the lighting. Today, we are going to take a look at the magic of […]
July 20, 2026
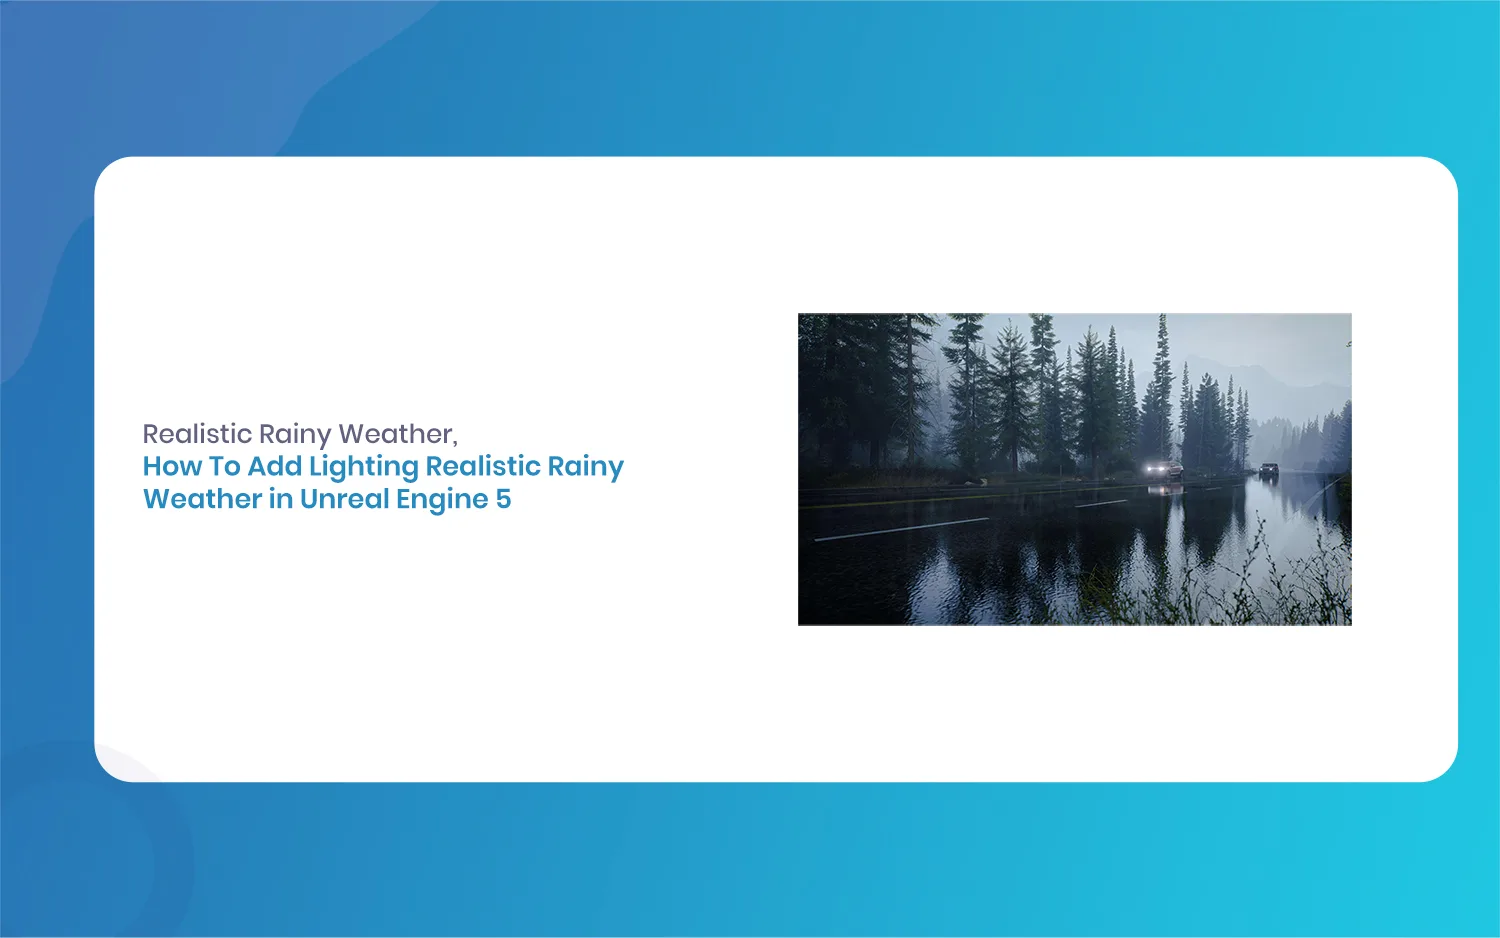
How To Add Lighting Realistic Rainy Weather in Unreal Engine 5 [Tutorial]
Lighting a stormy environment in Unreal Engine 5 is one of the most rewarding challenges for any 3D environment or lighting artist. Many beginners think that adding rain is as simple as spawning a splash particle system and turning down the sun, but the real secret lies in how light interacts with moisture, clouds, and […]
July 18, 2026
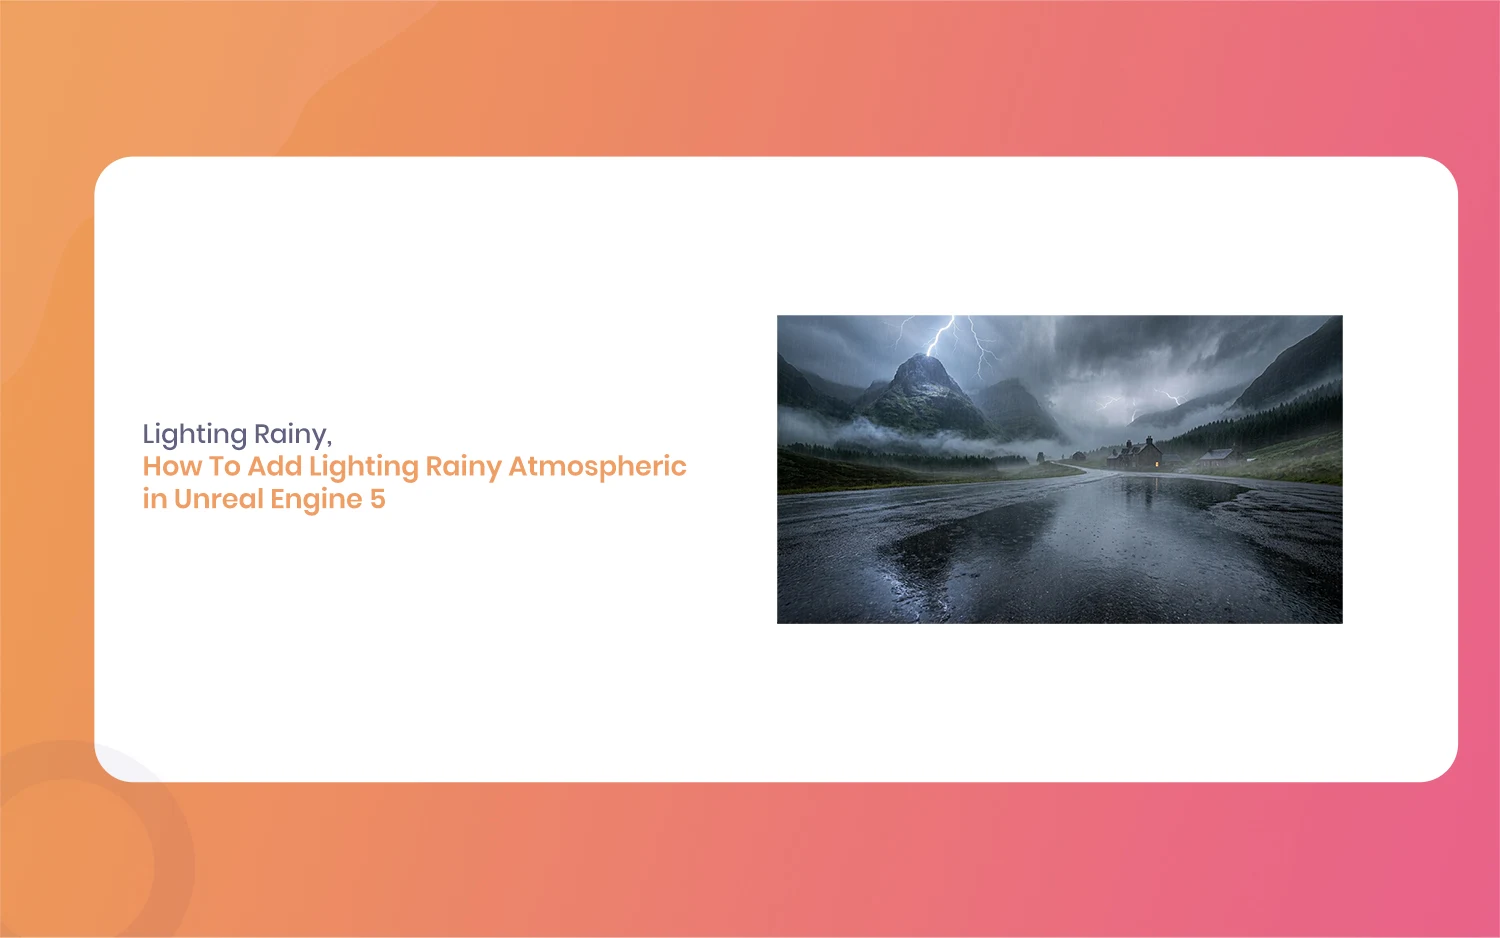
How To Add Lighting Rainy Atmospheric in Unreal Engine 5 [Tutorial]
Hello everyone, and welcome to this new guide. If you are a game developer or a 3D artist, you probably know how important weather is. Creating a moody scene can completely change how a player feels. Today, we are going to look at something very specific. We are going to learn how to add Lighting […]