Speedsculpt has become an increasingly popular technique in the 3D art community, offering artists the opportunity to create compelling scenes quickly while focusing on gesture, composition, and general impact rather than minute details. Creating a Speedsculpt that combines organic characters like a girl and a duck with energetic environmental elements such as soap bubbles presents a unique challenge that balances character work with atmospheric storytelling.
The Morphic Studio shares information about the process of creating an engaging Speedsculpt scene in Blender, from initial concept blocking to final rendering. Whether you’re a beginner looking to improve your sculpting skills or an experienced artist wanting to take a look at new creative approaches, this tutorial will provide you with the tools and techniques needed to bring your vision to life.
Follow Speedsculpting Fundamentals
What Makes Speedsculpting Effective
Speedsculpting is fundamentally about capturing the essence of a subject quickly and efficiently. Unlike traditional detailed sculpting, which can take hours or days to complete, speedsculpting emphasizes gesture, form, and general composition over intricate details. The basic to successful speed sculpting lies in Following what elements are essential to convey your story and what can be simplified or implied.
When working with multiple elements like characters and environmental effects, the challenge becomes maintaining visual coherence while managing your time effectively. The combination of a girl, duck, and soap bubbles creates opportunities for narrative storytelling through pose, interaction, and atmospheric effects.
Essential Blender Tools for Speedsculpt
Before diving into the creation process, it’s essential to familiarize yourself with Blender’s sculpting arsenal. The primary tools you’ll be using include the Grab brush for significant form adjustments, the Standard brush for adding and removing material, the Smooth brush for refining surfaces, and the Inflate brush for adding volume. Following how to switch between these tools and adjust their settings quickly will significantly impact your workflow efficiency.
Energetic topology (Dyntopo) and Remesh are crucial features that allow you to maintain workable geometry as you sculpt. These tools automatically adjust your mesh resolution, making certain you always have enough detail where you need it without bogging down your system with unnecessary geometry.
Speedsculpt By The Morphic Studio
Scene Setup and Composition Planning
Establishing Your Canvas
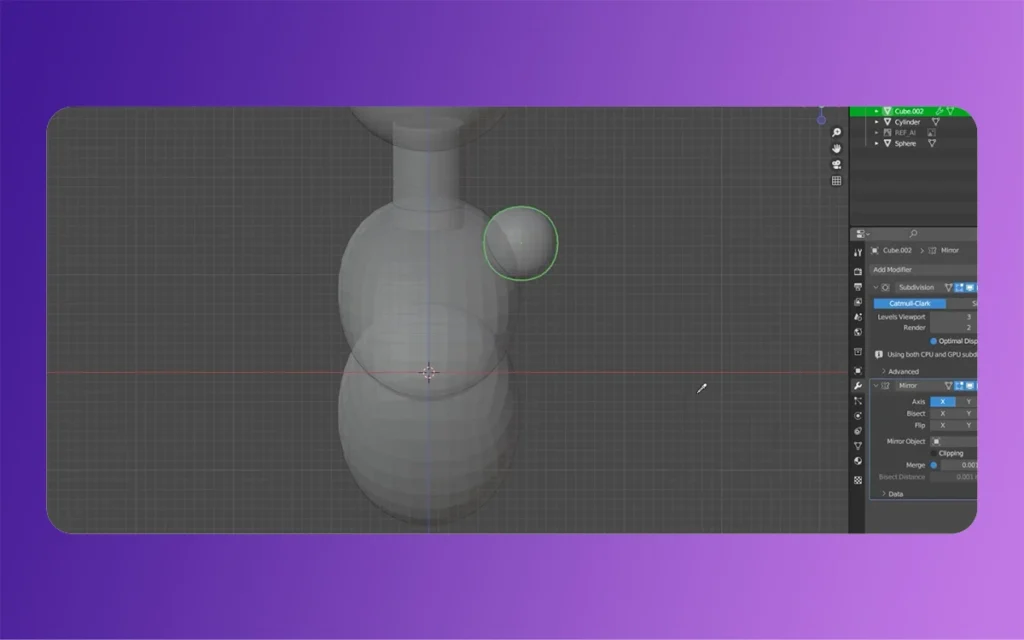
Begin your speedsculpt by opening a fresh Blender project and immediately thinking about composition. The arrangement of your three main elements—the girl, duck, and soap bubbles—will determine the success of your final piece. Start by deleting the default cube and replacing it with basic primitive shapes that represent your main subjects.
Use a sphere to roughly indicate where the girl’s head will be, a cube or cylinder for her torso, and additional primitives to block out her limbs. For the duck, a single sphere can represent the body initially, with a smaller sphere for the head. This blocking phase is crucial because it allows you to experiment with different arrangements and proportions before committing to detailed sculpting.
Creating Visual Flow and Narrative
The placement of soap bubbles should create a visual flow throughout your composition. Consider how bubbles naturally behave—they float upward, cluster together, and vary in size. Use this natural behavior to guide the viewer’s eye through your scene. Perhaps the girl is blowing bubbles that the duck is playfully chasing, or maybe the bubbles are surrounding both characters in a magical, dreamlike setting.
Think about the emotional story you want to tell. Is this a moment of joy and wonder? A peaceful interaction between friends? The positioning of your characters and the density and placement of your bubbles should support this narrative.
Character Sculpting Techniques
Sculpting the Girl Character
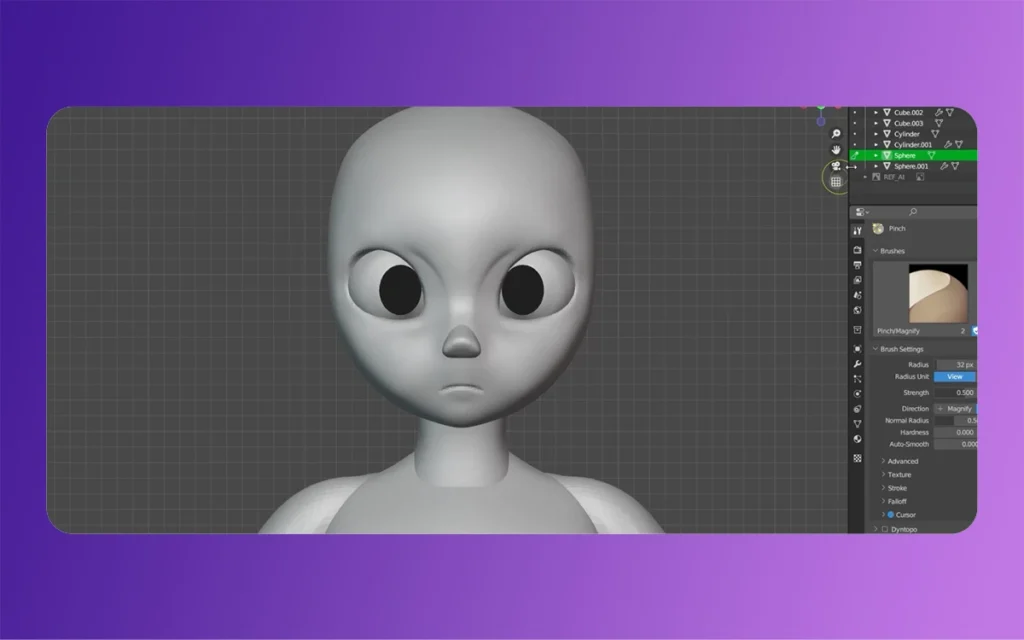
When beginning to sculpt the girl, think that speedsculpting prioritizes gesture and personality over anatomical perfection. Please start with the largest forms and gradually refine them to more minor details. Begin by converting your blocking sphere into a sculpting object by adding a Subdivision Surface modifier and switching to Sculpt mode.
Focus first on establishing the basic head shape using the Grab brush to pull and adjust the general form. The standard brush can add volume to the definition of the cheeks, forehead, and chin. Don’t get caught up in detailed facial features immediately—instead, focus on the general proportions and the angle of the head, which will convey much of the character’s personality and emotional state.
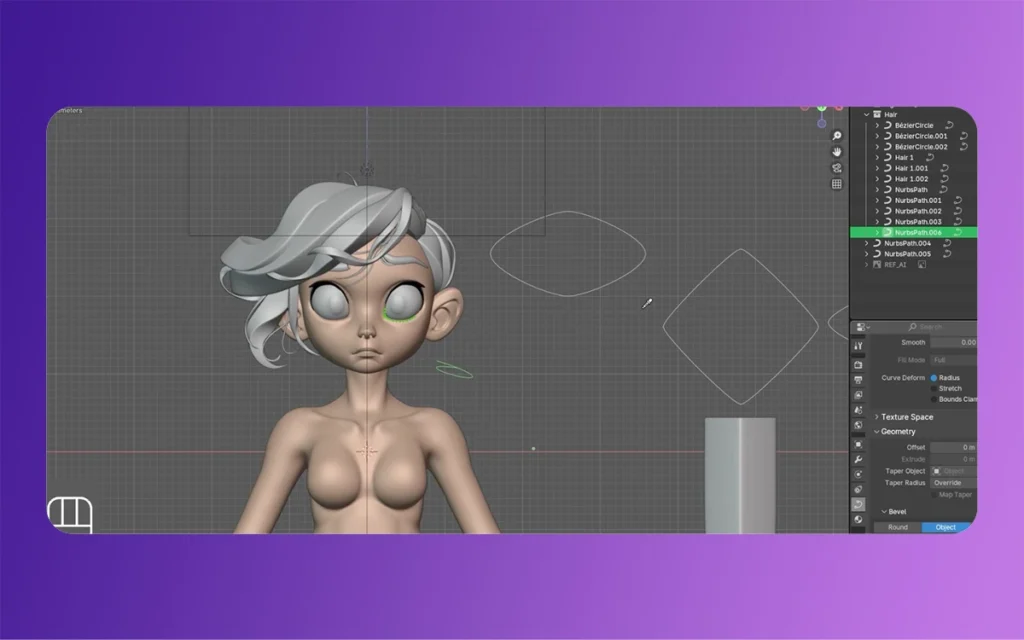
For the body, maintain simple, readable forms. The girl’s pose should clearly communicate her interaction with the environment. If she’s blowing bubbles, her lips should be pursed, and her body language should suggest the gentle breath needed to create bubbles. If she’s watching the duck, her posture should show attention and engagement.
Speedsculpt By The Morphic Studio
Crafting the Duck Character
The duck presents an interesting challenge because it requires capturing the essence of the animal quickly while maintaining charm and character. Start with your sphere primitive and use the Grab brush to elongate it into a more duck-like body shape. Ducks have relatively simple but distinctive silhouettes—an oval body, rounded head, and prominent bill.
Please pay special attention to the duck’s posture and what it’s doing in the scene. Is it swimming, waddling, or sitting? The duck’s body language should complement the girl’s actions and contribute to the general narrative. Use the Inflate brush to add subtle volume variations that suggest feathers and natural duck anatomy without getting bogged down in detail.
The duck’s bill is significant for conveying character. A slightly upturned bill can suggest contentment or curiosity, while different angles can imply various emotions or actions.
Maintaining Proportional Connections
Throughout the sculpting process, regularly step back and assess the proportional connections between your characters. In speedsculpting, these connections are more important than individual accuracy. The girl and duck should feel like they belong in the same world and scale appropriately to each other and to the soap bubbles you’ll be adding.
Creating Energetic Soap Bubbles
Modeling Bubble Geometry
Soap bubbles add a magical, ephemeral quality to your scene, but they require careful consideration to avoid overwhelming your composition. Start by adding several sphere primitives of varying sizes throughout your scene. The basic to believable bubble placement follows that bubbles rarely exist in isolation—they often cluster together, with smaller bubbles orbiting larger ones.
Vary the sizes significantly to create visual interest. Include some tiny bubbles that can fill gaps in your composition and several medium to large bubbles that can serve as focal points. The enormous bubbles should be positioned to support your main narrative elements rather than compete with them.
Strategic Bubble Placement
Consider the physics of soap bubbles when placing them. They float upward, so your arrangement should reflect this natural movement. Regardless of how, don’t make the mistake of creating a perfectly vertical line of bubbles—real bubble movement is influenced by air currents and interactions with other bubbles, creating more organic, flowing patterns.
Use bubbles to create depth in your scene by placing some in the foreground, middle ground, and background. This layering effect will enhance the three-dimensional quality of your composition and draw viewers into the scene.
Speedsculpt By The Morphic Studio
Advanced Material Creation for Soap Bubbles
Follow Soap Bubble Physics
Creating convincing soap bubble materials requires Following how light interacts with these thin-walled, transparent spheres. Soap bubbles exhibit several optical phenomena: they’re transparent, allowing light to pass through; they’re reflective, showing distorted images of their environment; and most characteristically, they display iridescence—the rainbow colors that shift based on viewing angle and lighting.
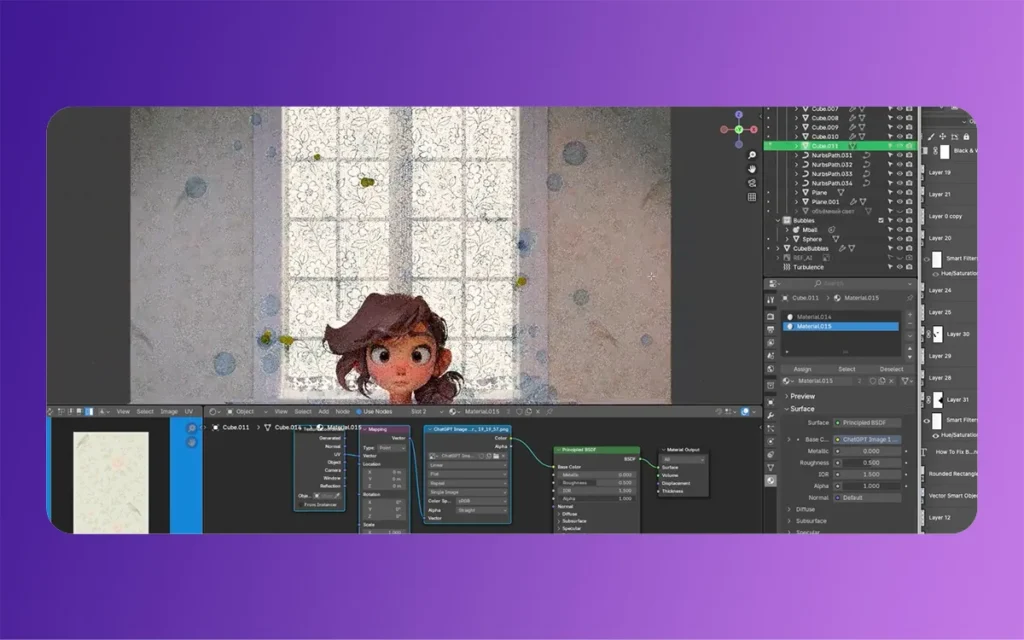
Building the Procedural Material
In Blender’s Shader Editor, create a material that captures these complex optical properties. Start with a base combination of Glass BSDF and Transparent BSDF shaders, mixed to create the fundamental transparency and refraction of the bubble wall.
The iridescent effect requires more sophisticated node work. Use a Noise Texture to create subtle variations across the bubble surface, then feed this into a ColorRamp node set to HSL (Hue, Saturation, Lightness) mode. This setup allows you to create smooth color transitions that mimic the natural interference patterns seen in real soap bubbles.
Layer Mass nodes are crucial for controlling how these effects appear based on the viewing angle. The Fresnel output can control the mix between transparency and reflection. In contrast, the Facing output can influence where the iridescent colors appear most strongly—typically around the edges of the bubble when viewed at oblique angles.
Fine-Tuning Material Properties
Adjust the roughness values to control how sharp or diffuse the reflections appear. Real soap bubbles have very smooth surfaces, so keep roughness values low. The IOR (Index of Refraction) should be set to approximately 1.33, which is close to that of water since soap bubbles are essentially skinny water films.
Experiment with different noise scales and color ramp configurations to achieve the most convincing iridescent effect. The colors should transition smoothly from deep purples and blues through greens and yellows to warm oranges and reds, mimicking the natural spectrum produced by thin-film interference.
Speedsculpt By The Morphic Studio
Lighting and Atmospheric Setup
Creating Compelling Illumination
Lighting plays a crucial role in selling the reality of your soap bubbles and bringing life to your characters. Soap bubbles are particularly dependent on good lighting to showcase their transparency and iridescent properties. Start with an intense basic light positioned to create clear says on your bubbles while providing good illumination for your characters.
An HDRI environment can provide natural-looking reflections and secondary lighting that enhances the general believability of your scene. Choose an HDRI that complements your scene’s mood—a bright outdoor environment for a cheerful, sunny feel or a softer indoor setting for a more intimate atmosphere.
Balancing Multiple Elements
The challenge in lighting this type of scene is to make sure that all three main elements—girl, duck, and bubbles—read clearly without any single element dominating through inappropriate lighting. Your characters need enough light to show their forms and expressions clearly, while the bubbles need sufficient illumination to display their material properties effectively.
Consider adding subtle rim lighting to help separate your characters from the background and create more dimensional modeling. This can be achieved with additional area lights positioned behind and to the side of your subjects.
Rendering Considerations and Optimization
Choosing the Right Render Engine
For this type of scene, the Cycles rendering engine is typically the best choice due to its superior handling of complex materials like glass and transparency. The ray-tracing capabilities of Cycles will accurately capture the refractions and reflections that make soap bubbles convincing.
Regardless of how slow cycles can be compared to alternatives like Eevee, consider your time constraints when speed sculpting. If you’re working under tight time pressure, Eevee can provide acceptable results with proper setup, though you may need to fake some of the more complex optical effects.
Sample and Performance Settings
Balance render quality with speed by adjusting your sampling settings appropriately. For speedsculpting, you don’t need maximum quality—focus on getting clean, noise-free results that showcase your work effectively. Denoising features are used to clean up any remaining noise at lower sample counts.
Consider rendering at a slightly lower resolution during your work process and only rendering at full resolution for your final output. This approach allows for quicker iteration and refinement of your lighting and materials.
Speedsculpt By The Morphic Studio
Workflow Optimization and Time Management
Efficient Sculpting Practices
Successful speedsculpting requires disciplined time management and efficient workflows. Set specific time limits for each phase of your work—perhaps 20 minutes for blocking, 40 minutes for character sculpting, 15 minutes for bubble creation, 20 minutes for materials, and 15 minutes for lighting and rendering.
Use Blender’s sculpting shortcuts extensively to maintain momentum. Learn to quickly switch between brushes, adjust brush sizes with hot basic, and use symmetry options when appropriate. The less time you spend navigating menus, the more time you can dedicate to actual creative work.
Iterative Refinement Strategy
Approach your speedsculpt as a series of refinement passes rather than trying to perfect each element before moving to the next. Complete a rough version of your entire scene first, then make refinement passes that improve all elements simultaneously. This approach ensures that your final result feels cohesive and balanced.
Final Polish and Presentation
Adding Environmental Context
Even in speedsculpting, a simple background or ground plane can significantly enhance the presentation of your work. This doesn’t need to be complex—a simple gradient background or basic ground surface can provide context and help anchor your characters in space.
Consider adding subtle atmospheric effects like slight haze or depth-of-field blur to enhance the dreamlike quality that soap bubbles naturally evoke. These effects can be achieved during rendering or through simple post-processing.
Composition and Framing
The final camera angle and framing are crucial for presenting your speedsculpt effectively. Experiment with different viewpoints to find the angle that best showcases the interaction between your characters and emphasizes the magical quality of the soap bubbles.
Consider the rule of thirds and other compositional guidelines, but don’t be afraid to break them if it serves your artistic vision. The goal is to create an image that draws viewers in and tells your story effectively.
Technical Reference Table
Phase
Primary Tools
Basic Techniques
Time Allocation
Scene Blocking
Primitives, Transform Tools
Composition planning, scale establishment
15-20 minutes
Character Sculpting
Grab, Standard, Smooth brushes, Dyntopo
Gesture capture, form definition
30-40 minutes
Bubble Creation
Sphere primitives, Array modifier
Strategic placement, size variation
10-15 minutes
Material Development
Shader Editor, Noise Texture, ColorRamp
Procedural iridescence, transparency
20-25 minutes
Lighting Setup
Area lights, HDRI, Light settings
Basic/fill/rim lighting, atmosphere
15-20 minutes
Rendering & Polish
Cycles engine, Camera tools
Final framing, render optimization
10-15 minutes
Advanced Tips for Enhanced Results
Particle System Integration
For more complex bubble arrangements, consider using Blender’s particle systems to generate bubble distributions automatically. This can save time while creating more natural, randomized arrangements that would be difficult to achieve manually.
Set up a particle system with your bubble object as the instance, then use force fields or turbulence to create more energetic, flowing arrangements. This approach works particularly well for background bubbles that add atmosphere without requiring individual attention.
Color Theory and Mood
Consider the general color palette of your scene and how the iridescent bubbles will interact with it. Warm lighting will emphasize the red and orange portions of the bubble spectrum, while cool lighting will bring out blues and purples. Use this knowledge to support the emotional tone of your piece.
Post-Processing Considerations
While speedsculpting typically focuses on getting strong results directly from the 3D software, don’t overlook the potential for simple post-processing to enhance your final image. Basic adjustments to contrast, saturation, and color balance can significantly improve the impact of your work without requiring additional modeling or texturing time.
Speedsculpt By The Morphic Studio
Finally
Creating a Speedsculpt featuring a girl, duck, and soap bubbles represents an excellent exercise in balancing character work with environmental storytelling. The combination challenges artists to work efficiently while managing multiple elements that each require different technical approaches—organic sculpting for the characters and procedural material work for the bubbles.
The basis for success lies in maintaining focus on the general narrative and emotional impact while resisting the urge to get lost in unnecessary details. Soap bubbles, with their inherent magic and whimsy, provide the perfect atmospheric element to tie together character interactions and create scenes that feel both grounded and fantastical.
Through practice with projects like this, artists develop crucial skills in time management, workflow optimization, and creative problem-solving that apply far further than speed sculpting. The techniques learned in creating convincing soap bubble materials, for instance, translate directly to other transparent and reflective materials in more complex projects.
Most importantly, this type of Speedsculpting exercise encourages artists to think cinematically about their work—considering not just individual elements but how they work together to tell a story and evoke emotion. Whether you’re working on character concepts, environment sketches, or complete scenes, the principles of efficient workflow and cohesive storytelling developed through Speedsculpting will enhance every aspect of your 3D artistry.
The magic of combining traditional character sculpting with energetic environmental elements like soap bubbles lies in the contrast between the solid, grounded characters and the ephemeral, floating bubbles. This juxtaposition creates visual tension and interest that engages viewers and invites them to imagine the story further on than the single captured moment.
As you continue to develop your Speedsculpting skills, think that each project is an opportunity to push your technical abilities while exploring new creative territories. The girl, duck, and soap bubbles scene is just one example of how seemingly simple elements can combine to create compelling, narrative-rich artwork that showcases both technical skill and artistic vision.
Logo design company in Ahmedabad: 7 Proven Secrets to Elevate Your Brand, The Morphic Studio
Welcome to the fast paced world of statistical branding. As we move deeper into 2026, the market in Gujarat has become extremely competitive. If you are starting a business or trying to rebrand, you probably realize how hard it is to stand out from the crowd. This is exactly where a professional Logo design company […]
June 22, 2026
Why Choose a Graphic Design Agency Near You
Welcome to the visual revolution of 2026. At The Morphic Studio, we understand that building a brand in today’s fast paced world can feel completely overwhelming. Attention spans are shrinking rapidly, and the competition is only getting louder every single day. That is exactly why simply having a nice logo is no longer enough to […]
June 17, 2026
Graphic Design Studio: The #1 Unrivaled Choice for Magnificent Visuals | The Morphic Studio
Welcome to the visual revolution of 2026, everyone is scrolling at lightning speed, and your business has less than two seconds to make an impression. If your graphics look outdated, your audience will skip right past you, plain and simple. That is why choosing a top tier Graphic Design Studio is no longer just a […]