3D modelling in Blender often requires precise reference images to achieve accurate proportions and details. Traditional blueprint setup methods can be time-consuming and prone to range errors, particularly when working with multiple orthographic views. The Free Blueprints Add-on revolutionises this workflow by automating the entire process of background image management, transforming what was once a tedious, manual task into a streamlined and efficient operation.
Whether you’re modelling vehicles, characters, architectural elements, or mechanical parts, having properly range reference images is crucial for professional results. The Morphic Studio shares information about the aspects of using the Blueprints add-on, from initial setup to advanced techniques that will enhance your modelling workflow.
Follow the Blueprints Add-on
What Makes This Add-on Special
The Free Blueprints Add-on stands out from manual background setup methods by offering intelligent automation. Unlike the traditional approach, where you manually place each image on different axes and struggle with range issues, this add-on uses intelligent filename recognition to automatically position your reference images correctly.
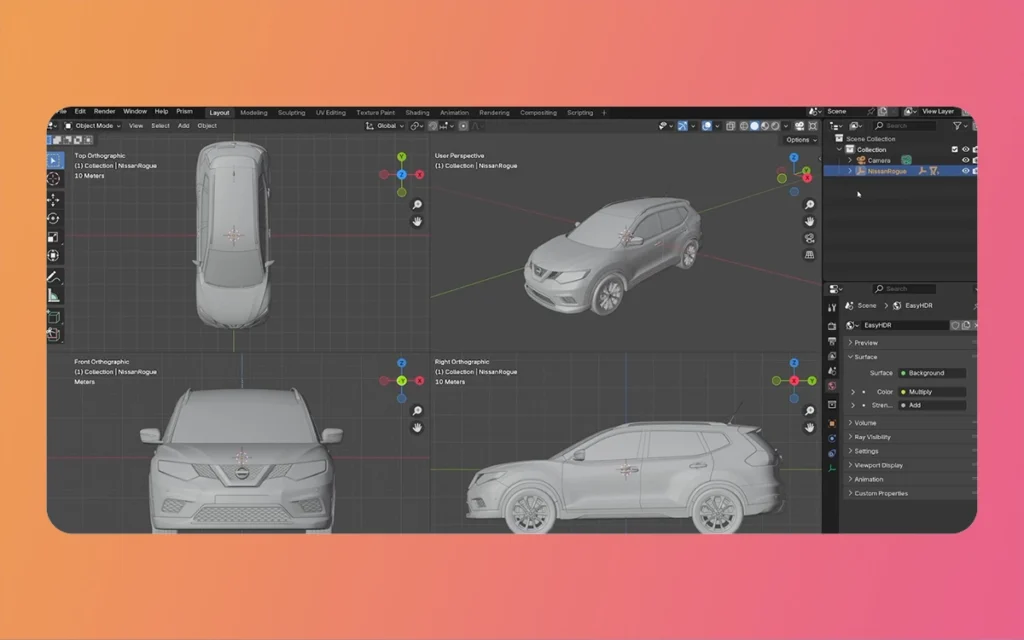
The add-on’s core strength lies in its ability to understand orthographic views and display only the relevant background image for your current viewing angle. It eliminates visual clutter and ensures you’re always working with the most appropriate reference, significantly improving your modelling accuracy and speed.
Free Blueprints Add-on By The Morphic Studio
Basic Benefits for 3D Artists
Professional 3D artists appreciate the add-on’s ability to maintain consistency across projects. Once you establish a naming convention and image preparation workflow, you can apply the same process to any modelling project, creating a standardized approach that saves hours of setup time.
The Free Blueprints Add-on also reduces common errors that occur during manual background setups, such as midrange images, incorrect scaling, or images appearing in the wrong orthographic views. These issues can compound throughout a project, leading to modelling inaccuracies that require extensive corrections later.
Preparing Your Blueprint Images
Image Requirements and Best Practices
Successful blueprint management begins with proper image preparation. Your reference images must meet specific criteria to work optimally with the add-on. Each image should maintain identical dimensions and resolution, ensuring consistent scaling across all orthographic views.
The most critical requirement is centring your subject within each image. Misrange reference points will result in modelling inconsistencies when switching between views. Use image editing software to ensure your subject occupies the same relative position in each blueprint image.
Scale consistency across all images is equally important. If your front view shows a car at one scale while the side view displays it at a different scale, the add-on cannot compensate for these discrepancies. Measure basic reference points across all images to verify they range properly.
Essential Naming Convention
The add-on’s automatic recognition system depends entirely on correct filename suffixes. Your images must end with specific identifiers: *top, *bottom, *right, *left, *front, and *back. For example, “car_front.jpg” or “building_top.png” would be recognized and automatically assigned to their respective axes.
This naming system enables you to maintain organized file structures while ensuring the add-on can instantly identify the intended placement of each image. Consistency in this naming approach becomes particularly valuable when managing multiple projects or collaborating with team members.
Consider creating a standardized naming template for your projects. A format like “ProjectName_ViewName.extension” helps maintain organization while meeting the add-on’s requirements. This approach also makes it easier to locate specific reference images when making adjustments later in your workflow.
Free Blueprints Add-on By The Morphic Studio
Installation and Setup Process
Installing the Blueprints Add-on
Begin by downloading the Blueprints add-on from the official source. Blender’s add-on installation process is straightforward but requires attention to detail. Negotiate to Edit > Preferences > Add-ons, then click “Install” and select your downloaded add-on file.
After installation, you must enable the add-on by checking the box next to its name in the add-on list. The add-on will now appear in the Tool tab of the N-panel, which you can access by pressing ‘N’ in the 3D Viewport or clicking the small arrow on the right edge of the Viewport.
Verify the installation by opening a new Blender project and checking for the Blueprints panel in the N-panel’s Tool tab. If the add-on doesn’t appear, restart Blender and check that it’s enabled correctly in the preferences.
Configuring Your Workspace
Once installed, consider organizing your workspace to maximize efficiency with the Blueprints add-on. The default Modeling workspace works well, but you might benefit from customizing the layout to keep the N-panel easily accessible while maintaining clear views of your reference images.
Some artists prefer splitting their viewport to show multiple orthographic views simultaneously while working with blueprints. This approach allows you to verify range across different axes without constantly switching views, though it requires more screen real estate.
Loading and Managing Your Blueprints
The Automatic Loading Process
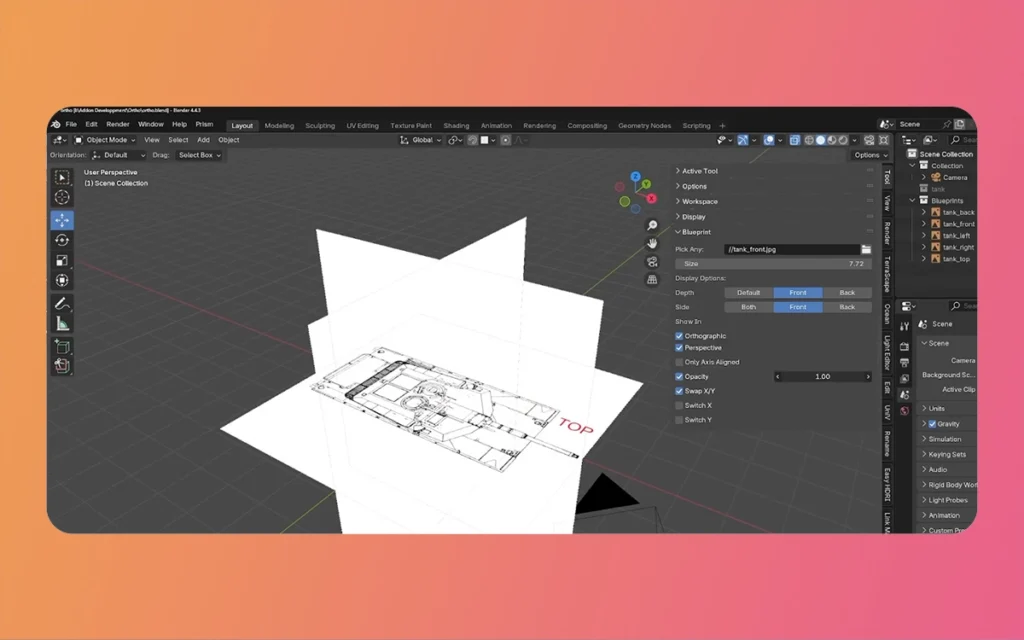
The magic of the Blueprints add-on becomes apparent during the loading process. Rather than manually placing each image on its corresponding axis, you select any one of your appropriately named blueprint images through the add-on interface.
The add-on immediately scans the same directory for other images with matching base names and correct suffixes. Within seconds, it automatically loads and positions each discovered image on its appropriate axis, eliminating the tedious manual placement process.
This automated approach not only saves time but also ensures perfect range every time. The add-on applies consistent positioning rules, removing the guesswork and potential errors associated with manual placement.
Managing Multiple Blueprint Sets
For complex projects requiring multiple reference sets, the add-on handles switching between different blueprint configurations perfectly. You can quickly load different vehicle views, character poses, or architectural plans without losing your current modelling progress.
The add-on maintains separate settings for each blueprint set, allowing you to configure different scaling factors, visibility options, and view settings for various modelling phases. This flexibility proves an adjective when working on projects with multiple components or when comparing different design iterations.
Free Blueprints Add-on By The Morphic Studio
Advanced Background Management Techniques
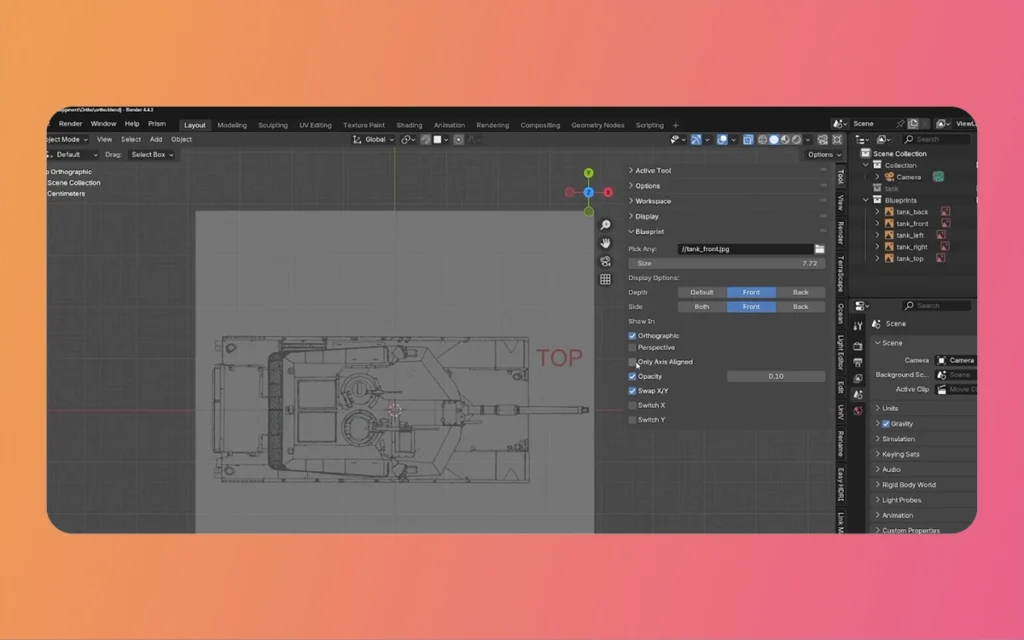
Scaling and Range Controls
The centralized scaling feature represents one of the add-on’s most powerful capabilities. Rather than adjusting each background image individually, you can scale all blueprint images simultaneously while maintaining their relative proportions and range.
This global scaling approach ensures consistency across all orthographic views, preventing the modelling inconsistencies that often result from individually scaled references. The scaling factor applies uniformly, preserving the critical connections between different views of your subject.
Fine-tuning range becomes straightforward with the add-on’s controls. You can make subtle adjustments to ensure your blueprints range perfectly with your modelling requirements without affecting the automated positioning system’s benefits.
View-Dependent Visibility System
The add-on’s intelligent visibility system shows only the relevant background image for your current orthographic view. This feature reduces visual confusion and allows you to focus entirely on the appropriate reference for your current modelling task.
When working in the front orthographic view, only the front blueprint appears, while side and top references remain hidden. This selective visibility system maintains clean working conditions while making sure you always have access to the correct reference information.
The system automatically transitions between different blueprint images as you switch orthographic views, creating a perfect workflow that feels natural and intuitive. You can also override this behaviour when necessary, maintaining complete control over your reference display preferences.
Free Blueprints Add-on By The Morphic Studio
Optimizing Your Workflow
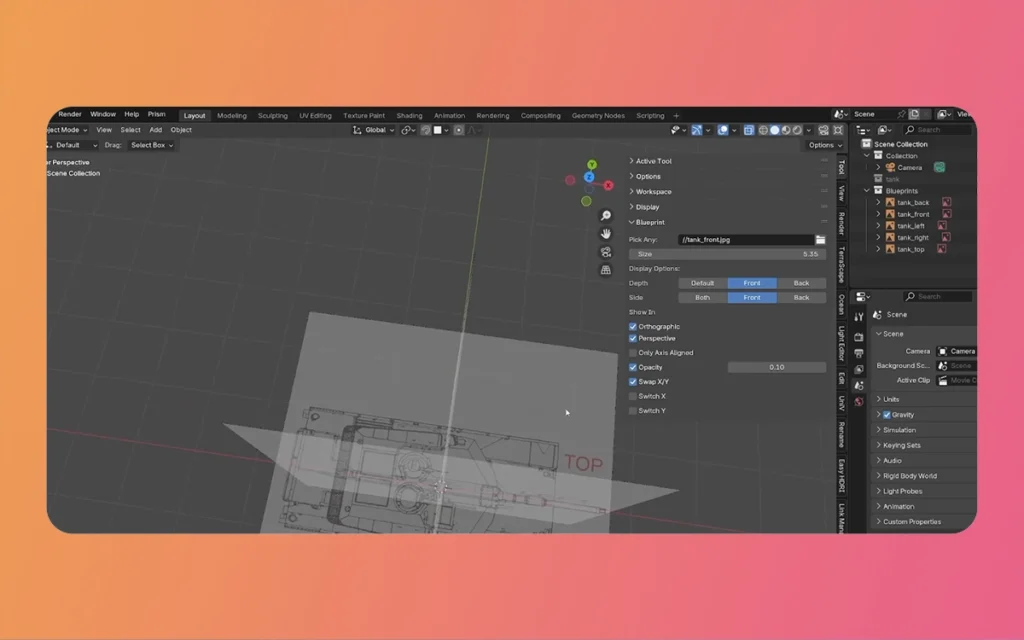
Perspective and Orthographic View Management
The add-on provides separate visibility controls for perspective and orthographic views, allowing you to customize your working environment based on your current modelling needs. You should hide blueprints in perspective view to better assess your model’s general form while keeping them visible in orthographic views for precise range work.
This dual visibility system acknowledges that different modelling phases require different reference approaches. During initial blocking phases, you might work primarily in orthographic views with complete blueprint visibility. As you progress to detail work, switch to perspective views with reduced or hidden blueprint displays.
Efficiency Tips and Best Practices
Develop a consistent file organization system that complements the add-on’s naming requirements. Create dedicated folders for blueprint images, organizing them by project or subject type. This approach streamlines the loading process and makes it easier to locate specific reference sets later.
Consider preparing multiple-resolution versions of your blueprint images. High-resolution images provide excellent detail for close-up modelling work, while lower-resolution versions can improve performance during initial blocking phases or when working on less powerful hardware.
Regularly save your Blender projects with descriptive names that indicate which blueprint set is currently loaded. This practice becomes particularly valuable when working on multiple similar projects or when returning to previous work after extended breaks.
Troubleshooting Common Issues
Addressing Loading Problems
If the add-on fails to automatically detect all your blueprint images, verify that your filename suffixes exactly match the required format. Common issues include extra characters after the suffix, incorrect capitalization, or missing deepen separators.
Check that all your blueprint images are located in the same directory. The add-on searches for matching files in the same folder as your initially selected image, so scattered files across different locations won’t be automatically detected.
Ensure your images use supported file formats. While the add-on works with standard image formats such as JPG, PNG, and TIFF, some unusual or proprietary formats may not be adequately recognised.
Solving Range Issues
Range problems typically stem from inconsistent image preparation rather than limitations inherent to the add-on. If your blueprints don’t range properly across different orthographic views, return to your source images and verify that your subject occupies identical positions within each frame.
Use image editing software to create range guides or grid overlays that help you position your subject consistently across all blueprint images. This preparatory work pays dividends in modelling accuracy and reduces the need for frequent adjustments during the modelling process.
Free Blueprints Add-on By The Morphic Studio
Comparison Table: Blueprint Management Methods
Feature
Manual Setup
Blueprints Add-on
Advantage
Setup Time
15-30 minutes per project
2-3 minutes per project
85% time reduction
Range Accuracy
Prone to human error
Automated precision
Consistent results
View Switching
Manual visibility toggles
Automatic view-dependent display
Perfect workflow
Scaling Control
Individual image adjustment
Unified scaling system
Perfect proportion maintenance
File Organization
Manual tracking required
Automatic detection system
Reduced file management overhead
Learning Curve
Complex multi-step process
Intuitive single-click operation
Faster adoption
Error Prevention
High risk of misrange
Built-in consistency checks
Professional quality assurance
Project Consistency
Varies between sessions
Standardized approach
Reliable results
Advanced Tips for Professional Workflows
Integrating with Other Blender Tools
The Blueprints Free Blueprints Add-on works perfectly with Blender’s other modelling tools and add-ons. You can use it alongside retopology add-ons, measurement tools, and specialised modelling utilities without encountering conflicts or performance issues.
Consider using the add-on in conjunction with Blender’s reference image import features for complex projects that require both orthographic blueprints and photographic references. This hybrid approach provides complete reference coverage for detailed modelling work.
Preparing for Team Collaboration
When working in team environments, establish shared naming conventions and file organization standards that accommodate the add-on’s requirements. Document these standards clearly to ensure all team members can effectively use the blueprint system.
Create template project files with pre-configured blueprint settings that team members can use as starting points for new projects. This approach ensures consistency across different artists while reducing setup time for individual team members.
Future-Proofing Your Blueprint Workflow
Maintaining Image Libraries
Develop a systematic approach to building and maintaining your blueprint image libraries. Organize references by category, subject type, and quality magnitude to streamline future project setup processes.
Regularly review and update your blueprint collections, replacing outdated or low-quality references with more accurate and high-quality alternatives. This ongoing maintenance ensures your reference library continues to support high-quality modelling work.
Staying Updated with Add-on Development
Monitor the Free Blueprints Add-on development progress and update to new versions as they become available. Developer updates often include performance improvements, bug fixes, and new features that can enhance your workflow.
Participate in user communities and forums where Blueprints add-on users share tips, techniques, and troubleshooting solutions. These communities often provide valuable awareness that can improve your modelling efficiency and results.
Finally
The Free Blueprints Add-on transforms background image management from a tedious manual process into an efficient, automated workflow that enhances both productivity and modelling accuracy. By eliminating the time-consuming setup procedures and range challenges associated with traditional blueprint methods, this add-on allows artists to focus their energy on the creative aspects of 3D modelling.
The add-on’s intelligent automation, combined with its intuitive interface and powerful management features, makes it an essential tool for any Blender artist working with reference images. Whether you’re modelling vehicles, characters, architectural elements, or mechanical parts, the Blueprints add-on provides the foundation for professional-quality results.
Success with the add-on depends on proper image preparation and Following its automated systems. By following the guidelines defined in this guide, you’ll be able to grip the add-on’s full potential while avoiding common pitfalls that can compromise your modelling workflow.
The time investment in learning and implementing the Blueprints add-on pays substantial dividends through improved modelling accuracy, reduced setup time, and enhanced project consistency. As you incorporate this tool into your regular workflow, you’ll discover that efficient reference management becomes second nature, allowing you to tackle more complex modelling challenges with confidence and precision.
Think of mastery as coming through practice and experimentation. Start with simple projects to familiarize yourself with the Free Blueprints Add-on features, then gradually incorporate more advanced techniques as your comfort magnitude increases. The Blueprints add-on represents a significant step forward in Blender workflow optimization, offering professional-grade capabilities that democratize access to efficient 3D modelling practices.
Brochure design agency: 10 Unbeatable Tips to Massively Boost Conversions, The Morphic Studio
Welcome to The Morphic Studio. If you think Brochure design agency are a thing of the past, you might want to reconsider. In the fast paced statistical world of 2026, a physical or well crafted statistical brochure is a powerful tool to stand out. It gives your brand a premium feel and builds deep trust […]
July 10, 2026
CGI Video Animation Company In Ahmedabad: 10 Mind-Blowing Trends to Massively Boost Sales, The Morphic Studio
This is exactly where a professional CGI video animation company in Ahmedabad comes into the picture. Videos created with computer graphics just have a special way of pulling people right in. At The Morphic Studio, we have seen first hand how 3D graphics can completely change a brand. It does not matter if you sell […]
July 9, 2026
Logo animation company: 10 Jaw-Dropping Styles to Skyrocket Engagement, The Morphic Studio
The statistical world is moving faster than ever before. In the year 2026, having a simple picture for your brand is just not enough to grab the attention of your audience. This is exactly where the magic of movement comes into play. This is why choosing the right creative partner is so incredibly important for […]